반응형


작성일: 2023년 11월 3일


2년 전에 macOS Monterey 버전이 설치된 Macbook을 구입하고, 한번도 OS upgrade를 하지 않았다가 오늘 Sonoma로 업그레이드했다. (macOS 12 --> macOS 14)

Parallels(패러렐즈) 17이 원래 Monterey 버전에 맞춰서 개발되었기 때문에 Sonoma에서 잘 동작하지 않을 것이라 예상을 했었고,

실제로 Sonoma로 upgrade를 하고 나니까 일부 동작이 이상하게 동작했다.


내가 사용중인 Parallels Desktop 17 버전


나는 Parallels Desktop 17에서 Coherence 모드로 Windows 11을 사용하고 있었기 때문에 이상한 GUI 동작이 발생했는데,

Coherence 모드를 사용하지 않는다면, 대부분 정상적으로 동작한다.

내가 coherence 모드에서 발견한 이상한 동작은 이런 것들이다.

  • Windows 11을 종료하기 위해 [시작] 메뉴 -> [시스템 종료] 를 선택하면  종료 옵션들이 현재 창의 뒷 부분으로 숨어서 종료 옵션 버튼을 못 누르게 된다. 항상 그런 것은 아니고, 가끔 발생한다.
    이런 경우, [Parallels Control Center]에서 [Shutdown] 메뉴를 사용하면 되니까 크게 문제되지 않는다.
  • Windows 11 내부에서 App을 실행하고, Pull Down 메뉴를 선택하면, 이 Pull Down 메뉴가 화면 뒤로 숨는 경우가 발생한다. 이것도 항상 발생하는게 아니고 가끔 발생한다. 조금 불편을 감수하면 쓸만한 수준 ^^
  • Windows 11 내부에서 App 창 크기를 조절하기 위해 마우스 포인트를 창 가장자리에 완벽하게 정확하게 진짜 정확하게 위치시켜야지만, 마우스 포인트가 "크기 조절용 모양"으로 바뀐다. 이거는 사용자로 하여금 스트레스를 증폭시킨다. Coherence 모드에서 App 창 크기를 조절하는 것은 포기한 상태 ㅠㅠ

결론적으로;

- Coherence Mode로 Parallels 17을 사용하지 않는 사용자라면, Sonoma로 macOS를 업그레이드해도 잘 동작한다.

- Corehence Mode로 Parallels 17을 사용하는 사용자라면, 화면에 표현된 일부 GUI 요소가 동작하지 않을 수 있다.


반응형

작성일: 2023년 10월 25일


내가 참고했던 문서:  https://semaphoreci.com/blog/prometheus-grafana-kubernetes-helm


Helm chart를 사용하면, 키보드로 명령을 몇 줄 입력하면 모든 설치 및 구성이 끝난다.

내가 수행했던 명령을 캡쳐했다. 아래 예제를 따라하면 잘 설치된다.


/home/sejong/chart/prometheus# helm install -n almighty prometheus ./

NAME: prometheus
LAST DEPLOYED: Wed Oct 25 18:01:27 2023
NAMESPACE: almighty
STATUS: deployed
REVISION: 1
TEST SUITE: None
NOTES:
The Prometheus server can be accessed via port 80 on the following DNS name from within your cluster:
prometheus-server.almighty.svc.cluster.local


Get the Prometheus server URL by running these commands in the same shell:
  export POD_NAME=$(kubectl get pods --namespace almighty -l "app.kubernetes.io/name=prometheus,app.kubernetes.io/instance=prometheus" -o jsonpath="{.items[0].metadata.name}")
  kubectl --namespace almighty port-forward $POD_NAME 9090


The Prometheus alertmanager can be accessed via port 9093 on the following DNS name from within your cluster:
prometheus-alertmanager.almighty.svc.cluster.local


Get the Alertmanager URL by running these commands in the same shell:
  export POD_NAME=$(kubectl get pods --namespace almighty -l "app.kubernetes.io/name=alertmanager,app.kubernetes.io/instance=prometheus" -o jsonpath="{.items[0].metadata.name}")
  kubectl --namespace almighty port-forward $POD_NAME 9093
#################################################################################
######   WARNING: Pod Security Policy has been disabled by default since    #####
######            it deprecated after k8s 1.25+. use                        #####
######            (index .Values "prometheus-node-exporter" "rbac"          #####
###### .          "pspEnabled") with (index .Values                         #####
######            "prometheus-node-exporter" "rbac" "pspAnnotations")       #####
######            in case you still need it.                                #####
#################################################################################


The Prometheus PushGateway can be accessed via port 9091 on the following DNS name from within your cluster:
prometheus-prometheus-pushgateway.almighty.svc.cluster.local


Get the PushGateway URL by running these commands in the same shell:
  export POD_NAME=$(kubectl get pods --namespace almighty -l "app=prometheus-pushgateway,component=pushgateway" -o jsonpath="{.items[0].metadata.name}")
  kubectl --namespace almighty port-forward $POD_NAME 9091

For more information on running Prometheus, visit:
https://prometheus.io/

/home/sejong/WorkSpace/chart/prometheus#


---


/home/sejong/chart/grafana# helm install -n almighty grafana ./

NAME: grafana
LAST DEPLOYED: Wed Oct 25 18:37:27 2023
NAMESPACE: almighty
STATUS: deployed
REVISION: 1
NOTES:
1. Get your 'admin' user password by running:

   kubectl get secret --namespace almighty grafana -o jsonpath="{.data.admin-password}" | base64 --decode ; echo


2. The Grafana server can be accessed via port 80 on the following DNS name from within your cluster:

   grafana.almighty.svc.cluster.local

   Get the Grafana URL to visit by running these commands in the same shell:
     export POD_NAME=$(kubectl get pods --namespace almighty -l "app.kubernetes.io/name=grafana,app.kubernetes.io/instance=grafana" -o jsonpath="{.items[0].metadata.name}")
     kubectl --namespace almighty port-forward $POD_NAME 3000

3. Login with the password from step 1 and the username: admin

/home/sejong/WorkSpace/chart/grafana#


---


## Grafana admin 계정 암호 찾기

$  kubectl get secret --namespace almighty grafana -o jsonpath="{.data.admin-password}" | base64 --decode ; echo
gxq5MbMBa2w5qkqpvkaYGU5T8bJDOTag9ayy5kxi


Helm chart가 잘 만들어져 있어서 큰 노력없이 클러스터 구축이 끝났다.

Helm chart를 만든 분께 감사하다는 말을 전하고 싶다.

반응형


작성일: 2023년 10월 10일


패킷 보내기 (Send a packet)

예제 코드

/**
 * How to build
 *  $  gcc send-raw-packet.c -o send-raw-packet
 *
 * How to run
 *  $ ./send-raw-packet
 *    or
 *  $ ./send-raw-packet  eth0
 */

#include <arpa/inet.h>
#include <linux/if_packet.h>
#include <linux/ip.h>
#include <stdio.h>
#include <string.h>
#include <stdlib.h>
#include <sys/ioctl.h>
#include <sys/socket.h>
#include <net/if.h>
#include <netinet/ether.h>
#include <errno.h>


// FIXME: MY_DEST_MACX 값은 각자 테스트 환경이 맞게 수정해서 사용.
#define MY_DEST_MAC0	0x52
#define MY_DEST_MAC1	0x54
#define MY_DEST_MAC2	0x00
#define MY_DEST_MAC3	0xcf
#define MY_DEST_MAC4	0xab
#define MY_DEST_MAC5	0x76

// FIXME: DEFAULT_IF 값은 각자 테스트 환경이 맞게 수정해서 사용.
#define DEFAULT_IF	"enp7s0"

#define BUF_SIZ		1024


int main(int argc, char *argv[])
{
	int                  sockfd;
	int                  tx_len = 0;
	char                 sendbuf[BUF_SIZ];
	char                 ifName[IFNAMSIZ];
	struct ifreq         if_idx;
	struct ifreq         if_mac;
	struct ether_header  *eh = (struct ether_header *) sendbuf;
	struct iphdr         *iph = (struct iphdr *) (sendbuf + sizeof(struct ether_header));
	struct sockaddr_ll   socket_address;

	// Network interface name 지정하기 (예: eth0)
	if (argc > 1)
	{
		strcpy(ifName, argv[1]);
	}
	else
	{
		strcpy(ifName, DEFAULT_IF);
	}

	// RAW socket 사용을 위한 File descriptor 생성하기
	if ((sockfd = socket(AF_PACKET, SOCK_RAW, IPPROTO_RAW)) == -1)
	{
		printf("socket() error: %d (%s)\n", errno, strerror(errno));
		return 0;
	}

	// Network interface의 index 값 구하기
	memset(&if_idx, 0, sizeof(struct ifreq));
	strncpy(if_idx.ifr_name, ifName, IFNAMSIZ-1);
	if (ioctl(sockfd, SIOCGIFINDEX, &if_idx) < 0)
	{
		printf("ioctl(SIOCGIFINDEX, %s) error: %d (%s)\n", ifName, errno, strerror(errno));
		return 0;
	}

	// Network interface의 MAC address 구하기
	memset(&if_mac, 0, sizeof(struct ifreq));
	strncpy(if_mac.ifr_name, ifName, IFNAMSIZ-1);
	if (ioctl(sockfd, SIOCGIFHWADDR, &if_mac) < 0)
	{
		printf("ioctl(SIOCGIFHWADDR, %s) error: %d (%s)\n", ifName, errno, strerror(errno));
		return 0;
	}

	// Ehternet header 구성하기 (참고: sendbuf pointer가 eh 주소를 pointing)
	memset(sendbuf, 0, BUF_SIZ);
	/*
	 * ioctl() 함수를 이용해서 얻은 'enp7s0' NIC에 대한 MAC Address 값을
	 * ethernet header 구조체의 ether_shost 변수에 복사한다.
	 */
	printf("( %s )  MAC address = ", ifName);
	for (int idx = 0; idx < 6; idx++)
	{
		eh->ether_shost[idx] = ((uint8_t *)&if_mac.ifr_hwaddr.sa_data)[idx];
		printf("%02x", eh->ether_shost[idx]);
		if (idx < 5)
		{
			printf(":");
		}
	}
	printf("\n");

	/*
	 * 일반적으로 NIC port의 MAC address를 ethernet frame의 source address로 사용하지만
	 * Ethernet packet 전송 테스트를 위해서 가짜 Source MAC address를 만들었다.
	 */
	eh->ether_shost[3] = 0x01;
	eh->ether_shost[4] = 0x02;
	eh->ether_shost[5] = 0x03;

	// Ethernet frame - Destination host MAC address
	eh->ether_dhost[0] = MY_DEST_MAC0;
	eh->ether_dhost[1] = MY_DEST_MAC1;
	eh->ether_dhost[2] = MY_DEST_MAC2;
	eh->ether_dhost[3] = MY_DEST_MAC3;
	eh->ether_dhost[4] = MY_DEST_MAC4;
	eh->ether_dhost[5] = MY_DEST_MAC5;

	// Ethertype:  Internet Protocol (0x0800)
	eh->ether_type = htons(ETH_P_IP);
	tx_len += sizeof(struct ether_header);

	// FIXME: IP Header
	//   각자 테스트 환경에 맞게 iph 변수를 수정하여 사용하기
  	iph->ihl = 20 >> 2;  // NOTE: (20 >> 2) * 4 = 20 bytes (IHL은 4 byte 단위로 해석되기 때문)
	iph->version = 4;
	iph->protocol = IPPROTO_IP;
	iph->saddr = inet_addr("10.1.1.10");
	iph->daddr = inet_addr("10.1.1.11");
	iph->tot_len = 46 + 32;

	tx_len += sizeof(struct iphdr);

	/* Payload (Packet data) */
	for (char idx = 0; idx < 32; idx++)
	{
		sendbuf[tx_len++] = idx;
	}

	/* Index of the network device */
	socket_address.sll_ifindex = if_idx.ifr_ifindex;
	/* Address length*/
	socket_address.sll_halen = ETH_ALEN;
	/* Destination MAC */
	socket_address.sll_addr[0] = MY_DEST_MAC0;
	socket_address.sll_addr[1] = MY_DEST_MAC1;
	socket_address.sll_addr[2] = MY_DEST_MAC2;
	socket_address.sll_addr[3] = MY_DEST_MAC3;
	socket_address.sll_addr[4] = MY_DEST_MAC4;
	socket_address.sll_addr[5] = MY_DEST_MAC5;

	/* Send packet */
	if (sendto(sockfd, sendbuf, tx_len, 0, (struct sockaddr*)&socket_address, sizeof(struct sockaddr_ll)) < 0)
	    printf("Send failed\n");

	return 0;
}


패킷 받기 (Receive a packet)

예제 코드

/**
 * How to build
 *  $  gcc recv-raw-packet.c -o recv-raw-packet
 *
 * How to run
 *  $ ./recv-raw-packet
 *    or
 *  $ ./recv-raw-packet  eth0
 */

#include <unistd.h>
#include <arpa/inet.h>
#include <linux/if_packet.h>
#include <linux/ip.h>
#include <linux/udp.h>
#include <stdio.h>
#include <string.h>
#include <stdlib.h>
#include <sys/ioctl.h>
#include <sys/socket.h>
#include <net/if.h>
#include <netinet/ether.h>
#include <errno.h>

#define ETHER_TYPE	0x0800

#define DEFAULT_IF	"enp7s0"
#define BUF_SIZ		1024

int main(int argc, char *argv[])
{
	char sender[INET6_ADDRSTRLEN];
	int sockfd, ret;
	int sockopt;
	ssize_t pktbytes;
	struct ifreq ifopts;	// To set promiscuous mode
	struct ifreq if_ip;	    // To get IP address of this host NIC
	struct sockaddr_storage peer_addr;
	uint8_t buf[BUF_SIZ];
	char ifName[IFNAMSIZ];

	// Network interface name 지정하기 (예: eth0)
	if (argc > 1)
	{
		strcpy(ifName, argv[1]);
	}
	else
	{
		strcpy(ifName, DEFAULT_IF);
	}

	// Ethernet + IP + UDP header
	struct ether_header *eh = (struct ether_header *) buf;
	struct iphdr *iph = (struct iphdr *) (buf + sizeof(struct ether_header));
	struct udphdr *udph = (struct udphdr *) (buf + sizeof(struct iphdr) + sizeof(struct ether_header));

	if ((sockfd = socket(PF_PACKET, SOCK_RAW, htons(ETHER_TYPE))) == -1)
	{
		printf("socket(PF_PACKET, SOCK_RAW, ETHER_TYPE) error: %d (%s)\n", errno, strerror(errno));
		return -1;
	}

	// Set interface to promiscuous mode
	strncpy(ifopts.ifr_name, ifName, IFNAMSIZ-1);
	ioctl(sockfd, SIOCGIFFLAGS, &ifopts);
	ifopts.ifr_flags |= IFF_PROMISC;
	ioctl(sockfd, SIOCSIFFLAGS, &ifopts);
	if (setsockopt(sockfd, SOL_SOCKET, SO_REUSEADDR, &sockopt, sizeof sockopt) == -1) {
		printf("setsockopt(SO_REUSEADDR) error: %d (%s)\n", errno, strerror(errno));
		close(sockfd);
		exit(0);
	}

	// Bind to device
	if (setsockopt(sockfd, SOL_SOCKET, SO_BINDTODEVICE, ifName, IFNAMSIZ-1) == -1)	{
		printf("setsockopt(SO_BINDTODEVICE, %s) error: %d (%s)\n", ifName, errno, strerror(errno));
		close(sockfd);
		exit(0);
	}

repeat:
	printf("\nWaiting to recvfrom...\n");
	pktbytes = recvfrom(sockfd, buf, BUF_SIZ, 0, NULL, NULL);
	printf("  Got packet %lu bytes\n", pktbytes);

	printf("Destination  MAC address = ");
	for (int idx = 0; idx < 6; idx++)
	{
		printf("%02x", eh->ether_dhost[idx]);
		if (idx < 5)
		{
			printf(":");
		}
	}
	printf("\n");

	// Get source IP
	((struct sockaddr_in *)&peer_addr)->sin_addr.s_addr = iph->saddr;
	inet_ntop(AF_INET, &((struct sockaddr_in*)&peer_addr)->sin_addr, sender, sizeof sender);

	// Look up my device IP addr
	memset(&if_ip, 0, sizeof(struct ifreq));
	strncpy(if_ip.ifr_name, ifName, IFNAMSIZ-1);
	if (ioctl(sockfd, SIOCGIFADDR, &if_ip) >= 0) {
		printf("Source IP: %s\n My IP: %s\n", sender,
				inet_ntoa(((struct sockaddr_in *)&if_ip.ifr_addr)->sin_addr));
		// Ignore if I sent it
		if (strcmp(sender, inet_ntoa(((struct sockaddr_in *)&if_ip.ifr_addr)->sin_addr)) == 0)	{
			printf("but I sent it :(\n");
			ret = -1;
			goto done;
		}
	}

	/* UDP payload length */
	ret = ntohs(udph->len) - sizeof(struct udphdr);

	/* Print packet */
	printf("\tData:");
	for (int idx = 0; idx < pktbytes; idx++)
	{
		printf("%02x ", buf[idx]);
	}
	printf("\n");

done:
	goto repeat;

	close(sockfd);
	return ret;
}


반응형

작성일: 2023년 9월 25일


파이썬으로 작성된 패킷 조작 라이브러리.

https://scapy.net/


Scopy - README.MD

https://github.com/secdev/scapy


Tutorial

https://scapy.readthedocs.io/en/latest/usage.html#interactive-tutorial


Scopy in 15 minutes

https://github.com/secdev/scapy/blob/master/doc/notebooks/Scapy%20in%2015%20minutes.ipynb


HTTP/2 Tutorial

https://github.com/secdev/scapy/blob/master/doc/notebooks/HTTP_2_Tuto.ipynb


Demo

https://scapy.readthedocs.io/en/latest/introduction.html#quick-demo


반응형


작성일: 2023년 9월 23일


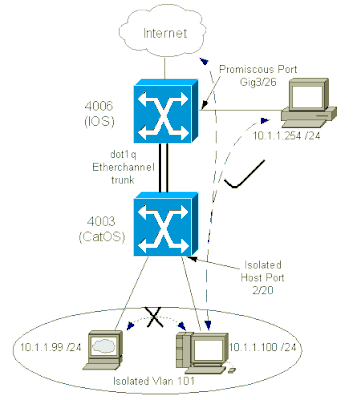
Private VLAN 개념 설명 및 Switch 설정 실습 (YouTube 영상)

https://www.youtube.com/watch?v=ZS80DM_-f5Y 

(이 영상에서 개념과 일반적인 Use Case에 대한 실습을 모두 다루기 때문에 이 영상을 보면서 이해가 되었다면, 아래 스터디 자료는 안 봐도 된다)


Private VLAN(PVLAN) on CISCO iOS Switch (예제 따라하기)

https://networklessons.com/switching/private-vlan-pvlan-cisco-catalyst-switch

(만약 CISCO Catalyst 제품을 사용하는 경우라면, 이 문서의 예제를 따라할 것)


Private VLAN 설정 실습 (가장 단순한 구조에 대한 실습)

https://packetlife.net/blog/2010/aug/30/basic-private-vlan-configuration/


Private VLAN 설정 실습 (전형적인 구조에 대한 실습)

https://www.internetworks.in/2023/07/what-is-private-vlan-how-to-configure.html


Configure Isolated Private VLANs on Catalyst Switches

https://www.cisco.com/c/en/us/support/docs/lan-switching/private-vlans-pvlans-promiscuous-isolated-community/40781-194.html  (English Document)


https://www.cisco.com/c/ko_kr/support/docs/lan-switching/private-vlans-pvlans-promiscuous-isolated-community/40781-194.html  (한글 문서)


https://ipwithease.com/private-vlan-configuration-scenrio/


Secondary VLAN Trunk Ports and Promiscuous Access Ports on PVLANs

https://www.juniper.net/documentation/en_US/release-independent/nce/topics/concept/private-vlans-isolated-trunks-qfx-series.html


VM + OVS(Open vSwitch) + L2 Switch 조합으로 PVLAN 실습

https://cwiki.apache.org/confluence/display/CLOUDSTACK/PVLAN+for+isolation+within+a+VLAN

https://docs.oracle.com/cd/E53394_01/html/E54788/gotxb.html


반응형

작성일: 2023년 9월 20일


Client 장비에 network port가 여러개 있는 경우, 특정 network port를 지정하여 IP 패킷을 전송하고 싶을 때가 있다.

이럴 때, source IP address를 binding하면 특정 network port를 통해 IP 패킷이 전송된다.

참고:
  일반적으로 Target IP address로 가기 위한 routing path 및 network port는 
  OS에 있는 Routing table을 통해서 자동으로 결정된다.
  그러나 Target IP address로 가기 위한 routing path가 1개가 아닌 2개 이상인 경우에는
  어느 network port를 통해서 IP 패킷이 나갈지 예측하기 어렵다.  
package main

import (
    "fmt"
    "io/ioutil"
    "net"
    "net/http"
    "time"
)


func main() {
##
## NOTE:  14.33.80.179를 Source IP address로 지정한다. (즉, Source IP address binding)
##
    localAddr, err := net.ResolveIPAddr("ip", "14.33.80.179")
    if err != nil {
        panic(err)
    }

    localTCPAddr := net.TCPAddr{
        IP: localAddr.IP,
    }

    d := net.Dialer{
        LocalAddr: &localTCPAddr,
        Timeout:   30 * time.Second,
        KeepAlive: 30 * time.Second,
    }

    tr := &http.Transport{
        Proxy:               http.ProxyFromEnvironment,
        Dial:                d.Dial,
        TLSHandshakeTimeout: 10 * time.Second,
    }

    webclient := &http.Client{Transport: tr}

    // Use NewRequest so we can change the UserAgent string in the header
    req, err := http.NewRequest("GET", "https://www.naver.com", nil)
    if err != nil {
        panic(err)
    }

    res, err := webclient.Do(req)
    if err != nil {
        panic(err)
    }

    fmt.Println("DEBUG", res)
    defer res.Body.Close()

    content, err := ioutil.ReadAll(res.Body)
    if err != nil {
        panic(err)
    }
    fmt.Printf("%s", string(content))
}


반응형


작성일: 2023년 9월 19일


NETCONF Python 예제 코드 

https://github.com/ncclient/ncclient/tree/master/examples

https://github.com/ncclient/ncclient/blob/master/examples/base/nc08.py  (Interface 설정 및 Activate)

https://github.com/aristanetworks/openmgmt/tree/main/src/ncclient  (Aristanetworks 예제)

https://developer.cisco.com/codeexchange/github/repo/ncclient/ncclient/  (CISCO 개발자 페이지)


NETCONF Python 예제 코드

https://blog.wimwauters.com/networkprogrammability/2020-03-30-netconf_python_part1/

https://blog.wimwauters.com/networkprogrammability/2020-03-31_netconf_python_part2/


NETCONF Golang 예제 코드

https://github.com/Juniper/go-netconf/tree/master/examples


NETCONF C++ 예제 코드

https://github.com/CESNET/libnetconf2/tree/master/examples


RESTCONF Postman 예제 코드

https://blog.wimwauters.com/networkprogrammability/2020-04-02_restconf_introduction_part1/

https://blog.wimwauters.com/networkprogrammability/2020-04-03_restconf_introduction_part2/


RESTCONF Python 예제  코드

https://blog.wimwauters.com/networkprogrammability/2020-04-04_restconf_python/


반응형


작성일: 2025년 3월 14일


수백 페이지 분량의 PDF 문서를 읽다보면, 특정 페이지 몇 장만 골라서 저장하고 싶을 때가 있다.

PDF 편집기 같은 유료 프로그램이 있다면, 원하는대로 편집해서 저장할 수 있지만

돈을 지출하지 않고 PDF 문서에서 몇 페이지만 추출하여 저장하고 싶다면,

인쇄 버튼을 누르고 추출하고 싶은 페이지 번호만 입력하고, PDF 문서로 출력하기를 선택하면 된다.


내 느낌인지는 모르겠지만, 이렇게 PDF 문서를 "PDF 문서로 저장"하면 약간 품질이 떨어지는 것 같다. ^^


또 다른 방법: Python script로 특정 페이지만 골라서 새 PDF 파일에 저장하기

아래의 python script를 실행하면 된다.

import PyPDF2

with open("origin.pdf", "rb") as origin_pdf_file:
    pdf_reader = PyPDF2.PdfReader(origin_pdf_file)
    pdf_writer = PyPDF2.PdfWriter()
    ## 아래 코드 중에 '1, 3, 5' 부분을 본인이 추출하기를 원하는 페이지 번호로 지정할 것!
    for page_num in [1, 3, 5]:  # 추출할 페이지 번호 (0부터 시작)
        page = pdf_reader.pages[page_num]
        pdf_writer.add_page(page)

    with open("new.pdf", "wb") as new_pdf:
        pdf_writer.write(new_pdf)


아래와 같이 명령을 실행한다.

$ pip3 install PyPDF2

$ python3 pdf-extract.py


위 명령을 실행하고 나면, 'new.pdf' 파일이 생성될 것이고

이   'new.pdf' 파일을 PDF Reader로 열어서 확인해보면 된다.

+ Recent posts