작성일: 2026년 3월 5일
이 문서는 Linux 커널이 네트워크 트래픽을 어떻게 받고 처리하는지, DMA·링 버퍼·softIRQ·NAPI·RPS까지 한 흐름으로 정리한 요약이다.
1. DMA 링 버퍼와 TX/RX 링의 관계
DMA 링 버퍼와 TX/RX 링은 같은 개념을 가리킨다. 네트워크 카드는 소프트웨어(커널 드라이버)가 할당한 메모리 영역을 DMA로 직접 접근하며, 이 공유 메모리 구조를 흔히 “DMA 링 버퍼” 또는 “TX/RX 링”이라고 부른다.
구성 요소
- 링(Ring): RAM에 있는 고정 크기의 원형 큐. 각 항목은 디스크립터(또는 주소)로, 실제 패킷이 들어 있는 버퍼를 가리킨다.
- TX 링: 전송할 데이터가 들어 있는 RAM 버퍼의 시작/끝 주소(디스크립터)를 담는다.
- RX 링: NIC가 수신 패킷을 쓸 RAM 버퍼의 주소를 담는다. NIC는 DMA로 이 버퍼에 직접 쓴다.
- NIC 레지스터: 링 버퍼가 위치한 RAM 주소를 NIC가 알 수 있도록 레지스터에 설정된다.

링과 버퍼는 모두 DMA 가능 메모리로 할당된다. 링은 지속적으로 NIC와 공유되므로 coherent/consistent DMA, 버퍼는 흐름 단위이므로 streaming DMA로 다루는 경우가 많다.
네트워크 링 버퍼의 역할
네트워크 링 버퍼는 NIC가 DMA로 직접 접근하는 메모리 영역이다. 크게 두 부분이 있다.
- 링(큐) 부분: 고정 크기의 원형 FIFO 큐. 각 항목은 디스크립터(또는 메모리 주소)로, 실제 데이터가 들어 있는 영역을 가리킨다.
- 버퍼(메모리) 부분: 실제 패킷 데이터가 들어가는 영역. 커널이 할당하고 디스크립터를 통해 링과 연결한다.
RX 링 버퍼는 수신용, TX 링 버퍼는 송신용이다. 둘 다 특정 네트워크 인터페이스에 묶여 있으며, 해당 인터페이스로 송수신하는 모든 트래픽이 이 링을 공유한다.
2. softIRQ 시스템과 ksoftirqd 초기화
디바이스는 “처리할 일이 있다”는 것을 IRQ(인터럽트)로 알린다. 네트워크의 경우 NIC가 패킷 도착 시 IRQ를 발생시킨다. IRQ 핸들러는 최우선으로 실행되며 다른 IRQ를 막을 수 있기 때문에, 커널은 짧게만 처리하고 나머지 작업을 softIRQ로 미룬다.
softIRQ는 “IRQ 컨텍스트 밖”에서 실행되는 지연 처리 메커니즘이다. 네트워크 수신의 경우 이 작업이 ksoftirqd 커널 스레드에서 실행된다.
부팅 시 초기화 순서
- ksoftirqd 스레드 생성: CPU당 하나씩 kernel/softirq.c의 spawn_ksoftirqd → smpboot_register_percpu_thread로 생성된다. 실제 루프에서 돌리는 함수는 run_ksoftirqd이다.
- softnet_data: CPU당 하나씩 생성된다. 네트워크 처리에 필요한 구조체 참조(예: poll_list)를 담는다. NAPI 폴 워커는 napi_schedule 등으로 이 poll_list에 붙는다.
- NET_RX_SOFTIRQ 등록: net_dev_init에서 open_softirq로 NET_RX_SOFTIRQ를 등록하고, 핸들러로 net_rx_action을 지정한다. 수신 패킷의 실제 처리는 이 함수에서 이뤄진다.

3. 데이터 도착부터 softIRQ까지
패킷이 도착하면 NIC → DMA → IRQ → 드라이버 → NAPI 스케줄 → softIRQ 순으로 진행된다.
하드웨어/드라이버 측
- 패킷이 NIC에 도착한다.
- NIC가 DMA로 패킷 데이터를 RAM의 RX 링이 가리키는 버퍼에 쓴다(CPU는 관여하지 않음).
- NIC가 IRQ를 발생시킨다.
- 드라이버에 등록된 IRQ 핸들러가 실행된다.
- NIC에서 IRQ를 클리어해 이후 패킷에 대해 다시 IRQ를 낼 수 있게 한다.
- NAPI softIRQ 폴 루프를 napi_schedule로 시작한다. 이 호출은 비트 플래그를 세우고 현재 CPU의 poll_list에 해당 디바이스의 NAPI 구조체를 넣는 정도만 하고, 실제 무거운 작업은 softIRQ로 넘긴다.

NIC가 DMA로 쓴 뒤 IRQ만 걸고, 실제 수신 처리는 ksoftirqd에서 이뤄진다.
softIRQ 쪽 (ksoftirqd)
- napi_schedule로 해당 CPU의 poll_list에 NAPI 폴 구조체가 추가된다.
- 해당 CPU의 softIRQ pending 비트가 설정되어, 그 CPU의 ksoftirqd가 “처리할 패킷이 있다”는 것을 알게 된다.
- ksoftirqd 커널 스레드의 run_ksoftirqd가 동작한다.
- __do_softirq가 pending을 보고, 등록된 핸들러인 net_rx_action을 호출한다. 무거운 수신 처리 작업은 IRQ 핸들러가 아니라 이 softIRQ 컨텍스트(ksoftirqd)에서 수행된다.
정리하면, NIC는 DMA로 RX 링 버퍼에만 쓰고, CPU는 IRQ에서 최소한의 일만 한 뒤 softIRQ로 “나중에 처리”를 맡기고, 실제로 RX 링에서 패킷을 꺼내서 프로토콜 스택으로 넘기는 것은 net_rx_action → 드라이버 poll (예: igb_poll)이다.
4. net_rx_action와 수신 처리
net_rx_action은 현재 CPU의 poll_list에 있는 NAPI 구조체들을 순회하며, 각 디바이스의 poll 함수를 호출한다.
처리 흐름 요약
- net_rx_action이 NAPI 폴 리스트에서 NAPI 구조체를 꺼낸다.
- budget과 경과 시간을 확인해 softIRQ가 CPU를 독점하지 않도록 한다.
- 등록된 poll 함수를 호출한다(예: igb_poll). 이 함수가 RAM의 RX 링 버퍼에서 패킷을 가져온다.
- 패킷은 napi_gro_receive로 넘어가 GRO(Generic Receive Offload) 등을 처리한다.
- GRO에서 묶이거나, 그렇지 않으면 netif_receive_skb → 프로토콜 스택으로 전달된다.

NAPI(New API) poll이 RX 링에서 패킷을 꺼내 GRO를 거쳐 netif_receive_skb로 넘긴다.
net_rx_action/igb_poll이 멈추는 경우
- 처리 시간이 너무 길어질 때
- budget 한도에 도달했을 때 (CPU 사용 제한)
- 더 읽을 데이터가 없을 때
budget 소진이나 시간 제한 때문에 아직 처리할 패킷이 있는데 루프가 끝나면 /proc/net/softnet_stat의 세 번째 필드(time_squeeze)가 증가한다. 이 값이 0보다 크면 한도에 걸린 것이다. CPU 여유가 있다면 netdev_budget을 올려서 net_rx_action이 더 많은 패킷을 처리하도록 할 수 있다.
# 기본값 300, 필요 시 증가
echo 900 > /proc/sys/net/core/netdev_budget
5. RPS (Receive Packet Steering)
RPS가 꺼져 있으면:
- netif_receive_skb → __netif_receive_core → 탭(예: PCAP) → 프로토콜 핸들러(예: ip_rcv)로 직접 전달된다.
RPS가 켜져 있으면:
- netif_receive_skb → enqueue_to_backlog. 패킷이 CPU별 입력 큐에 들어가고, 해당 원격 CPU의 NAPI 구조체가 그 CPU의 poll_list에 추가되며 IPI가 큐에 넣어진다. 그러면 원격 CPU의 ksoftirqd가 깨어나 같은 방식으로 net_rx_action → process_backlog로 그 CPU의 입력 큐에서 패킷을 꺼낸 뒤 __netif_receive_core → 프로토콜 스택으로 넘긴다. 즉, 수신 처리 부하가 여러 CPU에 나뉜다.
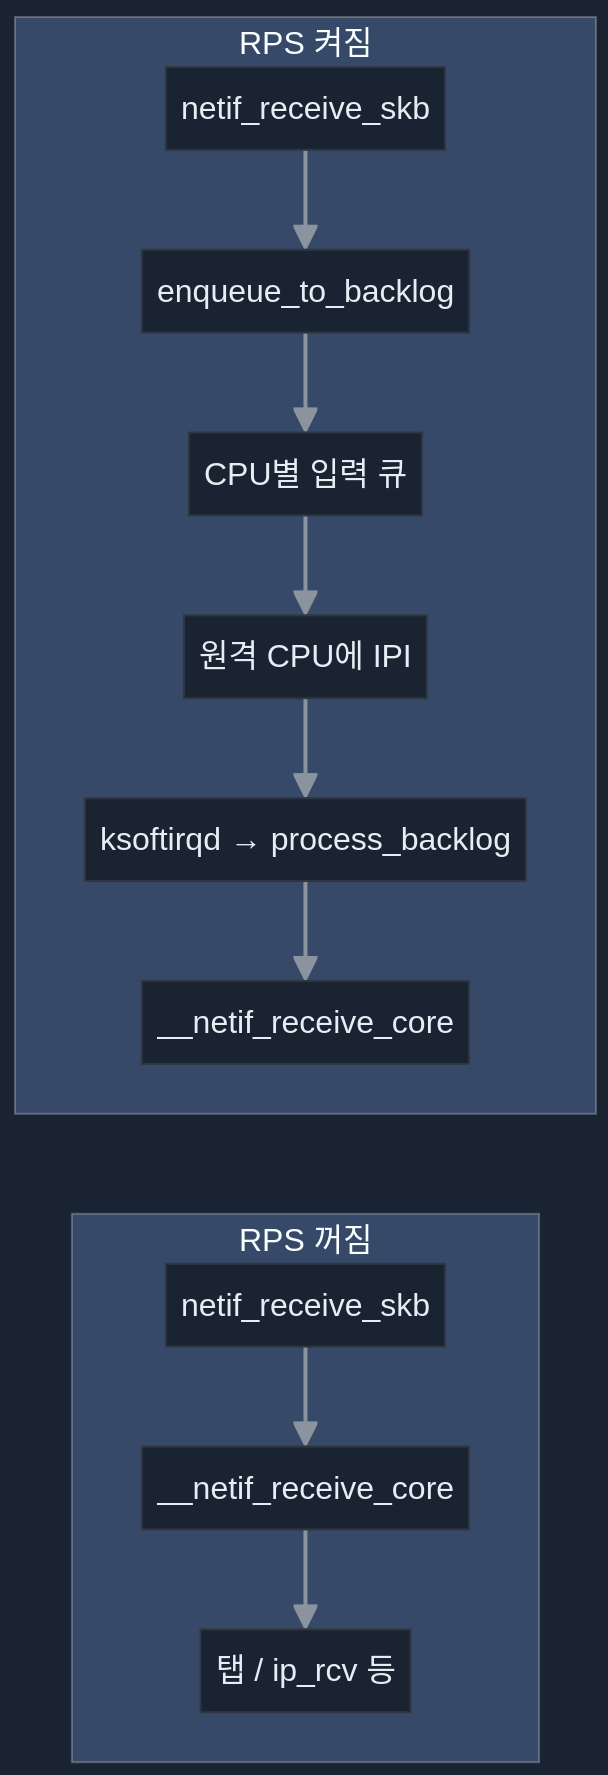
RPS를 쓰면 패킷이 CPU별 큐로 나뉘고 IPI로 다른 CPU의 ksoftirqd가 깨어나 부하가 분산된다.
멀티큐 NIC는 큐별로 다른 CPU에 IRQ를 붙여 softIRQ 부하를 나누고, RPS는 큐 수보다 CPU가 많을 때 추가로 부하를 분산할 때 유용하다.
6. 프로토콜 스택부터 사용자 소켓까지
__netif_receive_core 이후 경로는 대략 다음과 같다.
- IPv4의 경우 ip_rcv로 패킷 수신.
- netfilter 및 라우팅 최적화.
- 로컬로 오는 패킷은 상위 프로토콜(UDP 등)로 전달.
- UDP면 udp_rcv → udp_queue_rcv_skb, sock_queue_rcv로 사용자 소켓의 수신 버퍼에 큐잉. 그 전에 BPF 등이 처리될 수 있다.

ip_rcv → netfilter/라우팅 → UDP → 소켓 큐 → 사용자 공간.
7. 모니터링 및 튜닝
링/큐 크기와 드롭
링은 고정 크기 원형 큐이므로, 처리보다 도착이 빠르면 큐가 가득 차 패킷이 드롭된다.
ethtool -S enp8s0f0 | grep drop
드롭이 늘면:
- 멀티큐 사용: ethtool -l로 현재 설정, ethtool -L로 큐 개수 조정. 큐가 여러 개면 DMA/처리 부하가 여러 CPU에 나뉜다.
- 큐(디스크립터) 길이 증가: ethtool -g로 최대/현재 값 확인, ethtool -G로 조정. 큐를 길게 하면 처리량은 늘 수 있지만 지연 변동이 커질 수 있고, 짧으면 지연은 줄일 수 있지만 드롭 위험이 있다.
softIRQ 소비 확인
cat /proc/net/softnet_stat | awk '{print $3}'세 번째 필드가 time_squeeze이다. 0보다 크면 budget/시간 제한으로 아직 처리할 패킷이 있는데 루프가 끝난 경우다. CPU 여유가 있으면 netdev_budget을 올려 본다.
수신 처리 호출 스택 예시
# 예: netif_receive_skb_internal 부근 커널 스택
netif_receive_skb_internal+1
napi_gro_receive+186    # RX 링에서 꺼낸 직후
igb_poll+1153
net_rx_action+329
__do_softirq+222
...
관련 문서
Chapter 2. Tuning IRQ balancing | Network troubleshooting and performance tuning | Red Hat Enterprise Linux | 10 | Red Hat Doc
The kernel stores the interrupt counters in the /proc/interrupts file. To display the counters for a specific NIC, such as enp1s0, enter: grep -E "CPU|enp1s0" /proc/interrupts CPU0 CPU1 CPU2 CPU3 CPU4 CPU5 105: 141606 0 0 0 0 0 IR-PCI-MSI-edge enp1s0-rx-0
docs.redhat.com
https://tungdam.medium.com/linux-network-ring-buffers-cea7ead0b8e8
Linux network ring buffers
Trying to cover what I don’t know about Linux network
tungdam.medium.com
Illustrated Guide to Monitoring and Tuning the Linux Networking Stack: Receiving Data | Packagecloud Blog
This post illustrates guides to monitor and tune the Linux networking stack in great detail with the focus on receiving data.
blog.packagecloud.io


'Ubuntu' 카테고리의 다른 글
| Linux에서 큰 파일을 복사할 때 진행률 확인하기 (0) | 2026.03.05 |
|---|---|
| Linux kernel source를 다운로드하여 kernel build (0) | 2026.03.05 |
| Ubuntu OS가 Suspend mode에서 깨어날 때 Network Port 인식 못 하는 문제 해결 방법 (0) | 2025.11.25 |
| Ubuntu 24.04를 macOS Tahoe처럼 보이도록 설정하기 (0) | 2025.10.31 |
| Ubuntu OS 설치 후 해야 할 초기 설정 작업 (0) | 2025.04.01 |