반응형

Go Language로 특정 Process의 CPU, Memory 사용량을 계산하고 싶다면,

아래의 코드를 Build해서 사용하면 된다.


참고: Linux, MacOS, Unix, Windows 모두 동작하는 코드임.


// Filename: proc_usage.go

package main

import (
	"errors"
	"fmt"
	"io/ioutil"
	"math"
	"os/exec"
	"path"
	"runtime"
	"strconv"
	"strings"
	"sync"
)

const (
	statTypePS   = "ps"
	statTypeProc = "proc"
)

// SysInfo will record cpu and memory data
type SysInfo struct {
	CPU    float64
	Memory float64
}

// Stat will store CPU time struct
type Stat struct {
	utime  float64
	stime  float64
	cutime float64
	cstime float64
	start  float64
	rss    float64
	uptime float64
}

type fn func(int) (*SysInfo, error)

var fnMap map[string]fn
var platform string
var history map[int]Stat
var historyLock sync.Mutex
var eol string

// Linux platform
var clkTck float64 = 100    // default
var pageSize float64 = 4096 // default

func init() {
	platform = runtime.GOOS
	if eol = "\n"; strings.Index(platform, "win") == 0 {
		platform = "win"
		eol = "\r\n"
	}
	history = make(map[int]Stat)
	fnMap = make(map[string]fn)
	fnMap["darwin"] = wrapper("ps")
	fnMap["sunos"] = wrapper("ps")
	fnMap["freebsd"] = wrapper("ps")
	fnMap["openbsd"] = wrapper("proc")
	fnMap["aix"] = wrapper("ps")
	fnMap["linux"] = wrapper("proc")
	fnMap["netbsd"] = wrapper("proc")
	fnMap["win"] = wrapper("win")

	if platform == "linux" || platform == "netbsd" || platform == "openbsd" {
		initProc()
	}
}

func initProc() {
	clkTckStdout, err := exec.Command("getconf", "CLK_TCK").Output()
	if err == nil {
		clkTck = parseFloat(formatStdOut(clkTckStdout, 0)[0])
	}

	pageSizeStdout, err := exec.Command("getconf", "PAGESIZE").Output()
	if err == nil {
		pageSize = parseFloat(formatStdOut(pageSizeStdout, 0)[0])
	}

}

func wrapper(statType string) func(pid int) (*SysInfo, error) {
	return func(pid int) (*SysInfo, error) {
		return stat(pid, statType)
	}
}

func formatStdOut(stdout []byte, userfulIndex int) []string {
	infoArr := strings.Split(string(stdout), eol)[userfulIndex]
	ret := strings.Fields(infoArr)
	return ret
}

func parseFloat(val string) float64 {
	floatVal, _ := strconv.ParseFloat(val, 64)
	return floatVal
}

func statFromPS(pid int) (*SysInfo, error) {
	sysInfo := &SysInfo{}
	args := "-o pcpu,rss -p"
	if platform == "aix" {
		args = "-o pcpu,rssize -p"
	}
	stdout, _ := exec.Command("ps", args, strconv.Itoa(pid)).Output()
	ret := formatStdOut(stdout, 1)
	if len(ret) == 0 {
		return sysInfo, errors.New("Can't find process with this PID: " + strconv.Itoa(pid))
	}
	sysInfo.CPU = parseFloat(ret[0])
	sysInfo.Memory = parseFloat(ret[1]) * 1024
	return sysInfo, nil
}

func statFromProc(pid int) (*SysInfo, error) {
	sysInfo := &SysInfo{}
	uptimeFileBytes, err := ioutil.ReadFile(path.Join("/proc", "uptime"))
	if err != nil {
		return nil, err
	}
	uptime := parseFloat(strings.Split(string(uptimeFileBytes), " ")[0])

	procStatFileBytes, err := ioutil.ReadFile(path.Join("/proc", strconv.Itoa(pid), "stat"))
	if err != nil {
		return nil, err
	}
	splitAfter := strings.SplitAfter(string(procStatFileBytes), ")")

	if len(splitAfter) == 0 || len(splitAfter) == 1 {
		return sysInfo, errors.New("Can't find process with this PID: " + strconv.Itoa(pid))
	}
	infos := strings.Split(splitAfter[1], " ")
	stat := &Stat{
		utime:  parseFloat(infos[12]),
		stime:  parseFloat(infos[13]),
		cutime: parseFloat(infos[14]),
		cstime: parseFloat(infos[15]),
		start:  parseFloat(infos[20]) / clkTck,
		rss:    parseFloat(infos[22]),
		uptime: uptime,
	}

	_stime := 0.0
	_utime := 0.0

	historyLock.Lock()
	defer historyLock.Unlock()

	_history := history[pid]

	if _history.stime != 0 {
		_stime = _history.stime
	}

	if _history.utime != 0 {
		_utime = _history.utime
	}
	total := stat.stime - _stime + stat.utime - _utime
	total = total / clkTck

	seconds := stat.start - uptime
	if _history.uptime != 0 {
		seconds = uptime - _history.uptime
	}

	seconds = math.Abs(seconds)
	if seconds == 0 {
		seconds = 1
	}

	history[pid] = *stat
	sysInfo.CPU = (total / seconds) * 100
	sysInfo.Memory = stat.rss * pageSize
	return sysInfo, nil
}

func stat(pid int, statType string) (*SysInfo, error) {
	switch statType {
	case statTypePS:
		return statFromPS(pid)
	case statTypeProc:
		return statFromProc(pid)
	default:
		return nil, fmt.Errorf("Unsupported OS %s", runtime.GOOS)
	}
}

// GetStat will return current system CPU and memory data
func GetStat(pid int) (*SysInfo, error) {
	sysInfo, err := fnMap[platform](pid)
	return sysInfo, err
}


// Filename: main.go

package main

import (
    "os"
    "fmt"
    "time"
    "strconv"
)

func main() {
    myPid, _ := strconv.Atoi(os.Args[1])

    for i:= 0; i < 100; i++ {
        sysInfo, _ := GetStat(myPid)
        fmt.Println("CPU Usage     :", sysInfo.CPU)
        fmt.Println("Mem Usage(RSS):", sysInfo.Memory)
        time.Sleep(5 * time.Second)
    }
}


위와 같이 Go source code를 모두 작성했다면, 아래처럼 build하고 실행하면 된다.


$ go mod init andrew.space/proc_usage
go: creating new go.mod: module andrew.space/proc_usage
go: to add module requirements and sums:
	go mod tidy
    
$ go mod tidy

$ go build

$ ./proc_usage 4314
CPU Usage     : 52.92167225853122
Mem Usage(RSS): 2.018664448e+09
CPU Usage     : 39.800000000000004
Mem Usage(RSS): 2.018664448e+09
CPU Usage     : 47.30538922366738
Mem Usage(RSS): 2.018664448e+09
...
...


top 명령으로 본 것과 결과가 동일했다.

반응형

시스템 알람을 발생시키는 테스트를 하거나 Kubernetes의 Horizontal Pod Autoscaler 기능 테스트를 할 때,

CPU 부하를 발생시키는 명령 도구가 있으면 편하다.

아래와 같이 설치하고 테스트하면 된다. (설명은 생략하고, 그냥 따라해보자~)


##
## 설치
##

$ yum install -y stress

$ stress --help
...

##
## 30초 동안 3000ms의 CPU 과부하를 유발하기.
##
$ stress --cpu 3 --timeout 30s

##
## 500MB의 메모리 과부하를 유발하기
##  --vm : Worker 개수
##  --vm-hang : malloc 실행 후 free하기 전까지 sleep할 시간(초)
##
$ stress --vm 1 --vm-bytes 500M --vm-hang 1


블로그 작성자: sejong.jeonjo@gmail.com


반응형


작성일: 2024년 2월 16일


프로그래밍을 하다보면, 시간 값으로 "1697180099.123" 이런 형태의 값을 많이 보게된다.

이런 형태의 시간 값을 unix time 또는 epoch time이라고 한다.


1970년 1월 1일 0시 0분 0초를 Unix epoch라고 정의한다.

그리고 이 Unix epoch 이후부터 흐른 시간(초)를 표현한 것이 unix time(epoch time)이다.


그런데 이 Unix time은 컴퓨터가 다루기 좋은 형태일 뿐, 사람은 이 숫자(unix time)를 봐도 몇월 며칠 몇시인지 알 수 없다.

이럴 때 편하게 unix time을 우리가 읽을 수 있는 날짜 형태로 바꾸어는 웹 페이지가 있다.

아래 웹 페이지에서 unix time을 입력하면 사람이 읽기 좋은 형태로 바꾸어준다. 그 반대의 경우가 제공한다.


Epoch Converter

Convert Unix Timestamps (and many other date formats) to regular dates.

www.epochconverter.com


또는 Linux 명령어 중에 date 명령으로도 쉽게 날짜 형태를 바꿀 수 있다.


$  date -d @1657180059
Thu 07 Jul 2022 04:47:39 PM KST

$  date --date=@0
Thu 01 Jan 1970 09:00:02 AM KST


반응형


내가 자주 사용하는 형태는 아래와 예제와 같고, find 명령에 대한 자세한 내용은 아래 Web Docs를 참고할 것 !!!


$ find /proc -maxdepth 2 -name "comm" -print

$ find /proc -maxdepth 2 -name "comm" -exec cat {} \;

$ find . -maxdepth 2 -name "comm" -type f -mmin +1 -print | xargs grep kubelet
./4305/comm:kubelet
$


find 명령과 xargs 명령을 조합해서 사용하려면 많은 내용을 길게 입력해야 하는데, 아래와 같이 미리 .bashrc 파일에 function으로 등록하면 쉽게 이용할 수 있다.


$ cat .bashrc

... 중간 생략 ...

##
## .c 또는 .h 파일에서 특정 문자열을 찾는 함수
##
function find_xargs() {
    find . -name "*\.[ch]" -type f  -print | xargs grep $1
}

... 중간 생략 ...


##
## 위에서 .bashrc 파일에 추가한 내용을 현재 shell 환경에 적용하기
##

$ . .bashrc


## --------------------------------------------------------------

##
## 위에서 작성한 find_xargs 명령을 이용하여 Source code file에서 ip_hdr 함수를 찾는 예제
##

$ find_xargs  ip_hdr

./net/dccp/ipv6.c:		newnp->mcast_hops  = ip_hdr(skb)->ttl;
./net/dccp/ipv4.c:	return secure_dccp_sequence_number(ip_hdr(skb)->daddr,
./net/dccp/ipv4.c:					   ip_hdr(skb)->saddr,
./net/dccp/ipv4.c:	newinet->mc_ttl	   = ip_hdr(skb)->ttl;
./net/dccp/ipv4.c:	const struct iphdr *iph = ip_hdr(skb);
./net/dccp/ipv4.c:	rxiph = ip_hdr(rxskb);
./net/dccp/ipv4.c:	sk_rcv_saddr_set(req_to_sk(req), ip_hdr(skb)->daddr);
./net/dccp/ipv4.c:	sk_daddr_set(req_to_sk(req), ip_hdr(skb)->saddr);
./net/dccp/ipv4.c:	iph = ip_hdr(skb);
./net/sched/act_ipt.c:	iph = ip_hdr(skb);
./net/sched/act_ctinfo.c:		dscp = ipv4_get_dsfield(ip_hdr(skb)) & ~INET_ECN_MASK;
./net/sched/act_ctinfo.c:				ipv4_change_dsfield(ip_hdr(skb),
./net/sched/act_nat.c:	iph = ip_hdr(skb);
./net/sched/act_nat.c:		iph = ip_hdr(skb);
./net/sched/act_ct.c:	iph = ip_hdr(skb);

... 중간 생략 ...

$


아래 Web docs에 아주 자세한 설명과 예제가 있다.


How to Use the Linux xargs Command


반응형

https://engineer-mole.tistory.com/235#:~:text=w%20%ED%8C%8C%EC%9D%BC%EB%AA%85%20%23%20%ED%98%84%EC%9E%AC%EC%9D%98%20%ED%8C%A8%ED%84%B4,%EB%B3%80%ED%99%98%20%EB%AC%B8%EC%9E%90%EB%A1%9C%20%EB%B3%80%ED%99%98%ED%95%9C%EB%8B%A4.


[Linux] sed 커맨드 상황별 사용법

쉘에서 데이터를 가공할 때 sed를 자주 사용하게 되는데, 상황에 따른 사용예를 정리한 포스팅이다. sed 커맨드는 Linux/Unix/BSD/OSX의 경우 기본적으로 설치되어 있으므로, sed 커맨드를 사용하기 위

engineer-mole.tistory.com


반응형

Mac, Ubuntu, CentOS에서 Terminal을 사용하다보면, 알록달록 Color가 들어간 Text를 보게 된다.

이렇게 색이 들어간 글자를 만들려면, ANSI escape code라는 표준 기술을 활용해야 한다.

ANSI escape code에 관한 자세한 내용은 이 글의 끝 부분에 있는 Reference Web Docs를 보길~~~


간단하게 터미널의 글자에 색을 넣는 방법만 보면 아래와 같다.


Mac iTerm2 터미널에 글자 컬러 넣기


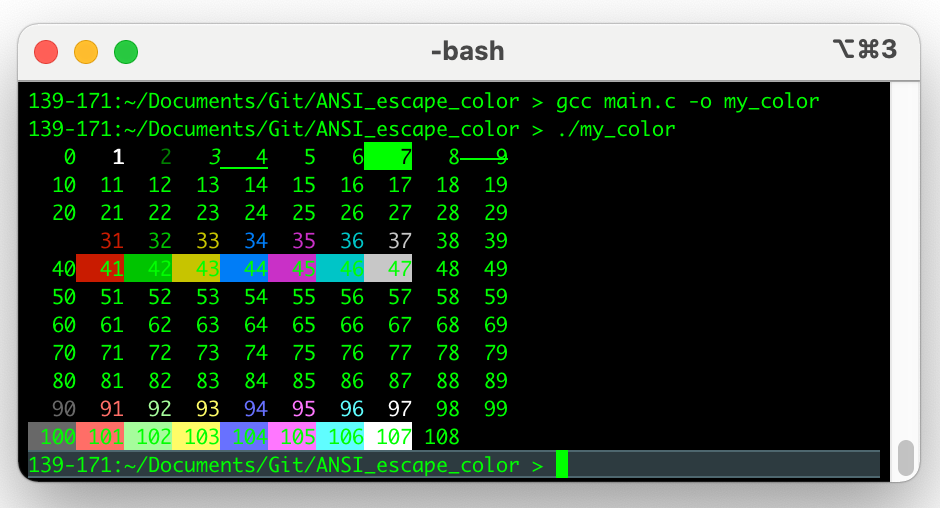
ANSI escape code 확인하는 C source code

각 ANSI code가 어떤 color, font, effect를 보여주는지 확인하고 싶다면, 아래와 같이 짧게 코드를 작성해서 돌려보면 바로 감(느낌)을 찾을 수 있다.

##
## File name:  main.c
##

#include <stdio.h>

int main(void)
{
  int i, j, n;

  for (i = 0; i < 11; i++) {
    for (j = 0; j < 10; j++) {
      n = 10*i + j;
      if (n > 108) break;
      printf("\033[%dm %3d\033[m", n, n);
    }
    printf("\n");
  }
  return 0;
}


위 C source code를 작성하고, 아래와 같이 gcc 명령으로 compile하고 실행해보면, 각 ANSI code의 숫자가 어떤 색을 표현하는지 알 수 있다.


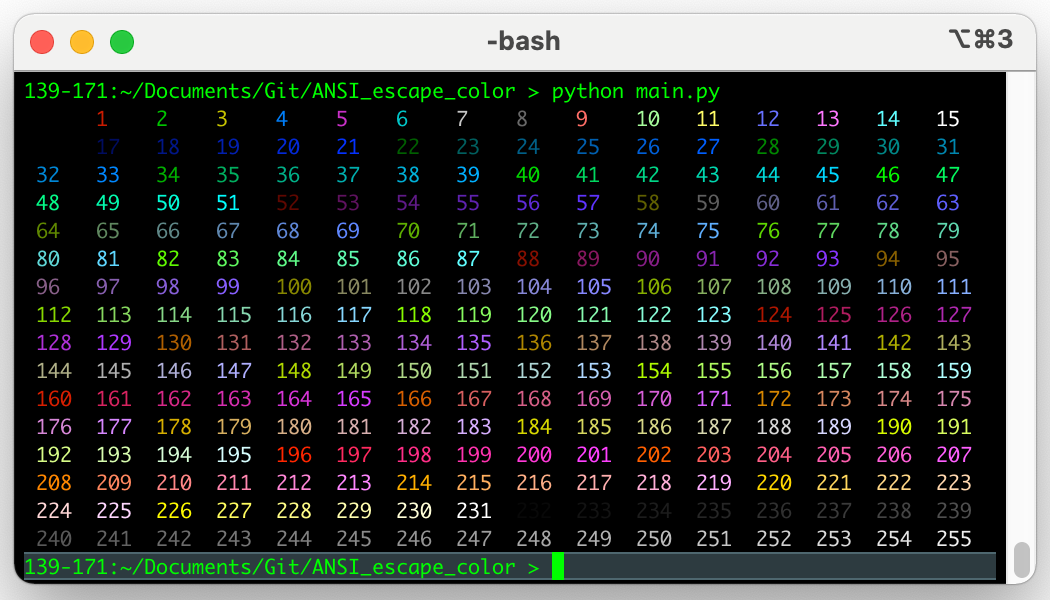
ANSI escape code 확인하는 Python source code

각 ANSI code가 어떤 color, font, effect를 보여주는지 확인하고 싶다면, 아래와 같이 짧게 코드를 작성해서 돌려보면 바로 감(느낌)을 찾을 수 있다.

##
## File name:  main.py
##

import sys
for i in range(0, 16):
    for j in range(0, 16):
        code = str(i * 16 + j)
        sys.stdout.write(u"\u001b[38;5;" + code + "m " + code.ljust(4))
    print u"\u001b[0m"


위 Python source code를 작성하고, 아래와 같이 실행해보면, 각 ANSI code의 숫자가 어떤 색을 표현하는지 알 수 있다.


import sys
for i in range(0, 16):
    for j in range(0, 16):
        code = str(i * 16 + j)
        sys.stdout.write(u"\u001b[48;5;" + code + "m " + code.ljust(4))
    print u"\u001b[0m"


ANSI escape code의 역사, 표준 정보, Example 등 자세한 내용은 아래 Reference Web Docs를 참고하길 ~~~


Reference


ANSI escape code - Wikipedia

From Wikipedia, the free encyclopedia Jump to navigation Jump to search Method used for display options on video text terminals ANSI escape sequences are a standard for in-band signaling to control cursor location, color, font styling, and other options on

en.wikipedia.org


ASCII Art Archive

A large collection of ASCII art drawings and other related ASCII art pictures.

www.asciiart.eu


※ 아래 Web Docs는 CLI 만들기에 필요한 다양한 Trick과 Tip이 있다.

※ CLI에 Progress Bar, Processing Status, Percentile 등 효과를 넣고 싶다면 아래 Web Docs를 참고할 것 !!!


Build your own Command Line with ANSI escape codes

Build your own Command Line with ANSI escape codes Everyone is used to programs printing out output in a terminal that scrolls as new text appears, but that's not all your can do: your program can color your text, move the cursor up, down, left or right, o

www.lihaoyi.com


반응형

grep command를 -v(또는 --invert-match) 옵션과 함께 사용할 때, 여러 개의 조건을 입력하고 싶을 때가 있다.

-v 옵션을 여러 조건과 사용할 때 항상 표현식이 헷갈렸는데, 그래서 메모를 해본다.

$ grep -vE 'aaa|bbb'
ccc
ddd
eee
$


+ Recent posts