반응형


작성일: 2024년 2월 21일


PPTP, L2TP 같은 터널링을 사용할 수 없는 상황에서

방화벽 건너편의 네트워크에 접속할 일이 발생하면, SSH Port Forwarding을 임시방편으로 사용하는 것도 좋다.

물론 전제 조건이 있다.

  - SSH 접속할 수 있도록 방화벽 허용 규칙
     또는
  - DNAT Rule
     또는
  - 공유기의 Port Forward Rule이 미리 설정되어 있어야 한다.


즉, 원격 Network에 SSH 접속 만큼은 가능한 환경이라는 가정하에 아래 설명을 봐야 한다.

간단하게 한번 훑어보고 실습 환경으로 가보자.


SSH Tunneling에는 3가지가 있다.

  - Local Port Forwarding (Local Tunneling)

  - Remote Port Forwarding

  - Dynamic Port Forwarding


각 Tunneling 방식에 대해서는 아래 구체적으로 설명하기로 한다.


우선 접속할 대상 Network의 SSH 서버의 설정을 수정해야 한다.

SSH Server Config 설정

$ sudo -s

$ vim /etc/ssh/sshd_config

... 중간 생략 ...
AllowTcpForwarding yes     # <-- yes로 변경
GatewayPorts yes           # <-- yes로 변경
... 중간 생략 ...

$ systemctl restart sshd


준비 작업 끝 !

예시를 들어서, Local Tunneling에 관해서 설명해보면 이렇다.


SSH Local Port Forwarding (Local Tunneling)

아래 그림과 같이 집에 있는 내 맥북 PC에서 회사에 있는 VNC 서버에 접근해보겠다.


SSH 터널링 (Local Port Forwarding 방식)


위 네트워크 구성도를 참고하여 내 PC(맥북)에서 아래의 명령을 수행한다.

(위 구성도와 아래 명령에 있는 IP Address 값을 매핑해서 보면, 아래 명령의 의미를 이해할 수 있다)

$  ssh  -L 5900:10.1.1.3:5900  root@10.1.1.2


그리고 내 PC(맥북)에서 RealVNC Viewer 또는 TigerVNC Viewer에 새 연결 정보를 설정해야 하는데,

주소를 localhost (또는 127.0.0.1)으로 입력해야 한다. (아래 화면을 참고)


위와 같이 VNC Server의 주소를 설정하고, 접속 버튼을 누르면 

VNC 접속 요청 트래픽은 아래 순서로 흘러간다.


  1)  내 맥북 PC VNC Client

  2)  localhost의 ssh client (192.168.1.5:5900)

  3)  사무실의 ssh server (10.1.1.2)

  4)  VNC Server (10.1.1.3:5900)


원하는 VNC 접속 성공 !!


SSH Remote Port Forwarding

이번에는 완전 반대의 경우를 생각해보자.

사무실 쪽에서 SSH 서버 접속을 허용하지 않아서 Local Tunneling이 안 되는 경우라면, 

사무실에 있는 누군가(나의 친한 동료)가 내 집에 있는 내 맥북에 SSH Tunneling을 요청해주어야 한다.

물론 내 맥북이 Public network에 노출되어야 한다.

이런 방식을 Remote Tunneling이라고 한다. 


SSH 터널링 (Remote Port Forwarding 방식)


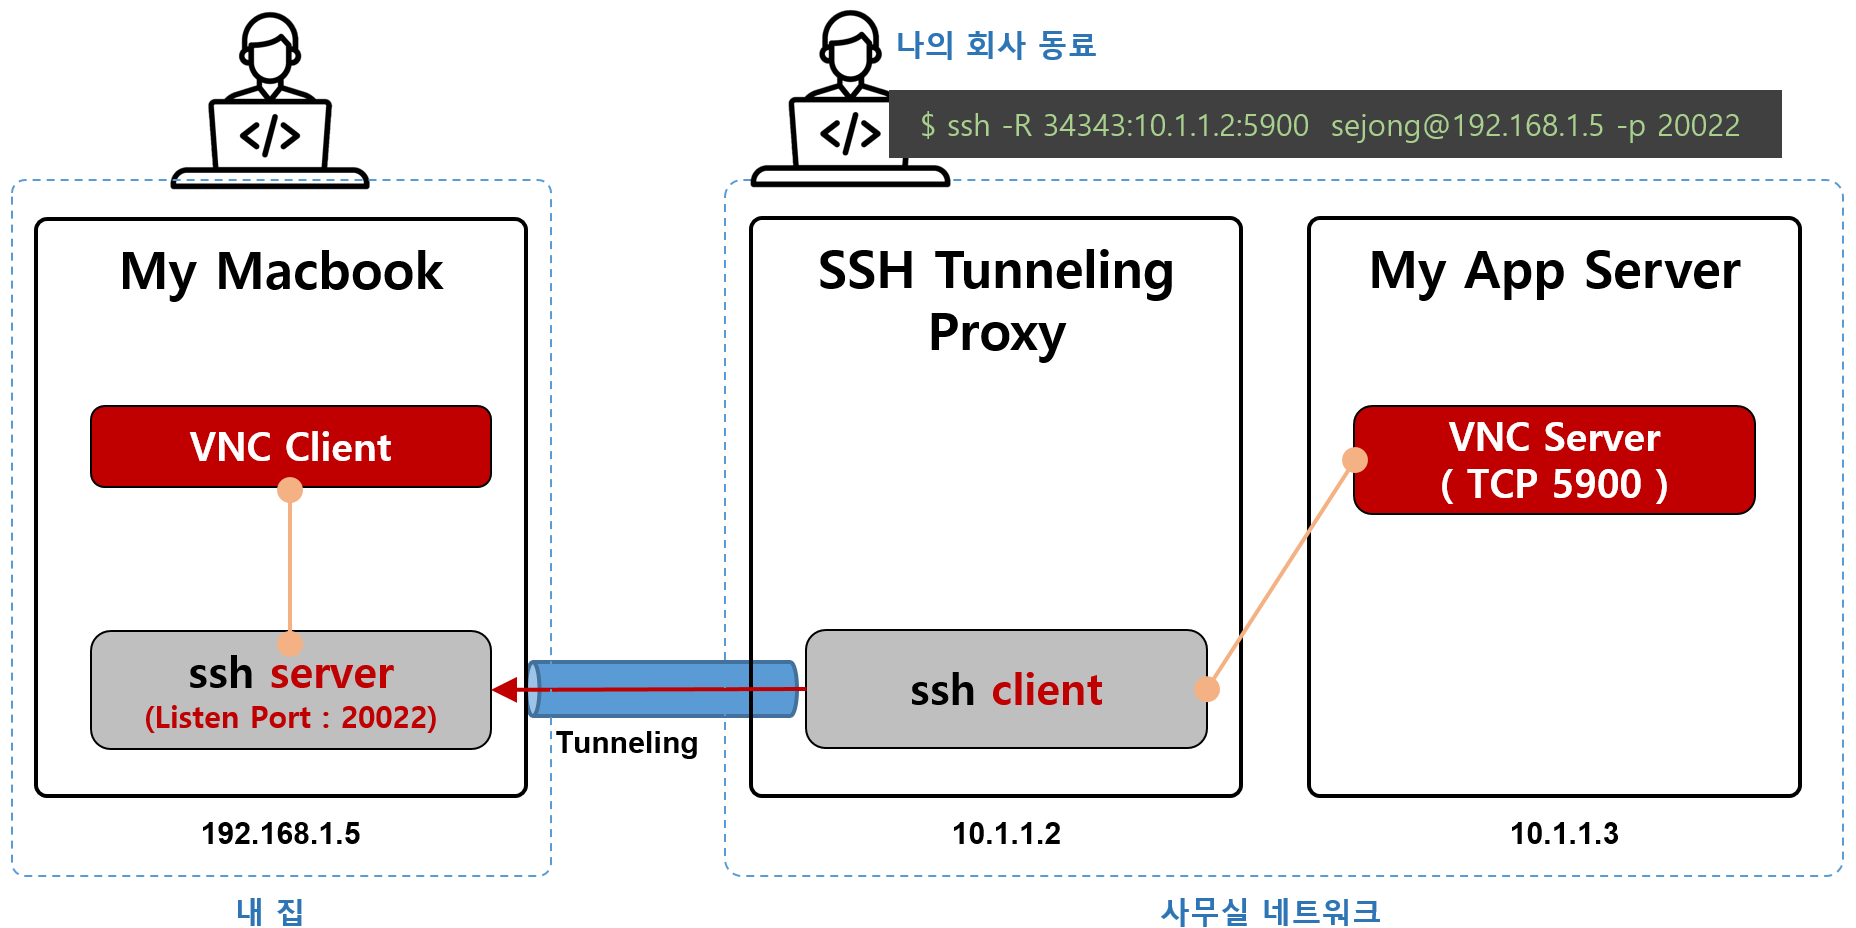
사무실에서 나의 동료가 회사 Linux 서버에서 아래와 명령을 실행해준다.

$  ssh  -R  34343:10.1.1.2:5900  sejong@192.168.1.5 -p 20022


그러면 위 명령 때문에 내 맥북 PC에는 TCP Listening port 34343가 생성된다.

## 집에 있는 내 맥북 PC에서 명령을 실행한 결과

$  netstat -anp | grep LISTEN
... 중간 생략 ...
tcp    0    0 0.0.0.0:34343       0.0.0.0:*         LISTEN      -
... 중간 생략 ...


이제 내 맥북에서 VNC Viewer를 이용해서 아래 화면과 같이 설정하고 회사 Network로 접속해보자.

VNC Server 주소는 localhost 또는 127.0.0.1 으로 설정하면 된다.


위와 같이 VNC Server의 주소를 설정하고, 접속 버튼을 누르면

VNC 접속 요청 트래픽은 아래 순서로 흘러간다.


  1)  내 맥북 PC VNC Client

  2)  localhost의 ssh client (192.168.1.5:5900)

  3)  사무실의 ssh server (10.1.1.2)

  4)  VNC Server (10.1.1.3:5900)


원하는 VNC 접속 성공 !!


반응형


OCP Cluster를 구축한 직후에  ovs-vsctl 명령으로 Open vSwitch의 구성을 확인해봤다.


특징한 살펴보면, 

  • br-int Bridge에 각 Kube Node로 가는 물리 Port(50.50.51.2x)는 geneve 터널링 방식을 사용.
    (아래 ovs-vsctl 명령 결과에서 geneve로 검색하면 됨)


[root@worker1 ~]# ovs-vsctl show
9cad81c8-d7be-4b18-90e8-03aadd86a8cb
    Bridge br-ex
        Port enp131s0f0
            Interface enp131s0f0
                type: system
        Port patch-br-ex_worker1.twcm.cloud-to-br-int
            Interface patch-br-ex_worker1.twcm.cloud-to-br-int
                type: patch
                options: {peer=patch-br-int-to-br-ex_worker1.twcm.cloud}
        Port br-ex
            Interface br-ex
                type: internal
    Bridge br-int
        fail_mode: secure
        datapath_type: system
        Port ovn-5e8778-0
            Interface ovn-5e8778-0
                type: geneve
                options: {csum="true", key=flow, remote_ip="50.50.51.22"}
        Port "83cf7b04f35b763"
            Interface "83cf7b04f35b763"
        Port br-int
            Interface br-int
                type: internal
        Port d10af31c1d33dac
            Interface d10af31c1d33dac
        Port "460c3ee2f55e7c9"
            Interface "460c3ee2f55e7c9"
        Port ovn-f95ec3-0
            Interface ovn-f95ec3-0
                type: geneve
                options: {csum="true", key=flow, remote_ip="50.50.51.21"}
        Port patch-br-int-to-br-ex_worker1.twcm.cloud
            Interface patch-br-int-to-br-ex_worker1.twcm.cloud
                type: patch
                options: {peer=patch-br-ex_worker1.twcm.cloud-to-br-int}
        Port ovn-84a2f7-0
            Interface ovn-84a2f7-0
                type: geneve
                options: {csum="true", key=flow, remote_ip="50.50.51.23"}
        Port "5fe45b331cff8df"
            Interface "5fe45b331cff8df"
        Port ovn-k8s-mp0
            Interface ovn-k8s-mp0
                type: internal
        Port "59a37a9be52afdb"
            Interface "59a37a9be52afdb"
    ovs_version: "2.15.4"


실제 Pod가 사용하는 Overlay Network Portovn-k8s-mp0는 아래 보이는 것처럼 MTU가 1400 bytes이다.

geneve 터널링을 위해 100 byte를 사용해야 하므로, MTU1400 bytes가 된 것이다.


[root@worker1 ~]# ifconfig ovn-k8s-mp0
ovn-k8s-mp0: flags=4163<UP,BROADCAST,RUNNING,MULTICAST>  mtu 1400
        inet 10.131.0.2  netmask 255.255.254.0  broadcast 10.131.1.255
        inet6 fe80::ec45:a3ff:fe53:665  prefixlen 64  scopeid 0x20<link>
        ether ee:45:a3:53:06:65  txqueuelen 1000  (Ethernet)
        RX packets 248078  bytes 20827992 (19.8 MiB)
        RX errors 0  dropped 0  overruns 0  frame 0
        TX packets 264379  bytes 23121981 (22.0 MiB)
        TX errors 0  dropped 0 overruns 0  carrier 0  collisions 0


Pod가 IP Networking은 일반적인 L2 Switching 통해서 처리되므로, 아래 routing table을 참조하여 이웃하는 Worker, Master Node로 전달된다. 

10.128.0.0  10.131.0.0 network가 Pod가 사용하는 Network이다.


[root@worker1 ~]# netstat -nr
Kernel IP routing table
Destination     Gateway         Genmask         Flags   MSS Window  irtt Iface
0.0.0.0         50.50.51.10     0.0.0.0         UG        0 0          0 br-ex
10.128.0.0      10.131.0.1      255.252.0.0     UG        0 0          0 ovn-k8s-mp0
10.131.0.0      0.0.0.0         255.255.254.0   U         0 0          0 ovn-k8s-mp0
50.50.51.0      0.0.0.0         255.255.255.0   U         0 0          0 br-ex
169.254.169.0   50.50.51.10     255.255.255.252 UG        0 0          0 br-ex
169.254.169.3   10.131.0.1      255.255.255.255 UGH       0 0          0 ovn-k8s-mp0
172.30.0.0      50.50.51.10     255.255.0.0     UG        0 0          0 br-ex


Netfilter를 살펴보면,

Pod와 Service 리소스를 생성하면서 Netfilter의 Chain Rule 변화 여부를 모니터링 해봤는데, 변화가 없다.


[root@worker1 ~]# iptables -L -t nat
Chain PREROUTING (policy ACCEPT)
target     prot opt source               destination
OVN-KUBE-ETP  all  --  anywhere             anywhere
OVN-KUBE-EXTERNALIP  all  --  anywhere             anywhere
OVN-KUBE-NODEPORT  all  --  anywhere             anywhere

Chain INPUT (policy ACCEPT)
target     prot opt source               destination

Chain POSTROUTING (policy ACCEPT)
target     prot opt source               destination
OVN-KUBE-SNAT-MGMTPORT  all  --  anywhere             anywhere
KUBE-POSTROUTING  all  --  anywhere             anywhere             /* kubernetes postrouting rules */

Chain OUTPUT (policy ACCEPT)
target     prot opt source               destination
OVN-KUBE-EXTERNALIP  all  --  anywhere             anywhere
OVN-KUBE-NODEPORT  all  --  anywhere             anywhere

Chain KUBE-MARK-MASQ (0 references)
target     prot opt source               destination
MARK       all  --  anywhere             anywhere             MARK or 0x4000

Chain KUBE-MARK-DROP (0 references)
target     prot opt source               destination
MARK       all  --  anywhere             anywhere             MARK or 0x8000

Chain KUBE-POSTROUTING (1 references)
target     prot opt source               destination
RETURN     all  --  anywhere             anywhere             mark match ! 0x4000/0x4000
MARK       all  --  anywhere             anywhere             MARK xor 0x4000
MASQUERADE  all  --  anywhere             anywhere             /* kubernetes service traffic requiring SNAT */ random-fully

Chain KUBE-KUBELET-CANARY (0 references)
target     prot opt source               destination

Chain OVN-KUBE-SNAT-MGMTPORT (1 references)
target     prot opt source               destination
SNAT       all  --  anywhere             anywhere             /* OVN SNAT to Management Port */ to:10.131.0.2

Chain OVN-KUBE-NODEPORT (2 references)
target     prot opt source               destination

Chain OVN-KUBE-EXTERNALIP (2 references)
target     prot opt source               destination

Chain OVN-KUBE-ETP (1 references)
target     prot opt source               destination
[root@worker1 ~]#


그리고 위 상황에서 Service  리소스를 한개를 ClusterIP type에서 NodePort type으로 변경했더니,

아래와 같이 OVN-KUBE-NODEPORT에 Chain Rule 한개 추가되었다.


[root@worker1 ~]# iptables -L -t nat

... 중간 생략 ...

## 이 내용이 추가되었음.

Chain OVN-KUBE-NODEPORT (2 references)
target     prot opt source               destination
DNAT       tcp  --  anywhere             anywhere             ADDRTYPE match dst-type LOCAL tcp dpt:31785 to:172.30.44.86:80

## 참고로 위 Chain Rule은 iptables 명령으로 추가한다면, 아래와 같이 실행하면 된다.
## (설명) destination port가 31785이면, 172.30.44.86:80 주소로 DNAT 처리하는 Rule을
##       OVN-KUBE-NODEPORT 체인에 추가하라는 명령.
# -A OVN-KUBE-NODEPORT -p tcp -m addrtype --dst-type LOCAL -m tcp --dport 31785 -j DNAT --to-destination 172.30.44.86:80

... 중간 생략 ...


이하, 작성 중...

+ Recent posts