반응형
작성일:  2024년 2월 9일


MACVLAN 가상 네트워크 포트 만들기

일반적으로 물리 네트워크 포트 1개에는 MAC address 1개, IP address 1개를 설정해서 사용한다.

(본업으로 Network 장비를 개발, 운영하는 사람이 아니라면 이런 단순한 구성이 익숙할 듯)

그런데 물리 네트워크 포트 1개에 '마치 여러 개의 네트워크 포트가 있는 것처럼' 동작하게 만들어야 할 때가 있다.

예를 들어,

  - 물리 포트 eth0에 2개 이상의 MAC address를 설정

  - 물리 포트 eth0에 2개 이상의 IP address를 설정

위 2가지를 모두 지원하는 가상 포트 타입이 'MACVLAN'이다.

[참고: Hypervisor, Virtual Machine Manager 에서 VM이 사용할 NIC 포트를 Bridge 타입으로 설정하면 위와 같은 형상이 된다)


Bridge 모드의 MACVLAN 포트 동작 방식 (출처: Red Hat Developer Blog)


아래 예시 명령과 같이 따라해보면 바로 이해가 될 듯.

(명령을 실행했던 OS: Ubuntu 22.04)


## 물리 NIC 포트 'eth0'에 IP address 설정
ip address add 10.1.4.55/24  dev eth0

## 물리 포트 'eth0'에 가상 포트 'macvlan1'을 만들기
ip link   add   macvlan1 link eth0 type macvlan mode bridge

## network namespace 'net1' 만들기
ip netns  add   net1

## network namespace 'net1'에 가상 포트 'macvlan1'을 추가
ip link   set   macvlan1 netns net1

## 가상 포트 'macvlan1'을 활성화(up)하기
ip netns  exec  net1 ip link set dev macvlan1 up

## 가상 포트에 IP address를 설정
ip netns  exec  net1 ip address  add 10.1.4.51/24 dev macvlan1

## IP 통신이 잘 되는지 'ping test'하기
ip netns  exec  net1 /usr/bin/ping 10.1.4.56


## 테스트 종료, 가상 포트 'macvlan1' 지우기
ip netns  exec  net1 ip link del macvlan1


위 예시에서 'mode bridge'로 설정한 부분이 있는데, bridge 모드 외에도 아래와 같은 다양한 모드를 설정할 수 있다.

  - Private

  - VEPA

  - Bridge

  - Passthru

  - Source

위 5 가지 모드에 대한 자세한 설명은 이 문서(Redhat Blod)를 참고할 것!


추천 문서

Redhat / Linux interfaces for virtual networking (2018년 10월)

https://developers.redhat.com/blog/2018/10/22/introduction-to-linux-interfaces-for-virtual-networking


반응형


HP DL-380, DL-580 또는 Dell PowerEdge 장비처럼 network port가 4~10개가 넘는 경우

Network 물리 포트와 OS에 할당된 Network port 이름간 관계를 찾기가 어렵다.


이럴 때, ethtool 명령으로 특정 포트 이름의 물리 포트가 어떤 것인지 찾을 수 있다.

예를 들어, 아래처럼 명령을 수행하면 eth0 포트에 해당하는 물리 포트의 램프가 아주 빠르게 깜빡깜빡거린다.


##
## eth0 포트의 램프를 깜빡거리게 한다.
##

$  ethtool -p eth0
^C


##
## eno2 포트의 램프를 깜빡거리게 한다.
##

$  ethtool -p eno2
^C


반응형


C language, Go(Golang), Netfilter, Netlink를 이용하여 Linux network을 제어하고 모니터링하는 방법을 알아보자~


개념 이해하기: Netfilter hooks into Linux networking packet flows

The following schematic shows packet flows through Linux networking:


From:  https://wiki.nftables.org/wiki-nftables/index.php/Netfilter_hooks


Linux Netfilter + C example code

참고 문서:   https://pr0gr4m.github.io/linux/kernel/netfilter/
  이론 설명과 함께 잘 동작하는 예시가 있어서 쉽게 이해할 수 있다.
  아래는 위 블로그의 끝 부분에 있는 HTTP Traffic만 선별하여 Drop하는 예제 코드인데,
  그냥 이 예제 코드만 봐도 이해할 수 있을 것이다.


http_netfilter.c

#include <linux/init.h>
#include <linux/kernel.h>
#include <linux/module.h>
#include <linux/netfilter.h>
#include <linux/netfilter_ipv4.h>
#include <linux/ip.h>
#include <linux/tcp.h>
#include <linux/netdevice.h>

static unsigned int hook_http(void *priv,
		struct sk_buff *skb, const struct nf_hook_state *state)
{
	struct iphdr *iph;
	struct tcphdr *th;
	char *data = NULL;
	int length = 0;
	
	if (!skb)
		return NF_ACCEPT;

	iph = ip_hdr(skb);

	if (iph->protocol == IPPROTO_TCP) {
		th = tcp_hdr(skb);

		length = skb->len - iph->ihl * 4 - th->doff * 4;
		if (length <= 4)
			return NF_ACCEPT;

		data = kzalloc(length, GFP_KERNEL);
		memcpy(data, (unsigned char *)th + th->doff * 4, length);

		if (strstr(data, "HTTP") != NULL) {
			printk("[Kernel:%s] HTTP Detected\n", __func__);
			kfree(data);
			return NF_DROP;
		}

		kfree(data);
	}

	return NF_ACCEPT;
}

static struct nf_hook_ops *nf_ops = NULL;

static int __init nfilter_init(void)
{
	nf_ops = (struct nf_hook_ops *)kzalloc(sizeof(struct nf_hook_ops), GFP_KERNEL);
	nf_ops->hook = (nf_hookfn *)hook_http;
	nf_ops->pf = PF_INET;
	nf_ops->hooknum = NF_INET_LOCAL_IN;
	nf_ops->priority = NF_IP_PRI_FIRST;

	nf_register_net_hook(&init_net, nf_ops);
	printk("[Kernel:%s] NFilter Init\n", __func__);
	return 0;
}

static void __exit nfilter_exit(void)
{
	nf_unregister_net_hook(&init_net, nf_ops);
	kfree(nf_ops);
	printk("[Kernel:%s] NFilter Exit\n", __func__);
}

module_init(nfilter_init);
module_exit(nfilter_exit);
MODULE_LICENSE("GPL");


Makefile

obj-m += http_netfilter.o

KDIR := /lib/modules/$(shell uname -r)/build

default:
	$(MAKE) -C $(KDIR) M=$(PWD) modules

CC := gcc

%.c%:
	${CC} -o $@ $^

clean:
	$(MAKE) -C $(KDIR) M=$(PWD) clean
	rm -f ${TARGETS}


Build & Test

##
## HTTP Server 장비에서 아래 명령을 수행.
##

$ make

$ sudo insmod http_netfilter.ko

$


---

##
## 다른 PC에서 아래와 같이 HTTP Traffic을 발생시켜본다.
##
$ curl -v http://my-test.server.domain/

*   Trying my-test.server.domain:80...
* Connected to my-test.server.domain port 80 (#0)
> GET / HTTP/1.1
> Host: my-test.server.domain
> User-Agent: curl/7.77.0
> Accept: */*
> ##
## TCP Session만 수립될 뿐, 
## 실제 HTTP Response 패킷을 받지 못해서 이 상태로 계속 남아있다가 Timed out 처리된다.
##
* Recv failure: Operation timed out
* Closing connection 0
curl: (56) Recv failure: Operation timed out
$


---

##
## HTTP Server 장비에서 아래 명령을 수행.
##

$ dmesg --color --follow
... 중간 생략 ..
[264707.035282] [Kernel:hook_http] HTTP Detected
[264711.387549] [Kernel:hook_http] HTTP Detected
... 중간 생략 ..


Netlink for C language

Wikipedia

Netlink Protocol Library Suite (libnl)

Core Library Developer's Guide (libnl)

Routing Library Developer's Guide (libnl-route)

Example Collection


위 문서를 읽고 나서, 아래 예제를 테스트하면서 이해하기.

$  cat detect_chg_event.c


/**
 * How to build
 *   $  gcc -o detect_chg_event detect_chg_event.c
 * How to run
 *   $  ./detect_chg_event
 */

#include <stdio.h>
#include <string.h>
#include <errno.h>
#include <unistd.h>
#include <sys/types.h>
#include <sys/socket.h>
#include <ifaddrs.h>
#include <net/if.h>
#include <netdb.h>
#include <netinet/in.h>
#include <linux/netlink.h>
#include <linux/rtnetlink.h>


static int
create_sock (const char *nic)
{
    struct sockaddr_nl addr;
    int                sock;

    memset (&addr, 0, sizeof (addr));
    addr.nl_family = AF_NETLINK;
    addr.nl_groups = RTMGRP_LINK | RTMGRP_IPV4_IFADDR | RTMGRP_IPV6_IFADDR;

    sock = socket (PF_NETLINK, SOCK_RAW, NETLINK_ROUTE);
    if (sock < 0)
    {
        fprintf (stderr, "failed to open NETLINK_ROUTE socket for %s - %s(%d)",
                nic, strerror (errno), errno);
        return -1;
    }

    if (bind (sock, (struct sockaddr *)&addr, sizeof(addr)) < 0)
    {
        fprintf (stderr, "failed to bind NETLINK_ROUTE socket for %s - %s(%d)",
                nic, strerror (errno), errno);
        close (sock);
        return -1;
    }

    return sock;
}


/**
 * NOTE: Cheeck if NIC status is changed
 */
static int
ip_changed (int         sock,
			const char *nic)
{
    struct nlmsghdr   *nlh;
    char               buffer[4096];
    int                len;
    int                idx;
    int                found;

    len = recv (sock, buffer, sizeof (buffer), 0);
    if (len <= 0)
    {
        fprintf (stderr, "NETLINK_ROUTE socket recv() failedn");
        return -1;
    }

    printf("\n %s %s(%d) Receive message from raw socket \n",
            __func__, __FILE__, __LINE__);

    found = 0;
    idx = if_nametoindex (nic);

    printf("\n %s %s(%d) Index of %s: %d \n",
            __func__, __FILE__, __LINE__, nic, idx);

    for (	nlh = (struct nlmsghdr *) buffer;
            NLMSG_OK (nlh, len);
            nlh = NLMSG_NEXT (nlh, len))
    {
        if (nlh->nlmsg_type == NLMSG_DONE)
            break;
        if (nlh->nlmsg_type == NLMSG_ERROR)
            continue;
        if (!(NLMSG_OK (nlh, len)))
            continue;

        printf("\n %s %s(%d) Netlink MSG Type: %d\n",
                __func__, __FILE__, __LINE__, nlh->nlmsg_type);

        /*
         * NOTE:
         *   RTM_NEWADDR, RTM_NEWLINK 에 관한 정의는 rtnetlink.h 파일에서 확인할 수 있다.
         *     - /usr/include/linux/rtnetlink.h
         */
        switch (nlh->nlmsg_type)
        {
            case RTM_NEWADDR:
                {
                    struct ifaddrmsg *ifa = (struct ifaddrmsg *)NLMSG_DATA (nlh);

                    if (ifa->ifa_index == idx)
                        found = 1;
                }
                break;
            case RTM_NEWLINK:
                {
                    struct ifinfomsg *ifi = (struct ifinfomsg *)NLMSG_DATA (nlh);

                    if (ifi->ifi_index == idx)
                        found = 1;
                }
                break;
            default:
                break;
        }
    }

    return found;
}


static int
get_nic_addr (  const char     *nic,
				struct ifaddrs *ifaddr,
				int             wanted_family,
				char           *host,
				int             host_len,
				int            *active)
{
    struct ifaddrs *ifa;

    for (ifa = ifaddr; ifa != NULL; ifa = ifa->ifa_next)
    {
        int family;
        int s;

        if (ifa->ifa_addr == NULL)
            continue;

        if (strcmp (ifa->ifa_name, nic))
            continue;

        /* Skip unwanted families. */
        family = ifa->ifa_addr->sa_family;
        if (family != wanted_family)
            continue;

        *active = (ifa->ifa_flags & IFF_RUNNING) ? 1 : 0;

        s = getnameinfo (   ifa->ifa_addr,
                            family == AF_INET ? sizeof (struct sockaddr_in) :
                            sizeof (struct sockaddr_in6),
                            host,
                            host_len,
                            NULL,
                            0,
                            NI_NUMERICHOST);
        if (s != 0)
        {
            fprintf (stderr, "failed to getnameinfo() for '%s - %s(%d)",
                    ifa->ifa_name, strerror (errno), errno);
            continue;
        }

        /* Get the address of only the first network interface card. */
        return 1;
    }

    return 0;
}


static void
print_ip (const char *nic)
{
    struct ifaddrs *ifaddr;
    char            addr[NI_MAXHOST];
    int             active;

    printf("\n %s(%d) nic: %s \n",
            __FILE__, __LINE__, nic);

    if (getifaddrs (&ifaddr) == -1)
    {
        fprintf (stderr, "failed to getifaddrs() - %s(%d)", strerror (errno), errno);
        return;
    }

    // NOTE: IPv4
    if (!get_nic_addr (nic, ifaddr, AF_INET, addr, sizeof (addr), &active))
    {
        // If IPv4 configuration is not available,
        // then try to get the Ipv6 configuration.
        printf("\n %s(%d) nic: %s  addr: %s  active: %d \n",
                __FILE__, __LINE__, nic, addr, active);
        // NOTE: IPv6
        if (!get_nic_addr (nic, ifaddr, AF_INET6, addr, sizeof (addr), &active))
        {
            // Nothing to do.
            strcpy (addr, "127.0.0.1");
            active = 0;
        }
    } else {
        printf("\n %s(%d) nic: %s  addr: %s  active: %d \n",
                __FILE__, __LINE__, nic, addr, active);
    }

    freeifaddrs (ifaddr);

    printf("\n %s %s(%d) %s is %s (link %s) \n",
            __func__, __FILE__, __LINE__,
            nic, addr, active ? "active" : "inactive");
}


int
main (void)
{
    // FIXME: enp7s0 --> my machine's network interface name
    char *nic = "enp7s0";
    int   sock;

    print_ip (nic);

    sock = create_sock (nic);
    if (sock < 0)
        return -1;

    while (1)
    {
        int ret;

        ret = ip_changed (sock, nic);
        if (ret < 0)
            return -1;

        if (ret)
            print_ip (nic);

        printf("\n\n %s %s(%d) END OF LOOP \n\n\n",
                __func__, __FILE__, __LINE__);
    }

    close (sock);

    return 0;
}


$

$  gcc -o detect_chg_event detect_chg_event.c

$  ./detect_chg_event

ip_changed detect_chg_event.c(73) Receive message from raw socket

 ip_changed detect_chg_event.c(79) Index of enp7s0: 2

 ip_changed detect_chg_event.c(93) Netlink MSG Type: 16

 detect_chg_event.c(181) nic: enp7s0

 detect_chg_event.c(205) nic: enp7s0  addr: 10.1.4.51  active: 1

 print_ip detect_chg_event.c(211) enp7s0 is 10.1.4.51 (link active)


 main detect_chg_event.c(239) END OF LOOP
 
 ...
 ...


위 예제에서 detect_chg_event 명령을 실행시켜 놓고, 아래와 같이 명령을 실행해본다.

$  ifconfig  enp7s0  mtu 1501
$  ifconfig  enp7s0  mtu 1500
$  ifconfig  enp7s0  down
$  ifconfig  enp7s0  up

detect_chg_event 예제 앱이 enp7s0 장치의 상태 변화를 감지해서 터미널에 감지한 내용을 출력해줄 것이다.


Netlink library for go

https://github.com/vishvananda/netlink


https://tomdnetto.net/post/linux_networking_from_go_nftables


Linux Networking From Go

Manipulating network interfaces, firewalling, and forwarding from Go.

tomdnetto.net


https://tomdnetto.net/post/advanced_nftables_with_go


Advanced NFTables With Go

NFTables like your mama taught you.

tomdnetto.net


반응형


Ubuntu OS를 설치한 후, Network 구성을 바꿀 때 nmtui, netplan, nm-connection-editor 등 CLI 명령을 사용하면 쉽게 network 구성을 설정할 수 있다.


nmtui 명령

메모: 지금은 바빠서 설명을 생략.  나중에 내용을 추가할 것 !!
$ nmtui

Text Terminal에서 위 명령을 수행하면, 아래와 같이 동일 Text Terminal에서 TUI가 뜬다.

nmtui 시작 화면


netplan 명령

길게 설명하는 것보다는 아래 예시를 보고 이해하고 따라하는 것이 좋을 듯 ~~~


Case A:
만약 Gnome Desktop GUI의 [ Settings ] - [ Network ] - [ Wired ] 화면에서 설정하고 싶으면,
아래와 같이 renderer를 NetworkManager로 지정하고 아무것도 설정하지 않으면 된다.
그러면 NetworkManager가 알아서 Physical Network Device를 찾아서 Profiling할 것이다.


$  cat  /etc/netplan/00-installer-config.yaml

network:
    renderer: NetworkManager
    version: 2
    
$  netplan  apply


Case B:
만약 Gnome Desktop GUI의 [ Settings ] - [ Network ] - [ Wired ] 화면에서 설정한 값을 무시하고
설정 파일에 있는 Network Config를 적용하고 싶다면, 
아래와 같이 renderer를 networkd 로 지정한다. 그런 후에 원하는 설정을 추가한다.
$  cat  /etc/netplan/00-installer-config.yaml

network:
    renderer: networkd
    version: 2
    ethernets:
        enp4s0:
            addresses:
                - 0.0.0.0/32
        br-ex:
            addresses:
                - 10.1.3.166/24
            nameservers:
                addresses: [8.8.8.8, 8.8.4.4]
            routes:
                - to: default
                  via: 10.1.3.1
        br-ex:                  
            dhcp4: true
 
$  netplan apply

## 설정 파일(YAML)에 에러가 없으면, 아무것도 출력하지 않는다.

$


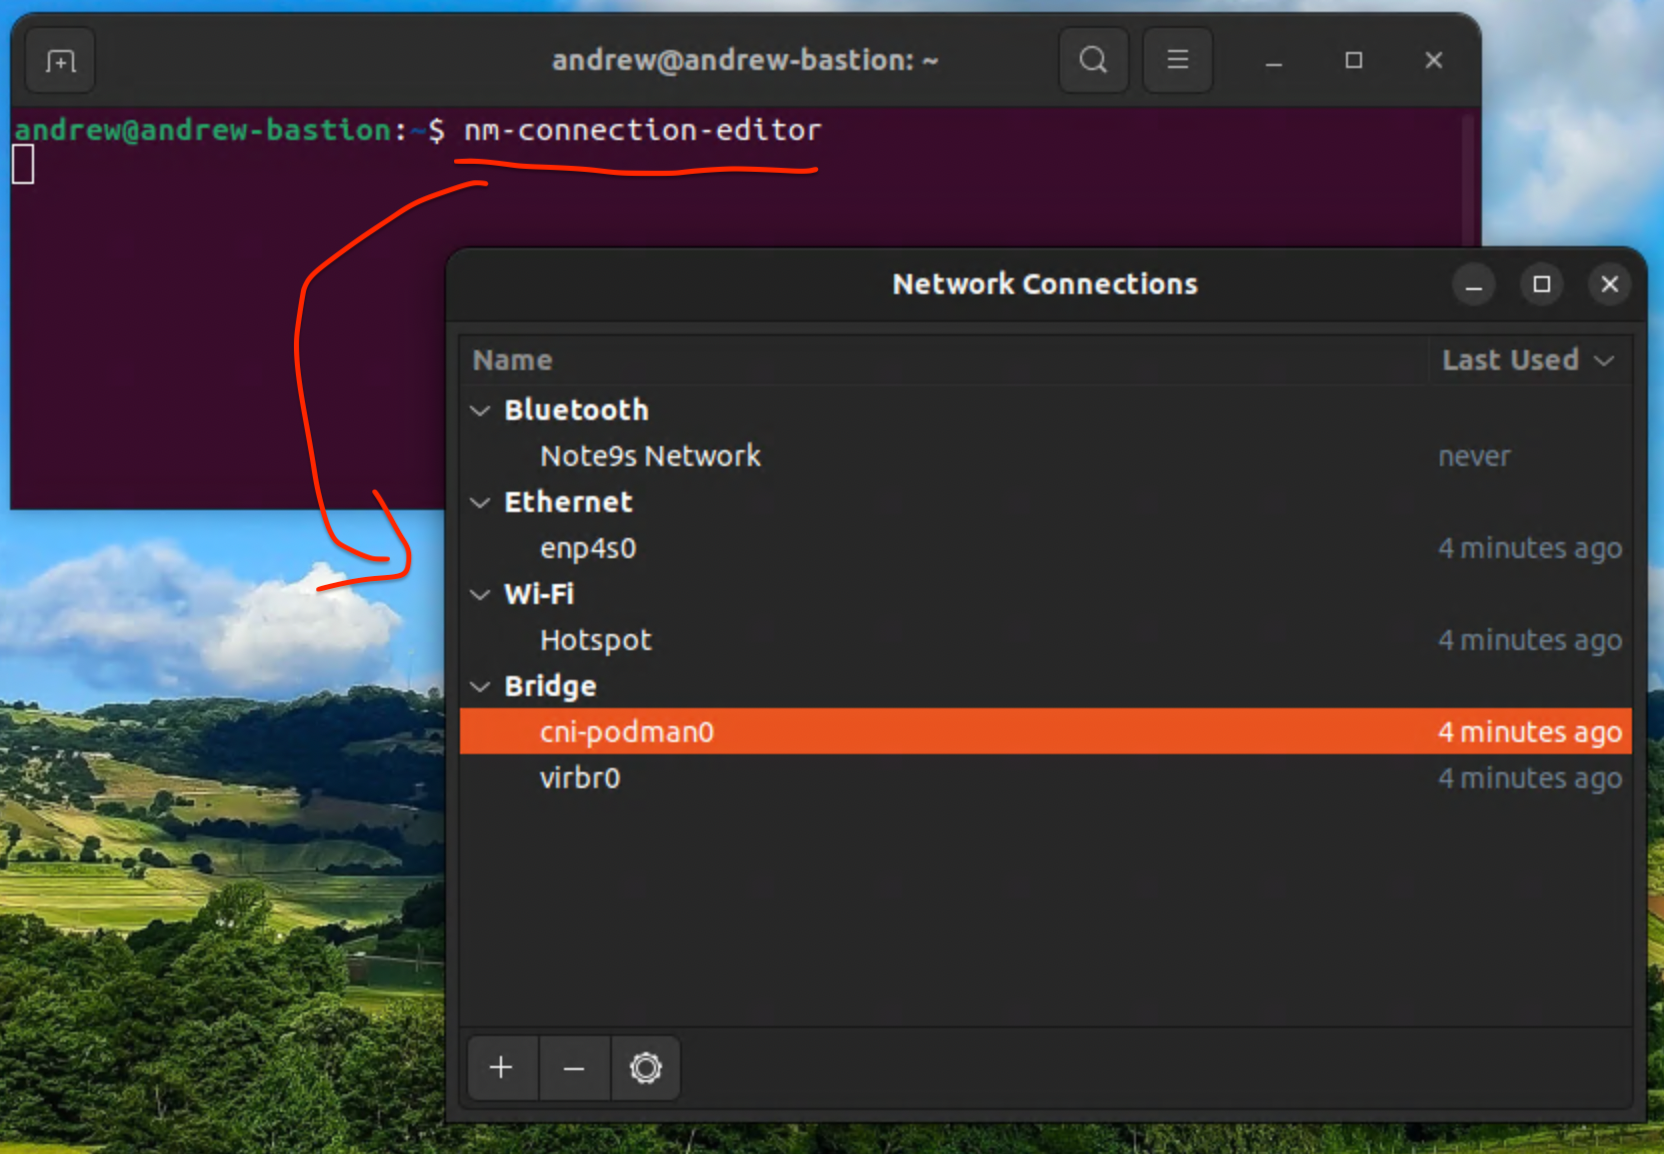
nm-connection-editor 명령

SSH로 접속한 Text Terminal에서는 실행하면 안 되고, 원격 데스크탑(Remote Desktop)으로 접속했거나 Console Monitor를 사용한 경우에만 nm-connection-editor가 동작한다.


nm-connection-editor 시작 화면


게시물 작성자: sejong.jeonjo@gmail.com


반응형
원래는 책과 Kubernetes Web Docs, CNI 문서를 읽고 이해한 것을 정리하려고 했는데,
이미 이렇게 정리한 블로그와 YouTube 영상을 발견해서, 
원래 계획을 접고, 관련 블로그 정보를 리스팅하는 페이지를 만들었다.


Kubernetes Service Network (YouTube 자료)

이 보다 쉽게 설명할 수 있을까 싶을 정도로 쉽게 설명하는 영상을 찾았다.


kubernetes service network


위 동영상을 본 이후에 아래 Web Docs를 보면, 확실히 Kubernetes의 IP Traffic을 처리하는 방식을 이해하기 좋다.


Kubernetes Network, Kube-Proxy 전반적인 내용 (Blog 자료)

이 문서는 꼭 보는 것을 권장한다.


Kubernetes kube-proxy Mode 분석


54. Kubernetes kube-proxy Mode 분석

Kubernetes kube-proxy Mode 분석 [kubernetes kube-proxy 관련 글 목록] 54. Kubernetes kube-proxy Mode 분석 70. Kubernetes kube-proxy IPVS Mode 설정 74. Kubernetes NodePort Networking 분석 (ku..

ikcoo.tistory.com


Kubernetes kube-proxy IPVS Mode 설정


70. Kubernetes kube-proxy IPVS Mode 설정

Kubernetes kube-proxy IPVS Mode 설정 [kubernetes kube-proxy 관련 글 목록] 54. Kubernetes kube-proxy Mode 분석 70. Kubernetes kube-proxy IPVS Mode 설정 74. Kubernetes NodePort Networking 분..

ikcoo.tistory.com


Kubernetes Node Port Networking 분석 (kube-proxy: iptable mode)


74. Kubernetes NodePort Networking 분석 (kube-proxy : iptable mode)

kubernetes NodePort Networking 분석 kube-proxy = iptable mode CNI = Flannel [kubernetes kube-proxy 관련 글 목록] 54. Kubernetes kube-proxy Mode 분석 70. Kubernetes kube-proxy IPVS Mode 설정..

ikcoo.tistory.com


Kubernetes LoadBalancer Networking 분석 (kube-proxy: iptable mode)


75. kubernetes LoadBalancer Networking 분석 (kube-proxy : iptable mode)

kubernetes LoadBalancer Networking 분석 kube-proxy = iptable mode CNI = Flannel [kubernetes kube-proxy 관련 글 목록] 54. Kubernetes kube-proxy Mode 분석 70. Kubernetes kube-proxy IPVS Mode ..

ikcoo.tistory.com


Kubernetes Node Port Networking 분석 (kube-proxy: IPVS mode)


76. kubernetes NodePort Networking 분석 (kube-proxy : IPVS mode)

kubernetes NodePort Networking 분석 kube-proxy : IPVS mode CNI = Flannel [kubernetes kube-proxy 관련 글 목록] 54. Kubernetes kube-proxy Mode 분석 70. Kubernetes kube-proxy IPVS Mode 설정 74..

ikcoo.tistory.com


IPTABLES :: The Kubernetes Networking Guide

IPTABLES Most of the focus of this section will be on the standard node-local proxy implementation called kube-proxy. It is used by default by most of the Kubernetes orchestrators and is installed as a daemonset on top of an newly bootstrapped cluster: $ k

k8s.networkop.co.uk


반응형

Kubernetes Cluster에서 MetalLB를 사용하다 보면, IP 트래픽을 처리하는 방식이 궁금할 때가 많다.

특히 Baremetal 환경에서 서비스를 운영한 개발자, 운영자라면 특히나 MetalLB의 동작 방식이나 원리가 이해가 안 되고, 감(느낌)도 안 잡힌다.

어디에 MetalLB 설계서 같은 문서가 있으면 좋겠지만, 그런게 없으니까 일단 궁금한 점이 떠오를 때마다 테스트하고 기록하는 수 밖에 ~~~


Q)  Kubernetes Service 리소스의 External IP 항목에 보여지는 IP Address는 실제로 어디에 있는가?

실제로 LoadBalancer Type으로 서비스 리소스를 설정하고, External IP Address를 할당받아서 테스트를 해보니까, 

External IP Address는 Master Node 또는 Worker Node에 있는 특정한 Network Port(예:  eth2)의 Mac Address를 공유해서 쓰고 있었다.

물론 Network Port(예: eth2)는 External IP Address와 같은 Network 대역이라서 라우팅이 가능한 Port가 된다.

(아마 MetalLB Operator가 동일한 Network 대역을 찾아서 할당해주는 것 같다)

참고: Layer 2 Mode로 MetalLB를 구성하고 테스트한 결과임
그렇다면, Master Node와 Worker Node가 10개가 있을 때, 어떤 Master Node와 Worker Node에 External IP Address가 있게 되는걸까?


이 External IP Address와 관련있는 Pod의 위치(Pod가 구동된 Master Node 또는 Worker Node)와는 전혀 관련이 없다.

MetalLB는 External IP Address를 Worker Node의 특정 Ethernet Port에 할당할 때, 최대한 분산되도록 스케쥴링한다.

만약 MetalLB가 External IP를 worker-a에 이미 할당할 것이 있다면, 그 다음 External IP를 worker-a가 아닌 다른 Node에 위치하도록 구성한다. 즉, 이 External IP가 한쪽 Kubernetes Node에 몰려서 외부 트래픽이 한개의 Node에 집중되는 것을 막으려는 노력을 하는 것이다.


반응형

아래 문서를 따라 하면 SRIOV가 잘 동작한다.


16장. 하드웨어 네트워크 OpenShift Container Platform 4.10 | Red Hat Customer Portal

Access Red Hat’s knowledge, guidance, and support through your subscription.

access.redhat.com


위 Document는 app-netutil 라이브러리를 이용하여 DPDK, SRIOV를 사용하는 App 개발 및 확인하는 방법도 소개하고 있다.

따라서 SRIOV 관련 설정, App 테스트까지 모든 절차를 알고 싶다면, 위 문서를 읽는 것을 추천한다.


반응형


아래의 Go App을 Build해서 Kubernetes Worker Node에서 돌려보면,

각 Container가 사용하는 CPU Set(즉, Container App이 Pinning한 Core 정보), Memory Hugepages, Network 주소 및 PCI 정보를 알 수 있다.


https://github.com/openshift/app-netutil/tree/master/samples/go_app


GitHub - openshift/app-netutil: app-netutil is a library that provides API methods for applications to get pod network informati

app-netutil is a library that provides API methods for applications to get pod network information. - GitHub - openshift/app-netutil: app-netutil is a library that provides API methods for applicat...

github.com


그리고, 위 Repository에 DPDK example app container도 있으니까, DPDK 테스트할 때도 이용하면 좋다.


+ Recent posts