사람의 개입을 최소화하면서 OS를 자동 설치하는 절차를 설명하겠다.
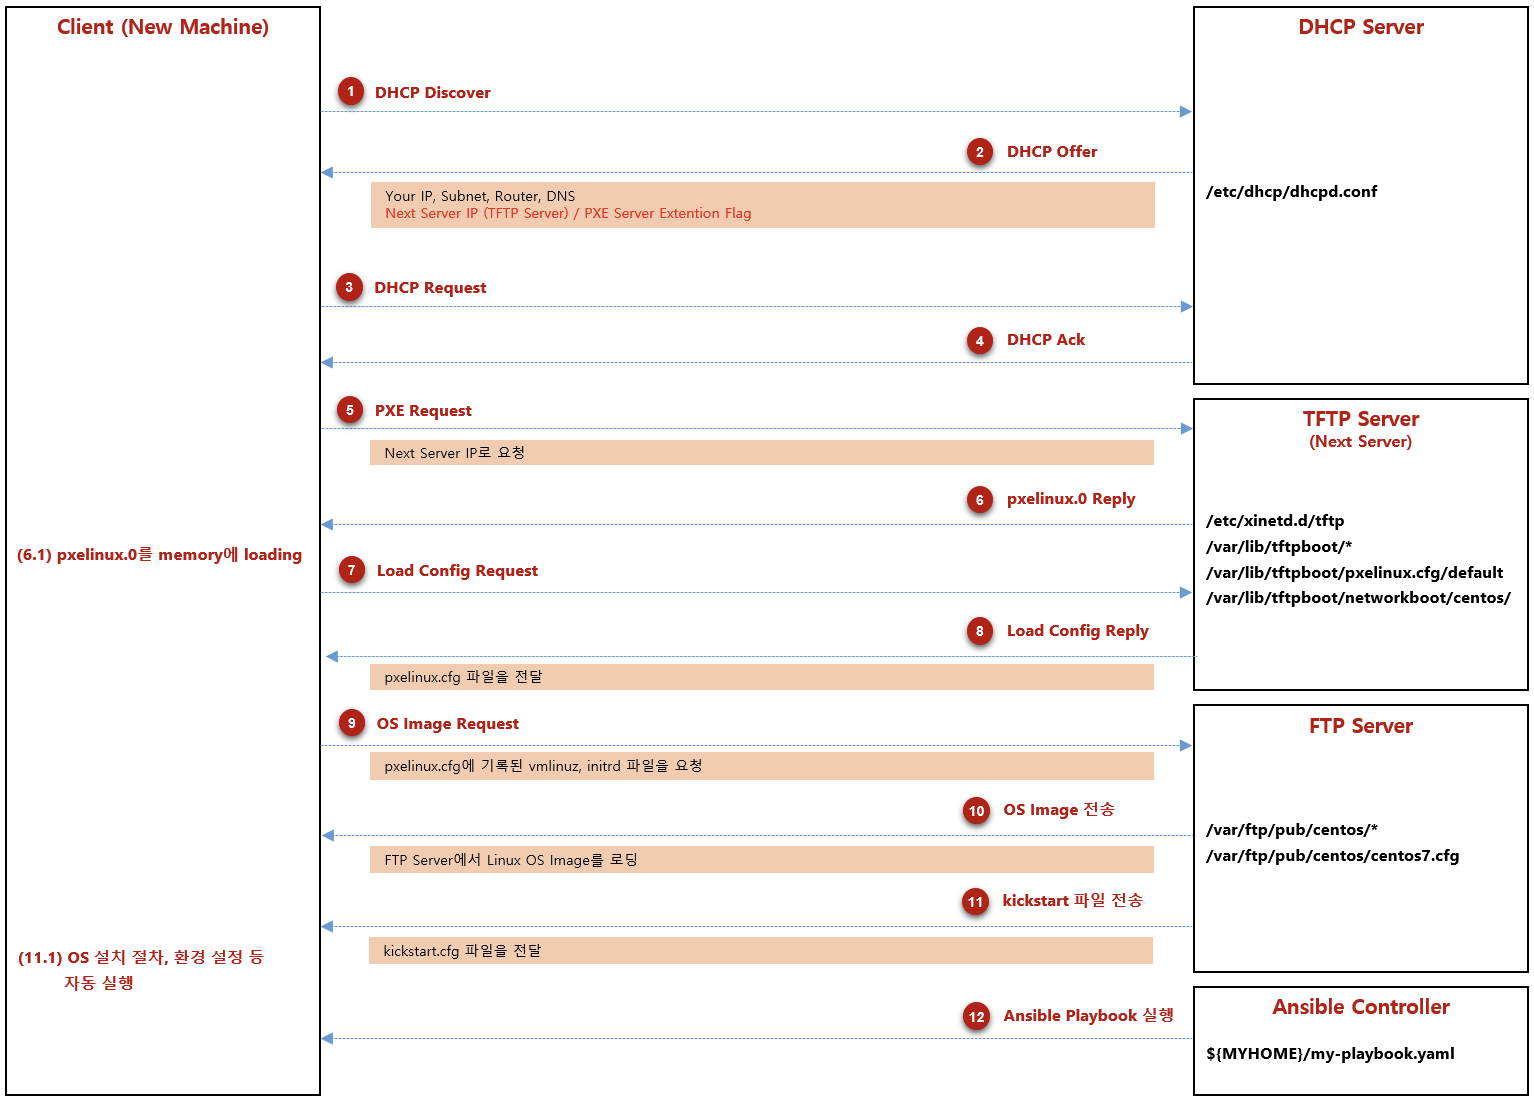
OS를 자동 설치하는 큰 흐름은 아래 그림과 같다.
OS 자동 설치 절차 개요
PXE 개념
PXE(Preboot Execution Environment)는 Network를 통해 OS Booting에 필요한 정보를 전달하기 위한 기술이다.
PXE를 동작시키기 위한 구성 요소
- Server 구성 요소
- DHCPD: DHCP Server 역할을 수행. Client Node에게 설정해줘야할 Network 구성 정보를 전달해준다.
- TFTP: Client의 PXE Boot image를 배포한다.
- FTP: PXE booting 이후, OS Image 및 SW PKG를 설치할 때 필요한 File을 배포한다.
- Kickstart: Client가 OS를 설치할 때, Kickstart 설정 파일을 읽어서 OS 설치 작업을 자동화한다. (Network 설정, 특정 PKG 설치 여부 결정, Account 생성, 인증서 복사 등)
- Client 구성 요소
- BIOS/NIC: BIOS에서 PXE boot를 지원해야 한다.
준비 작업 (Server Software PKG 설치 + 설정 파일 작성)
Server PKG 설치
$ yum install -y  dhcpd tftp ttfp-server xinetd vsftpd syslinux
$ systemctl enable --now dhcpd
$ systemctl enable --now tftp
$ systemctl enable --now xinetd
$ systemctl enable --now vsftpd
DHCPD Server 설정
$  cat /etc/dhcp/dhcpd.conf

...

allow booting;
allow bootp;
allow unknown-clients;

subnet 10.10.12.0 netmask 255.255.255.0 {
  range           10.10.12.64 10.10.12.79;
  option routers  10.10.12.1;
  option broadcast-address 10.10.12.255;
  option subnet-mask 255.255.255.0;
  option domain-name-servers 10.10.100.2;
  get-lease-hostnames true;
  next-server     10.10.12.33;              ## NOTE: TFTP Server 주소를 설정
  filename        "pxelinux.0";             ## NOTE: Boot Image 정보를 설정
}

...
TFTP Server 설정
$  cat  /etc/xinetd.d/tftp

service tftp
{
	socket_type		= dgram
	protocol		= udp
	wait			= yes
	user			= root
	server			= /usr/sbin/in.tftpd
	server_args		= -s /var/lib/tftpboot   ## NOTE: boot image file을 저장할 directory
	disable			= no                     ## NOTE: 'no'로 변경
	per_source		= 11
	cps			= 100 2
	flags			= IPv4
}
FTP Server 설정
## 모든 client가 vsftpd에 access하는 것을 허용하기 위한 설정
## (ID, Password 없이 FTP server에 access하는 것이 가능)

$  setsebool -P allow_ftpd_full_access 1
syslinux file 복사
##  Client에게 전달할 syslinux boot loader 파일을 TFTP 서버 폴더에 복사한다.

$  cp /usr/share/syslinux/pxelinux.0  /var/lib/tftpboot
$  cp /usr/share/syslinux/menu.c32    /var/lib/tftpboot
$  cp /usr/share/syslinux/memdisk     /var/lib/tftpboot
$  cp /usr/share/syslinux/mboot.c32   /var/lib/tftpboot
$  cp /usr/share/syslinux/chain.c32   /var/lib/tftpboot
PXE Menufile 작성
##  TFTP 서버의 /var/lib/tftpboot/pxelinux.cfg/default 파일에 아래와 같은 내용을 작성한다.

$  cat  /var/lib/tftpboot/pxelinux.cfg/default

default menu.c32
prompt 0
timeout 30

menu title Homelab PXE Menu

label centos7_x64
  menu label CentOS 7_X64
  kernel /networkboot/centos/vmlinuz
  append initrd=/networkboot/centos/initrd.img inst.repo=ftp://10.10.12.33/pub/centos ks=ftp://10.10.12.33/pub/centos/centos7.cfg
Linux OS image file 준비
##  FTP server에 Linux OS image file을 복사하는 절차

$  mkdir  /media/iso
$  mount  /myhome/CentOS-7-x86_64-2009.iso  /media/iso
$  mkdir  -p  /var/ftp/pub/centos
$  cp -r  /media/iso/*  /var/ftp/pub/centos/
## 준비 작업을 마무리했다면, FTP 서버에 접근 가능한지 아래와 같이 확인한다.
## (가능하면 Remote Node에서 테스트할 것)
$ curl ftp://x-node.hub.cncf/pub/centos/
-rw-r--r-- 1 0 0 14 Oct 29 2020 CentOS_BuildTag
drwxr-xr-x 3 0 0 35 Oct 26 2020 EFI
-rw-rw-r-- 1 0 0 227 Aug 30 2017 EULA
-rw-rw-r-- 1 0 0 18009 Dec 09 2015 GPL
drwxr-xr-x 2 0 0 43 Oct 26 2020 LiveOS
drwxr-xr-x 2 0 0 225280 Nov 04 2020 Packages
-rw-rw-r-- 1 0 0 1690 Dec 09 2015 RPM-GPG-KEY-CentOS-7
-rw-rw-r-- 1 0 0 1690 Dec 09 2015 RPM-GPG-KEY-CentOS-Testing-7
-r--r--r-- 1 0 0 2883 Nov 04 2020 TRANS.TBL
-rwxr-xr-x 1 0 0 1833 Nov 09 10:16 centos7-graphical-server.cfg
-rwxr-xr-x 1 0 0 1708 Nov 10 14:37 centos7-ok-11-10.cfg
-rwxr-xr-x 1 0 0 5462 Nov 11 10:16 centos7-ok-11-11-2nd.cfg
-rwxr-xr-x 1 0 0 3381 Nov 11 01:39 centos7-ok-11-11.cfg
-rwxr-xr-x 1 0 0 5633 Nov 11 16:14 centos7-ok-11-12.cfg
-rwxr-xr-x 1 0 0 5739 Nov 12 03:09 centos7.cfg
drwxr-xr-x 3 0 0 57 Oct 26 2020 images
drwxr-xr-x 2 0 0 198 Nov 02 2020 isolinux
drwxr-xr-x 2 0 0 4096 Nov 04 2020 repodata## TFTP server 저장소에 PXE kernel image file을 복사하는 절차
$ mkdir /var/lib/tftpboot/networkboot/centos
$ cp /var/ftp/pub/centos/images/pxeboot/{inird.img,vmlinuz} /var/lib/tftpboot/networkboot/centos/Kickstart Configuration File 작성
centos7.cfg 파일의 내용이 길어서 보기 어려울 수 있으나, 원래 OS 패키지에 기본 제공되는 centos7.cfg에 일부 내용만 수정하면 된다.
(참고: /root/centos7.cfg 같은 곳에 OS 배포판에서 제공하는 기본 kickstart configuration 파일이 있다)
$  cat  /var/ftp/pub/centos/centos7.cfg

## System authorization information

auth --enableshadow --passalgo=sha512

## Andrew
##  Use network installation
url --url="ftp://10.10.12.33/pub/centos/"

## Use graphical install
#graphical
text

## Run the Setup Agent on first boot
firstboot --enable
ignoredisk --only-use=vda

## Keyboard layouts
keyboard --vckeymap=us --xlayouts='us'

## System language
lang en_US.UTF-8

## Network information
network  --bootproto=dhcp --device=eth0 --nameserver=10.10.12.2,10.10.12.3 --noipv6 --activate

## Root user's password
## NOTE:  Run this command `openssl passwd -1 mysmilepass`
##        and use the result string as a password for user.
rootpw --iscrypted $1$HC34jk4576jk23j4kljk5l6jk2j345kj

## System services
services --disabled="chronyd"

## System timezone
timezone Asia/Seoul --isUtc --nontp

## NOTE:  Run this command `openssl passwd -1 myhappypass`
##        and use the result string as a password for user.
user --groups=wheel --name=sejong --password=$1$HC34jk4576jk23j4kljk5l6jk2j345kj --iscrypted --uid=1000 --gecos="sejong" --gid=1000

## X Window System configuration information
#xconfig  --startxonboot

## System bootloader configuration
bootloader --append=" crashkernel=auto" --location=mbr --boot-drive=vda
autopart --type=lvm

## Partition clearing information
clearpart --all --initlabel --drives=vda

## Install software application
%packages
@^minimal
@base
@core
kexec-tools
net-tools
chrony
%end

## Enable KDUMP
%addon com_redhat_kdump --enable --reserve-mb='auto'
%end

## Policy of user password
%anaconda
pwpolicy root --minlen=6 --minquality=1 --notstrict --nochanges --notempty
pwpolicy user --minlen=6 --minquality=1 --notstrict --nochanges --emptyok
pwpolicy luks --minlen=6 --minquality=1 --notstrict --nochanges --notempty
%end


##
## NOTE (By Andrew)
##  Refer to  https://docs.centos.org/en-US/centos/install-guide/Kickstart2/#sect-kickstart-postinstall
##
%post --interpreter=/bin/bash

## NOTE (By Andrew)
myhostname=$(nslookup  $(hostname -I | awk '{print $1}') 10.10.12.30 | awk '{print $4}' |  cut -d '.' -f1)
hostname $myhostname
echo $myhostname > /etc/hostname

## Add authorized_keys for root user
mkdir  --mode=0700 /root/.ssh

cat << EOF > /root/.ssh/authorized_keys
ssh-rsa AAAAB3NzaC1yaskdjfkjk34634jkdkfjg.....= sejong@MacBook-Pro.local
EOF

chown  -R root:root  /root/.ssh
chmod  0600  /root/.ssh/authorized_keys

## Add authorized_keys for sejong user
mkdir  --mode=0700 /home/sejong/.ssh

cat << EOF > /home/sejong/.ssh/authorized_keys
ssh-rsa AAAAB3NzaC1yaskdjfkjk34634jkdkfjg.....= sejong@MacBook-Pro.local
EOF

chown  -R sejong:sejong  /home/sejong/.ssh
chmod  0600  /home/sejong/.ssh/authorized_keys

##
## Install Docker, Kubernetes
##
modprobe br_netfilter

cat <<EOF | tee /etc/modules-load.d/k8s.conf
br_netfilter
EOF

cat <<EOF | tee /etc/sysctl.d/k8s.conf
net.bridge.bridge-nf-call-ip6tables = 1
net.bridge.bridge-nf-call-iptables = 1
EOF

sysctl --system

## disable swap space
sed -i '/swap/d' /etc/fstab
swapoff -a

## disable firewalld
systemctl stop firewalld
systemctl disable firewalld

## Install Docker container runtime
yum install -y yum-utils
yum-config-manager  --add-repo  https://download.docker.com/linux/centos/docker-ce.repo
yum install -y docker-ce docker-ce-cli containerd.io
systemctl  enable  docker
systemctl  start   docker

mkdir -p /etc/docker
cat <<EOF | tee /etc/docker/daemon.json
{
  "exec-opts": ["native.cgroupdriver=systemd"],
  "log-driver": "json-file",
  "log-opts": {
    "max-size": "100m"
  },
  "storage-driver": "overlay2",
  "insecure-registries": ["myhost.cncf:8080", "yourhost.cncf:8080"]
}
EOF

systemctl daemon-reload
systemctl restart docker

## Install kubeadm, kubelete
cat <<EOF | tee /etc/yum.repos.d/kubernetes.repo
[kubernetes]
name=Kubernetes
baseurl=https://packages.cloud.google.com/yum/repos/kubernetes-el7-\$basearch
enabled=1
gpgcheck=1
repo_gpgcheck=1
gpgkey=https://packages.cloud.google.com/yum/doc/yum-key.gpg https://packages.cloud.google.com/yum/doc/rpm-package-key.gpg
exclude=kubelet kubeadm kubectl
EOF

setenforce 0
sed  -i 's/^SELINUX=enforcing$/SELINUX=permissive/' /etc/selinux/config
yum  install  -y kubelet kubeadm kubectl  --disableexcludes=kubernetes
systemctl enable --now kubelet

chmod +x /etc/rc.d/rc.local
systemctl enable --now  rc-local.service

echo "END OF POST-SCRIPT" > /root/kickstart.log

%end


## Andrew
##  reboot after finishing installation
reboot
Ansible Playbook 작성 (Option)
만약, kickstart configration만으로 OS 초기화/설정하기 어려운 복잡한 Job이 있다면, 아래 예시처럼 Ansible playbook을 작성해서 좀 더 복잡하고 지능적인 처리가 가능하다.
## playbook-kube-cluster-join.yaml

- name: Joining Job Step 1 on Master node
  hosts: kubemaster
  tasks:
    - name: Generate join command
      command: kubeadm token create --print-join-command
      register: join_command
    - name: Copy join command to local file
      local_action: copy content="{{ join_command.stdout_lines[0] }}" dest="./join-command"

- name: Joining Job Step 2 on Worker node
  hosts: kubeworker
  tasks:
    - name: Copy the join command to server location
      copy: src=join-command dest=/tmp/join-command.sh mode=0777
    - name: Join the node to cluster
      command: sh /tmp/join-command.sh
준비 작업은 끝났다.
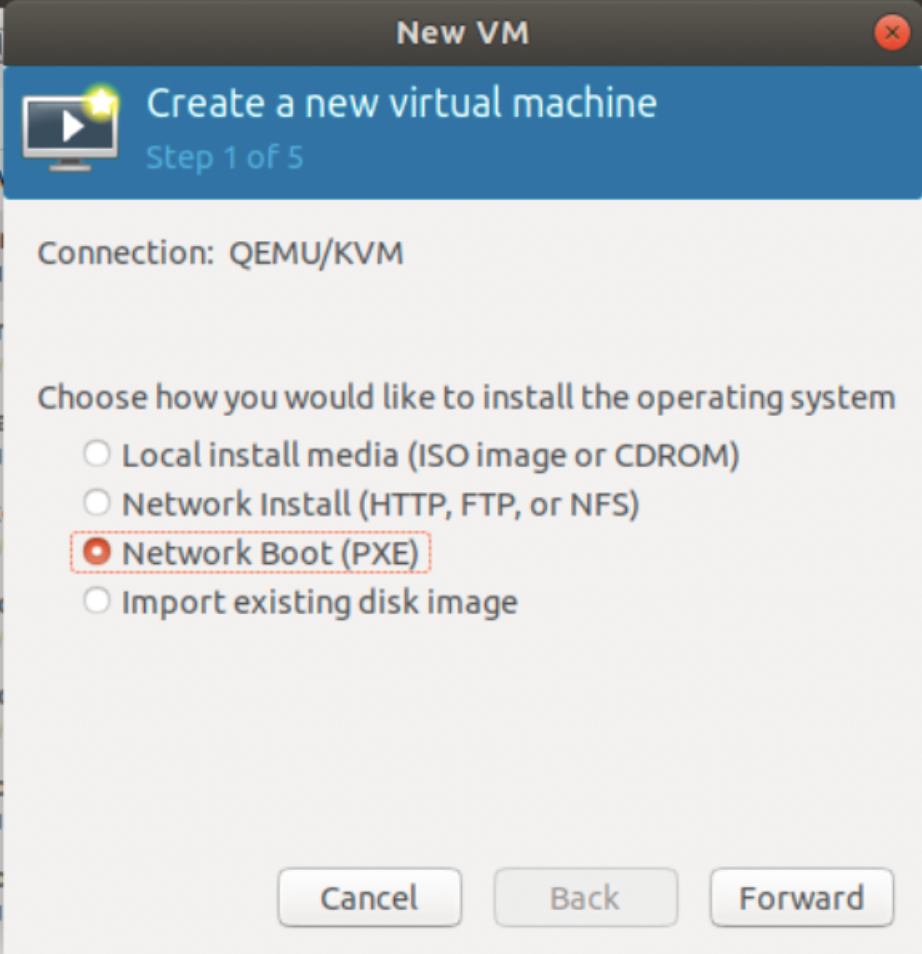
공장 초기화된 컴퓨터, 또는 VirtualBox 프로그램, 또는 KVM/Qemu의 Virtual Manager로 아래 예제처럼 Machine Start만 하면 된다.
OS 자동 설치 실행
나는 KVM/Qemu + Virtual Manager 조합으로 VM을 만드는 것을 좋아하기 때문에 KVM을 예시로 들었다.
Hypervisor는 어떤 것을 사용하든 PXE로 부팅하는 기능은 동일하기 때문에, 다른 Hypervisor를 사용하더라도 아래 절차는 비슷하다.
깡통 컴퓨터의 Booting Option 메뉴에서 또는 VM을 새로 생성하면서 PXE 옵션을 선택한다.
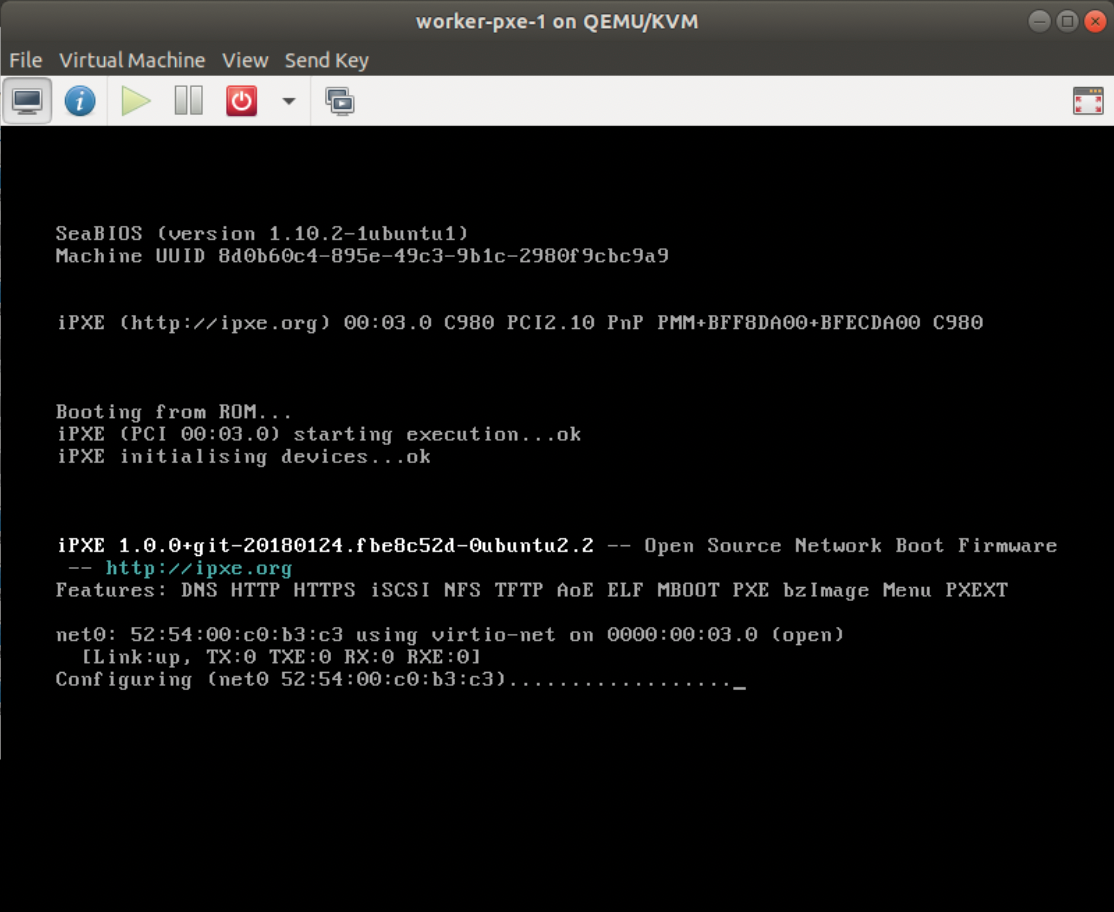
위와 같이 PXE boot 옵션을 선택 후, booting을 시도하면 아래 화면처럼 DHCP 서버에서 Network 주소 및 TFTP 정보를 가져와서 TFTP에서 boot image file을 가져온다. 이후부터는 자동으로 OS를 설치하고, kickstart confiration file에 있는 OS 설정 작업을 자동 수행한다.
Reference
'청년정신'님이 2019년 4월에 작성한 'PXE 기반의 CentOS 자동 구축' 블로그가 제일 잘 정리된 글 같다.
PXE 기반의 CentOS 설치 1부
CentOS 강좌 PART 2. 10 PXE기반의 CentOS 서버 자동 구축 1편
CentOS 강좌 PART 2. 10 PXE기반의 CentOS 서버 자동 구축 1편 [ PXE 개념 소개 및 구성요소 ] PXE (Preboot Excution Environment) 기반의 운영체제 자동설치 방법은 앞서 강좌에서 소개한 다양한 서버 구축 기..
youngmind.tistory.com
PXE 기반의 CentOS 설치 2부
CentOS 강좌 PART 2. 10 PXE기반의 CentOS 서버 자동 구축 2편
CentOS 강좌 PART 2. 10 PXE기반의 CentOS 서버 자동 구축 2편 "CentOS 강좌 PART 2. 10 PXE기반의 CentOS 서버 자동 구축 1편" 에 이어서… 10. KickStart 구성 먼저 kickstart 파일을 구성한다. Kickstart 파일..
youngmind.tistory.com
추가로, CentOS를 kickstart를 이용해서 자동 설치하려는 경우라면, 아래 Install guide를 참고하면 좋다.
Kickstart Installations :: CentOS Docs Site
Kickstart installations offer a means to automate the installation process, either partially or fully. Kickstart files contain answers to all questions normally asked by the installation program, such as what time zone you want the system to use, how the d
docs.centos.org
'CentOS' 카테고리의 다른 글
| OpenStack, OCI, AWS 에서 VM Instance를 위한 UserData 설정 (init-cloud 스크립트) (0) | 2022.06.21 |
|---|---|
| Install Ansible AWX (version 17.1.0) (0) | 2021.11.16 |
| How to use Ansible and Playbook (0) | 2021.11.12 |
| Samba(SMB) on CentOS (0) | 2021.07.10 |
| Network config on CentOS 8 (0) | 2021.07.10 |