반응형


Ubuntu OS를 설치한 후, Network 구성을 바꿀 때 nmtui, netplan, nm-connection-editor 등 CLI 명령을 사용하면 쉽게 network 구성을 설정할 수 있다.


nmtui 명령

메모: 지금은 바빠서 설명을 생략.  나중에 내용을 추가할 것 !!
$ nmtui

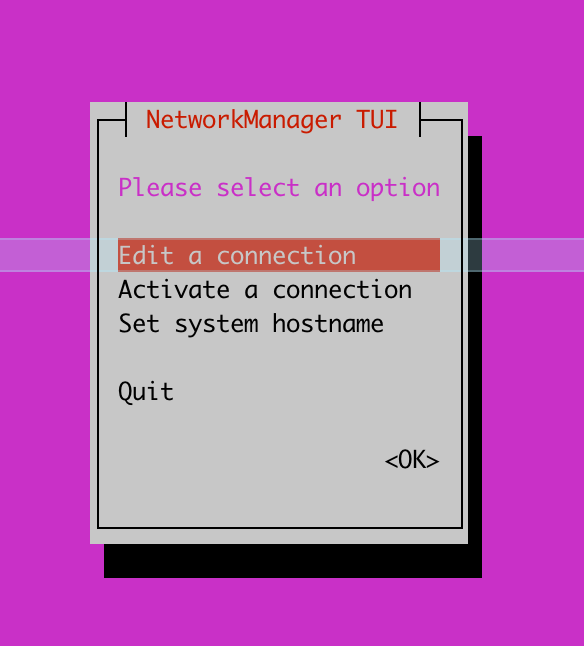
Text Terminal에서 위 명령을 수행하면, 아래와 같이 동일 Text Terminal에서 TUI가 뜬다.

nmtui 시작 화면


netplan 명령

길게 설명하는 것보다는 아래 예시를 보고 이해하고 따라하는 것이 좋을 듯 ~~~


Case A:
만약 Gnome Desktop GUI의 [ Settings ] - [ Network ] - [ Wired ] 화면에서 설정하고 싶으면,
아래와 같이 renderer를 NetworkManager로 지정하고 아무것도 설정하지 않으면 된다.
그러면 NetworkManager가 알아서 Physical Network Device를 찾아서 Profiling할 것이다.


$  cat  /etc/netplan/00-installer-config.yaml

network:
    renderer: NetworkManager
    version: 2
    
$  netplan  apply


Case B:
만약 Gnome Desktop GUI의 [ Settings ] - [ Network ] - [ Wired ] 화면에서 설정한 값을 무시하고
설정 파일에 있는 Network Config를 적용하고 싶다면, 
아래와 같이 renderer를 networkd 로 지정한다. 그런 후에 원하는 설정을 추가한다.
$  cat  /etc/netplan/00-installer-config.yaml

network:
    renderer: networkd
    version: 2
    ethernets:
        enp4s0:
            addresses:
                - 0.0.0.0/32
        br-ex:
            addresses:
                - 10.1.3.166/24
            nameservers:
                addresses: [8.8.8.8, 8.8.4.4]
            routes:
                - to: default
                  via: 10.1.3.1
        br-ex:                  
            dhcp4: true
 
$  netplan apply

## 설정 파일(YAML)에 에러가 없으면, 아무것도 출력하지 않는다.

$


nm-connection-editor 명령

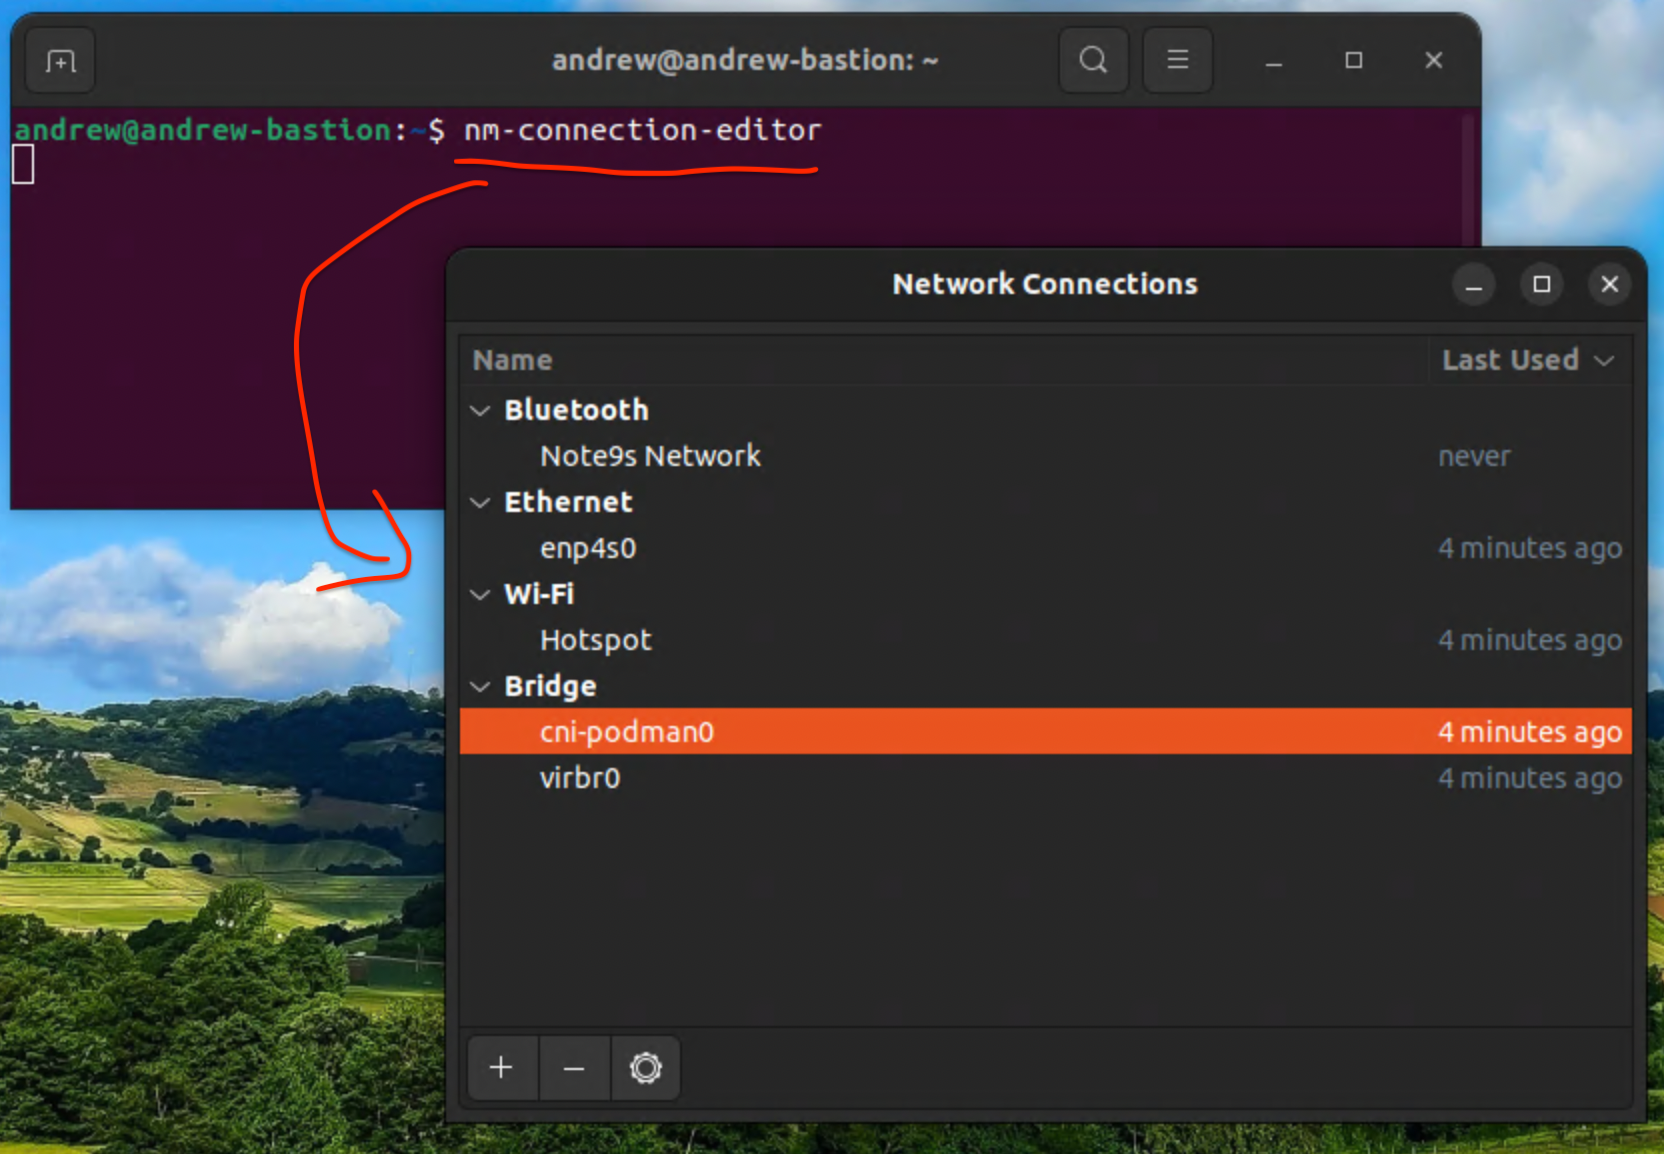
SSH로 접속한 Text Terminal에서는 실행하면 안 되고, 원격 데스크탑(Remote Desktop)으로 접속했거나 Console Monitor를 사용한 경우에만 nm-connection-editor가 동작한다.


nm-connection-editor 시작 화면


게시물 작성자: sejong.jeonjo@gmail.com


반응형

Go Language로 특정 Process의 CPU, Memory 사용량을 계산하고 싶다면,

아래의 코드를 Build해서 사용하면 된다.


참고: Linux, MacOS, Unix, Windows 모두 동작하는 코드임.


// Filename: proc_usage.go

package main

import (
	"errors"
	"fmt"
	"io/ioutil"
	"math"
	"os/exec"
	"path"
	"runtime"
	"strconv"
	"strings"
	"sync"
)

const (
	statTypePS   = "ps"
	statTypeProc = "proc"
)

// SysInfo will record cpu and memory data
type SysInfo struct {
	CPU    float64
	Memory float64
}

// Stat will store CPU time struct
type Stat struct {
	utime  float64
	stime  float64
	cutime float64
	cstime float64
	start  float64
	rss    float64
	uptime float64
}

type fn func(int) (*SysInfo, error)

var fnMap map[string]fn
var platform string
var history map[int]Stat
var historyLock sync.Mutex
var eol string

// Linux platform
var clkTck float64 = 100    // default
var pageSize float64 = 4096 // default

func init() {
	platform = runtime.GOOS
	if eol = "\n"; strings.Index(platform, "win") == 0 {
		platform = "win"
		eol = "\r\n"
	}
	history = make(map[int]Stat)
	fnMap = make(map[string]fn)
	fnMap["darwin"] = wrapper("ps")
	fnMap["sunos"] = wrapper("ps")
	fnMap["freebsd"] = wrapper("ps")
	fnMap["openbsd"] = wrapper("proc")
	fnMap["aix"] = wrapper("ps")
	fnMap["linux"] = wrapper("proc")
	fnMap["netbsd"] = wrapper("proc")
	fnMap["win"] = wrapper("win")

	if platform == "linux" || platform == "netbsd" || platform == "openbsd" {
		initProc()
	}
}

func initProc() {
	clkTckStdout, err := exec.Command("getconf", "CLK_TCK").Output()
	if err == nil {
		clkTck = parseFloat(formatStdOut(clkTckStdout, 0)[0])
	}

	pageSizeStdout, err := exec.Command("getconf", "PAGESIZE").Output()
	if err == nil {
		pageSize = parseFloat(formatStdOut(pageSizeStdout, 0)[0])
	}

}

func wrapper(statType string) func(pid int) (*SysInfo, error) {
	return func(pid int) (*SysInfo, error) {
		return stat(pid, statType)
	}
}

func formatStdOut(stdout []byte, userfulIndex int) []string {
	infoArr := strings.Split(string(stdout), eol)[userfulIndex]
	ret := strings.Fields(infoArr)
	return ret
}

func parseFloat(val string) float64 {
	floatVal, _ := strconv.ParseFloat(val, 64)
	return floatVal
}

func statFromPS(pid int) (*SysInfo, error) {
	sysInfo := &SysInfo{}
	args := "-o pcpu,rss -p"
	if platform == "aix" {
		args = "-o pcpu,rssize -p"
	}
	stdout, _ := exec.Command("ps", args, strconv.Itoa(pid)).Output()
	ret := formatStdOut(stdout, 1)
	if len(ret) == 0 {
		return sysInfo, errors.New("Can't find process with this PID: " + strconv.Itoa(pid))
	}
	sysInfo.CPU = parseFloat(ret[0])
	sysInfo.Memory = parseFloat(ret[1]) * 1024
	return sysInfo, nil
}

func statFromProc(pid int) (*SysInfo, error) {
	sysInfo := &SysInfo{}
	uptimeFileBytes, err := ioutil.ReadFile(path.Join("/proc", "uptime"))
	if err != nil {
		return nil, err
	}
	uptime := parseFloat(strings.Split(string(uptimeFileBytes), " ")[0])

	procStatFileBytes, err := ioutil.ReadFile(path.Join("/proc", strconv.Itoa(pid), "stat"))
	if err != nil {
		return nil, err
	}
	splitAfter := strings.SplitAfter(string(procStatFileBytes), ")")

	if len(splitAfter) == 0 || len(splitAfter) == 1 {
		return sysInfo, errors.New("Can't find process with this PID: " + strconv.Itoa(pid))
	}
	infos := strings.Split(splitAfter[1], " ")
	stat := &Stat{
		utime:  parseFloat(infos[12]),
		stime:  parseFloat(infos[13]),
		cutime: parseFloat(infos[14]),
		cstime: parseFloat(infos[15]),
		start:  parseFloat(infos[20]) / clkTck,
		rss:    parseFloat(infos[22]),
		uptime: uptime,
	}

	_stime := 0.0
	_utime := 0.0

	historyLock.Lock()
	defer historyLock.Unlock()

	_history := history[pid]

	if _history.stime != 0 {
		_stime = _history.stime
	}

	if _history.utime != 0 {
		_utime = _history.utime
	}
	total := stat.stime - _stime + stat.utime - _utime
	total = total / clkTck

	seconds := stat.start - uptime
	if _history.uptime != 0 {
		seconds = uptime - _history.uptime
	}

	seconds = math.Abs(seconds)
	if seconds == 0 {
		seconds = 1
	}

	history[pid] = *stat
	sysInfo.CPU = (total / seconds) * 100
	sysInfo.Memory = stat.rss * pageSize
	return sysInfo, nil
}

func stat(pid int, statType string) (*SysInfo, error) {
	switch statType {
	case statTypePS:
		return statFromPS(pid)
	case statTypeProc:
		return statFromProc(pid)
	default:
		return nil, fmt.Errorf("Unsupported OS %s", runtime.GOOS)
	}
}

// GetStat will return current system CPU and memory data
func GetStat(pid int) (*SysInfo, error) {
	sysInfo, err := fnMap[platform](pid)
	return sysInfo, err
}


// Filename: main.go

package main

import (
    "os"
    "fmt"
    "time"
    "strconv"
)

func main() {
    myPid, _ := strconv.Atoi(os.Args[1])

    for i:= 0; i < 100; i++ {
        sysInfo, _ := GetStat(myPid)
        fmt.Println("CPU Usage     :", sysInfo.CPU)
        fmt.Println("Mem Usage(RSS):", sysInfo.Memory)
        time.Sleep(5 * time.Second)
    }
}


위와 같이 Go source code를 모두 작성했다면, 아래처럼 build하고 실행하면 된다.


$ go mod init andrew.space/proc_usage
go: creating new go.mod: module andrew.space/proc_usage
go: to add module requirements and sums:
	go mod tidy
    
$ go mod tidy

$ go build

$ ./proc_usage 4314
CPU Usage     : 52.92167225853122
Mem Usage(RSS): 2.018664448e+09
CPU Usage     : 39.800000000000004
Mem Usage(RSS): 2.018664448e+09
CPU Usage     : 47.30538922366738
Mem Usage(RSS): 2.018664448e+09
...
...


top 명령으로 본 것과 결과가 동일했다.

반응형

시스템 알람을 발생시키는 테스트를 하거나 Kubernetes의 Horizontal Pod Autoscaler 기능 테스트를 할 때,

CPU 부하를 발생시키는 명령 도구가 있으면 편하다.

아래와 같이 설치하고 테스트하면 된다. (설명은 생략하고, 그냥 따라해보자~)


##
## 설치
##

$ yum install -y stress

$ stress --help
...

##
## 30초 동안 3000ms의 CPU 과부하를 유발하기.
##
$ stress --cpu 3 --timeout 30s

##
## 500MB의 메모리 과부하를 유발하기
##  --vm : Worker 개수
##  --vm-hang : malloc 실행 후 free하기 전까지 sleep할 시간(초)
##
$ stress --vm 1 --vm-bytes 500M --vm-hang 1


블로그 작성자: sejong.jeonjo@gmail.com


반응형


작성일: 2024년 2월 16일


프로그래밍을 하다보면, 시간 값으로 "1697180099.123" 이런 형태의 값을 많이 보게된다.

이런 형태의 시간 값을 unix time 또는 epoch time이라고 한다.


1970년 1월 1일 0시 0분 0초를 Unix epoch라고 정의한다.

그리고 이 Unix epoch 이후부터 흐른 시간(초)를 표현한 것이 unix time(epoch time)이다.


그런데 이 Unix time은 컴퓨터가 다루기 좋은 형태일 뿐, 사람은 이 숫자(unix time)를 봐도 몇월 며칠 몇시인지 알 수 없다.

이럴 때 편하게 unix time을 우리가 읽을 수 있는 날짜 형태로 바꾸어는 웹 페이지가 있다.

아래 웹 페이지에서 unix time을 입력하면 사람이 읽기 좋은 형태로 바꾸어준다. 그 반대의 경우가 제공한다.


Epoch Converter

Convert Unix Timestamps (and many other date formats) to regular dates.

www.epochconverter.com


또는 Linux 명령어 중에 date 명령으로도 쉽게 날짜 형태를 바꿀 수 있다.


$  date -d @1657180059
Thu 07 Jul 2022 04:47:39 PM KST

$  date --date=@0
Thu 01 Jan 1970 09:00:02 AM KST


반응형


구성 환경


Host OS: Ubuntu

Hypervisor: KVM

VM(Guest): CentOS, Ubuntu, CoreOS 등 (Linux 계열)


우선 아래의 Web Docs를 보고 설정 및 테스트해보고, 잘 동작하면 여기에 테스트한 내용을 기록할 예정이다.


https://help.ubuntu.com/community/KVM%20-%20Using%20Hugepages


KVM - Using Hugepages - Community Help Wiki

Introduction The computer memory is divided in pages. The standard page size on most systems is 4KB. To keep track on what information is stored in which page, the system uses a page table. Searching in this page table is (in computer terms) a time costly

help.ubuntu.com


블로그 작성자: sejong.jeonjo@gmail.com


반응형


Host OS가 Ubuntu 20.04이고, 이 Host에 KVM을 설치했다.

그리고 이 KVM에서 PCI passthrough를 사용하는 방법을 정리해봤다.


참고: 이론적인 내용은 아래 블로그가 아주 쉽게 설명하고 있다.

https://www.nepirity.com/blog/kvm-gpu-passthrough/


KVM 기반의 GPU Passthrough 환경 - 네피리티

KVM 기반의 GPU Passthrough 환경 KVM 기반의 Hypervisor 에서 하드웨어 장치를 직접 Virtual Machine에게 할당하는 PassThrough 를 소개하고 환경 설정 방법에 대해서 설명드리도록 하겠습니다. PCI Passthrough는 NIC,

www.nepirity.com


PCI passthrough 사용을 위한 Host OS 설정


PCI passthrough를 사용하기 위해 아래 명령과 같이 Host OS를 설정한다.


##
## Grub 설정
##

$  cat /etc/default/grub

... 중간 생략 ...

GRUB_CMDLINE_LINUX_DEFAULT="quiet splash intel_iommu=on intel_iommu=igfx_off iommu=pt vfio-pci.ids=8086:1572"

... 중간 생략 ...

$  reboot

...
...
...


##
## Host OS가 Booting 되면, 아래와 같이 PCI에 관한 로그를 확인한다. "iommu=pt" 설정 확인
##

$  dmesg | grep -i vfio
[    0.000000] Command line: BOOT_IMAGE=/vmlinuz-5.4.0-94-generic root=UUID=7824a9ea-e59b-4796-9e23-75e3d909a001 ro quiet splash intel_iommu=on intel_iommu=igfx_off iommu=pt vfio-pci.ids=8086:1572 vt.handoff=7
[    4.136218] Kernel command line: BOOT_IMAGE=/vmlinuz-5.4.0-94-generic root=UUID=7824a9ea-e59b-4796-9e23-75e3d909a001 ro quiet splash intel_iommu=on intel_iommu=igfx_off iommu=pt vfio-pci.ids=8086:1572 vt.handoff=7
[   10.734658] VFIO - User Level meta-driver version: 0.3
[   10.814142] vfio_pci: add [8086:1572[ffffffff:ffffffff]] class 0x000000/00000000

...
...
...


$  lspci -k

... 중간 생략 ...

12:00.0 Ethernet controller: Intel Corporation Ethernet Controller X710 for 10GbE SFP+ (rev 02)
        Subsystem: Hewlett-Packard Company Ethernet 10Gb 2-port 562SFP+ Adapter
        Kernel driver in use: vfio-pci
        Kernel modules: i40e
12:00.1 Ethernet controller: Intel Corporation Ethernet Controller X710 for 10GbE SFP+ (rev 02)
        Subsystem: Hewlett-Packard Company Ethernet 10Gb 562SFP+ Adapter
        Kernel driver in use: vfio-pci
        Kernel modules: i40e

... 중간 생략 ...

$


PCI passthrough 사용을 위한 KVM 설정


##
## PCI passthrough할 NIC이 x710 드라이버를 사용한다고 가정하고
## 아래 설정 절차를 진행했다.
##

$  lspci | grep -i x710
12:00.0 Ethernet controller: Intel Corporation Ethernet Controller X710 for 10GbE SFP+ (rev 02)
12:00.1 Ethernet controller: Intel Corporation Ethernet Controller X710 for 10GbE SFP+ (rev 02)
af:00.0 Ethernet controller: Intel Corporation Ethernet Controller X710 for 10GbE SFP+ (rev 02)
af:00.1 Ethernet controller: Intel Corporation Ethernet Controller X710 for 10GbE SFP+ (rev 02)
$

##
## 위 출력된 내용 중에서 왼쪽 컬럼의 
##  12:00.0 
##  12:00.1
##  af:00.0
##  af:00.1
## 이 값을 이용하여 아래와 같이 KVM이 관리하는 device list를 확인한다.
##
##  참고:
##    nodedev-list로 출력된 device들은 모든 VM에서 공유해서 사용하는 device이므로
##    특정 VM에서 PCI device를 독점적으로 점유하려면, 아래 device를 KVM에서 detach하고
##    특정 VM의 HW에 아래 PCI device를 추가해주어야 PCI passthrough 효과를 얻을 수 있다.
##

$  virsh nodedev-list | grep 12_00
pci_0000_12_00_0
pci_0000_12_00_1
$  virsh nodedev-list | grep af_00
pci_0000_af_00_0
pci_0000_af_00_1
$

##
## PCI 슬롯 번호로 host에 등록된 PCI장비의 이름을 확인후 이 이름을 바탕으로 device 상제 정보를 확인한다.
## 아래 출력 내용 중에서 bus, slot, function 번호 확인 => KVM에서 VM의 device 추가할 때 필요하다.
##


root@bmt:~# virsh nodedev-dumpxml pci_0000_12_00_0
<device>
  <name>pci_0000_12_00_0</name>
  <path>/sys/devices/pci0000:11/0000:11:00.0/0000:12:00.0</path>
  <parent>pci_0000_11_00_0</parent>
  <driver>
    <name>vfio-pci</name>
  </driver>
  <capability type='pci'>
    <class>0x020000</class>
    <domain>0</domain>
    <bus>18</bus>
    <slot>0</slot>
    <function>0</function>
    <product id='0x1572'>Ethernet Controller X710 for 10GbE SFP+</product>
    <vendor id='0x8086'>Intel Corporation</vendor>
    <capability type='virt_functions' maxCount='64'/>
    <iommuGroup number='38'>
      <address domain='0x0000' bus='0x12' slot='0x00' function='0x0'/>
    </iommuGroup>
    <numa node='0'/>
    <pci-express>
      <link validity='cap' port='0' speed='8' width='8'/>
      <link validity='sta' speed='8' width='8'/>
    </pci-express>
  </capability>
</device>


root@bmt:~# virsh nodedev-dumpxml pci_0000_12_00_1
<device>
  <name>pci_0000_12_00_1</name>
  <path>/sys/devices/pci0000:11/0000:11:00.0/0000:12:00.1</path>
  <parent>pci_0000_11_00_0</parent>
  <driver>
    <name>vfio-pci</name>
  </driver>
  <capability type='pci'>
    <class>0x020000</class>
    <domain>0</domain>
    <bus>18</bus>
    <slot>0</slot>
    <function>1</function>
    <product id='0x1572'>Ethernet Controller X710 for 10GbE SFP+</product>
    <vendor id='0x8086'>Intel Corporation</vendor>
    <capability type='virt_functions' maxCount='64'/>
    <iommuGroup number='39'>
      <address domain='0x0000' bus='0x12' slot='0x00' function='0x1'/>
    </iommuGroup>
    <numa node='0'/>
    <pci-express>
      <link validity='cap' port='0' speed='8' width='8'/>
      <link validity='sta' speed='8' width='8'/>
    </pci-express>
  </capability>
</device>


root@bmt:~# virsh nodedev-dumpxml pci_0000_af_00_0
<device>
  <name>pci_0000_af_00_0</name>
  <path>/sys/devices/pci0000:ae/0000:ae:00.0/0000:af:00.0</path>
  <parent>pci_0000_ae_00_0</parent>
  <driver>
    <name>vfio-pci</name>
  </driver>
  <capability type='pci'>
    <class>0x020000</class>
    <domain>0</domain>
    <bus>175</bus>
    <slot>0</slot>
    <function>0</function>
    <product id='0x1572'>Ethernet Controller X710 for 10GbE SFP+</product>
    <vendor id='0x8086'>Intel Corporation</vendor>
    <capability type='virt_functions' maxCount='64'/>
    <iommuGroup number='151'>
      <address domain='0x0000' bus='0xaf' slot='0x00' function='0x0'/>
    </iommuGroup>
    <pci-express>
      <link validity='cap' port='0' speed='8' width='8'/>
      <link validity='sta' speed='8' width='8'/>
    </pci-express>
  </capability>
</device>


root@bmt:~# virsh nodedev-dumpxml pci_0000_af_00_1
<device>
  <name>pci_0000_af_00_1</name>
  <path>/sys/devices/pci0000:ae/0000:ae:00.0/0000:af:00.1</path>
  <parent>pci_0000_ae_00_0</parent>
  <driver>
    <name>vfio-pci</name>
  </driver>
  <capability type='pci'>
    <class>0x020000</class>
    <domain>0</domain>
    <bus>175</bus>
    <slot>0</slot>
    <function>1</function>
    <product id='0x1572'>Ethernet Controller X710 for 10GbE SFP+</product>
    <vendor id='0x8086'>Intel Corporation</vendor>
    <capability type='virt_functions' maxCount='64'/>
    <iommuGroup number='152'>
      <address domain='0x0000' bus='0xaf' slot='0x00' function='0x1'/>
    </iommuGroup>
    <pci-express>
      <link validity='cap' port='0' speed='8' width='8'/>
      <link validity='sta' speed='8' width='8'/>
    </pci-express>
  </capability>
</device>


##
## Host에서 위의 PCI Device를 detach한다.
##   참고: Host에 Attach된 nodedev는 VM에 Mount가 불가능하여 Detach해야 한다.
##        즉, 특정 VM에서만 위 PCI 장치를 전용해서 사용해야 하기 때문에
##        다수의 VM이 위 PCI 장비를 공유하지 못하도록 싹을 뽑아 버린다고 생각하면 된다.
##

$  virsh nodedev-detach pci_0000_12_00_0
Device pci_0000_12_00_0 detached

$  virsh nodedev-detach pci_0000_12_00_1
Device pci_0000_12_00_1 detached


위와 같이 KVM에서 Host 머신의 PCI 장치를 Detach했으면, 아래 KVM Virtual Manager 화면에서

특정 Virtual Machine 의 설정 화면을 열어본다.

그리고 이 Virtual Machine에 PCI Device를 추가한다. (아래 화면의 설정 순서를 따라할 것!!!) 


KVM Virt-Manager 에서 특정 VM의 HW 설정


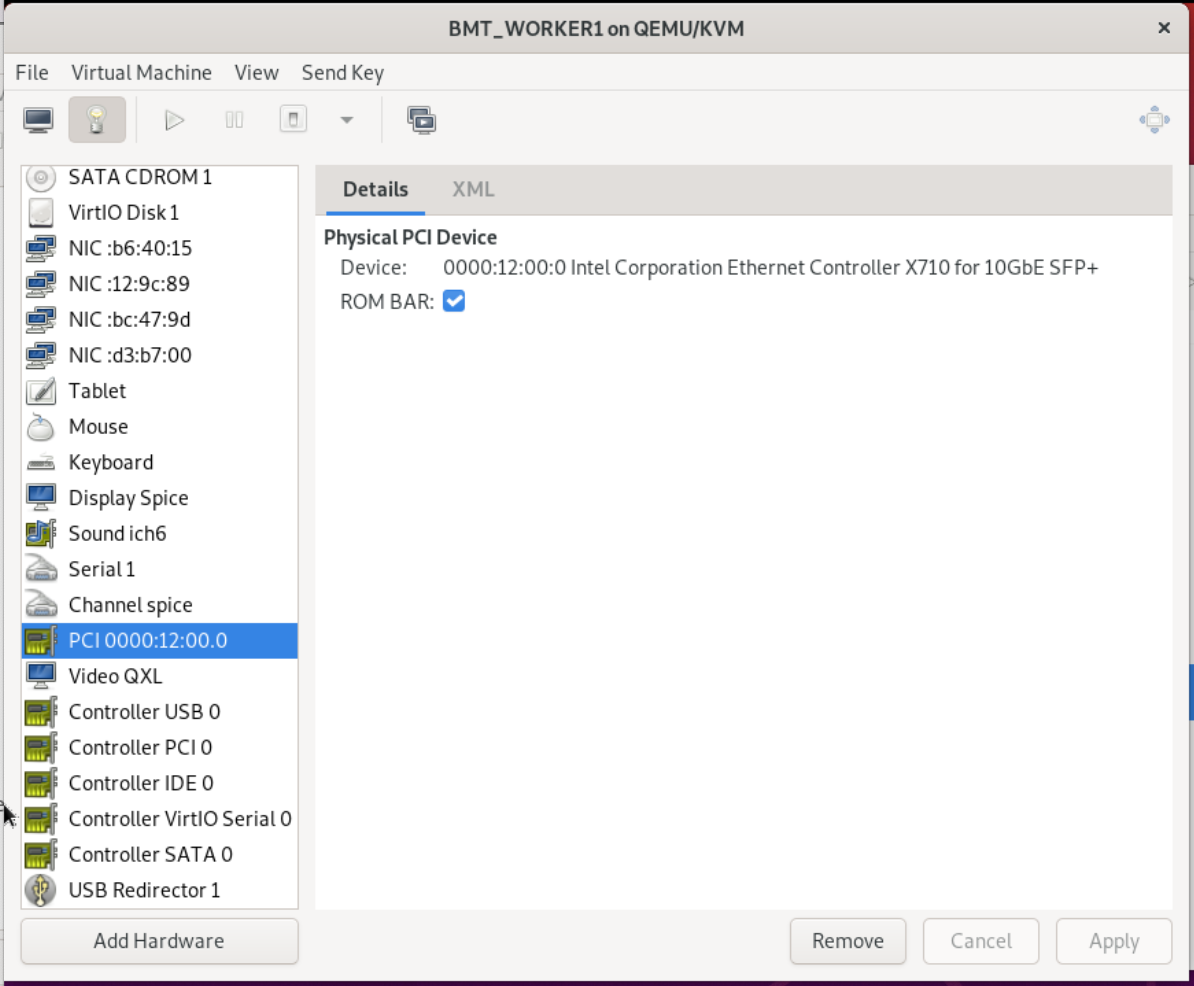
위 설정 화면에서 [Finish] 버튼을 누르면, 아래 화면처럼 새로 추가한 PCI 장치 정보를 볼 수 있다.


VM의 HW 목록 및 설정 정보를 확인


위와 같이 Virtual Machine이 설정된 후에 VM 내부에서는 SR-IOV 구성까지 해야 NIC에 여러 VF를 생성하고, Application Process가 VF를 사용할 수 있을 것이다. (이후 과정에 나중에 테스트하면서 다시 기록할 생각이다) 


'Ubuntu' 카테고리의 다른 글

Epoch & Unix Time변환 (Date 변환)  (0) 2022.07.07
KVM의 VM에서 Hugepage 사용하기  (0) 2022.01.13
rc.local 활성 설정 (Ubuntu, CentOS)  (0) 2021.12.28
추가 장착한 Disk Mount  (0) 2021.12.28
Root 계정의 SSH 로그인 허용  (0) 2021.12.28
반응형


테스트 및 작성일: 2023년 11월 29일


Ubuntu에서 rc.local 초기화 스크립트 활성화하기


테스트한 날짜:  2023년 2월 20일

테스트에 사용한 OS:
  - Ubuntu 22.04 
  - CentOS7.9


##
##  이해를 돕기 위해 eth0 NIC 포트에 IP address를 설정하는 예시를 들었다.
##

$  sudo -s

$  cat  /etc/rc.local

#!/bin/bash

ifconfig eth0 10.10.2.5/24

route add -net 10.10.2.0/24 gw 10.10.2.1

exit 0

$  chmod +x /etc/rc.local


##
## rc-local.service 설정 파일의 마지막 줄에 [Install] 섹션을 추가한다.
##

$  cat  /lib/systemd/system/rc-local.service
... 중간 생략 ...

[Install]                      ## 이 내용을 추가
WantedBy=multi-user.target     ## 이 내용을 추가
$

##
## 위에서 변경한 내용을 반영하기 위해 데몬을 reload하고, rc-local 서비스를 기동한다.
##

$  systemctl daemon-reload

$  systemctl enable --now rc-local

$  systemctl status rc-local

##
##  잘 설정되었는지 확인하기 위해 OS를 reboot하고, eth0 포트의 IP address 값을 확인한다.
##

$  reboot

... 중간 생략 ...

$  hostname -I

10.10.2.5

$


CentOS 7.9 에서 rc.local 초기화 스크립트 활성화하기

CentOS의 rc.local  파일은 /etc/rc.d/rc.local 파일의 Symbolic Link라는 점에서 Ubuntu와 약간 차이가 있다.

이 부분만 주의해서 아래 예제를 따라하면 잘 동작한다.


##
##  이해를 돕기 위해 eth0 NIC 포트에 IP address를 설정하는 예시를 들었다.
##

$  sudo -s

$  cat  /etc/rc.local

#!/bin/bash

ifconfig eth0 10.10.2.5/24

route add -net 10.10.2.0/24 gw 10.10.2.1

exit 0

$  chmod 755 /etc/rc.d/rc.local


##
## rc-local.service 설정 파일의 마지막 줄에 [Install] 섹션을 추가한다.
##

$  cat  /lib/systemd/system/rc-local.service
... 중간 생략 ...

[Install]
WantedBy=multi-user.target
$

##
## 위에서 변경한 내용을 반영하기 위해 데몬을 reload하고, rc-local 서비스를 기동한다.
##

$  systemctl daemon-reload

$  systemctl enable --now rc-local

$  systemctl status rc-local

##
##  잘 설정되었는지 확인하기 위해 OS를 reboot하고, eth0 포트의 IP address 값을 확인한다.
##

$  reboot

... 중간 생략 ...

$  hostname -I

10.10.2.5

$


'Ubuntu' 카테고리의 다른 글

KVM의 VM에서 Hugepage 사용하기  (0) 2022.01.13
PCI passthrough on Ubuntu + KVM  (0) 2022.01.12
추가 장착한 Disk Mount  (0) 2021.12.28
Root 계정의 SSH 로그인 허용  (0) 2021.12.28
Install BIND for name server(DNS) on Ubuntu 22.04  (0) 2021.11.05
반응형


블로그 작성 & 테스트한 날짜: 2023년 2월 1일


아래 명령 순서를 따라하면, 추가 장착한 disk를 filesystem에 마운트할 수 있다.


$  sudo -s

##
## 아래 예제는 /dev/sdb 을 추가로 mount한다고 가정하고 설명하겠다.
##

$  fdisk /dev/sdb

## NOTE  대화형 명령 화면에서 /dev/sdb1 파티션을 생성한다.
## (캡처한 화면이 없어서 자세한 설명은 생략함)


$  fdisk -l

... 중간 생략 ...

Disk /dev/sdb: 232.91 GiB, 250059350016 bytes, 488397168 sectors
Disk model: Samsung SSD 750
Units: sectors of 1 * 512 = 512 bytes
Sector size (logical/physical): 512 bytes / 512 bytes
I/O size (minimum/optimal): 512 bytes / 512 bytes
Disklabel type: dos
Disk identifier: 0xa8eab75b

Device     Boot Start       End   Sectors   Size Id Type
/dev/sdb1        2048 488396799 488394752 232.9G 83 Linux

... 중간 생략 ...

##
##  새로 장착한 저장 장치를 sdb라고 가정하면, 아래와 같이 ext4 파일 시스템으로 format한다.
##
$  mkfs -t ext4 /dev/sdb1

$  lsblk -f

... 중간 생략 ...

sdb
└─sdb1 ext4     SSD_250G ad6fe291-e588-4376-8638-c4d782e833f8  146.2G    31% /ssd2

... 중간 생략 ...


##
## 마운트 대상 directory를 생성
##
$  mkdir /ssd2

##
## /dev/sdb1 파티션을 /ssd2에 마운트하기
##
$  mount /dev/sdb1 /ssd2

$  df -h /ssd2
Filesystem      Size  Used Avail Use% Mounted on
/dev/sdb1       229G   71G  147G  33% /ssd2

$


OS 부팅할 때, volume mount할 수 있도록 /etc/fstab 에 mount 정보를 추가한다.


$ ls -lh /dev/disk/by-uuid

total 0
lrwxrwxrwx 1 root root 10 Jan 30 04:41 51234567-1234-1234-abcd-abcdef123456 -> ../../sdb1
lrwxrwxrwx 1 root root 10 Jan 30 04:41 51234567-1234-1234-abcd-abcdef123457 -> ../../sda2

$  cat /etc/fstab

... 중간 생략 ...

# <file system> <mount point>   <type>  <options>       <dump>  <pass>
/dev/disk/by-uuid/51234567-1234-1234-abcd-abcdef123456 /         ext4  defaults  0  1
/dev/disk/by-uuid/51234567-1234-1234-abcd-abcdef123457 /mnt/hdd0 ext4  defaults  0  0
/swap.img                                              none      swap  sw        0  0

$

'Ubuntu' 카테고리의 다른 글

PCI passthrough on Ubuntu + KVM  (0) 2022.01.12
rc.local 활성 설정 (Ubuntu, CentOS)  (0) 2021.12.28
Root 계정의 SSH 로그인 허용  (0) 2021.12.28
Install BIND for name server(DNS) on Ubuntu 22.04  (0) 2021.11.05
openssl command example  (0) 2021.11.04

+ Recent posts