
Rook를 이용하여 Ceph 설치한 날짜: 2024년 8월 7일
Rook version: 1.10.10
Ceph version: 17.2.5(quincy) and 15.2.17 (octopus) ## 이 두 버전 모두 잘 동작했다.
지난 2년 동안 NFS server를 이용하여 Kubernetes PV(Persistent Volume)의 Storage로 사용했었는데, 별로 좋지 않음을 경험하고는 Ceph를 사용해야겠다는 결단이 생겼다.
Ceph 설치가 만만치 않은 작업이지 않을까 걱정했는데, 괜한 걱정이었다.
Rook operator official document의 설명을 따라서 설치하니까 30분 만에 Ceph cluster가 뚝딱하고 만들어졌다.
Test용 Example App까지 Rook operator에 포함되어 있어서 Test까지 다 포함해서 1시간이 채 안 걸렸다.
일단, 아래 공식 문서인 Rook Ceph document를 읽고 따라하면 일사천리로 설치와 테스트가 모두 끝난다.
Quickstart - Rook Ceph Documentation
Quickstart Welcome to Rook! We hope you have a great experience installing the Rook cloud-native storage orchestrator platform to enable highly available, durable Ceph storage in your Kubernetes cluster. If you have any questions along the way, please don'
rook.io
그럼... 설치를 시작해보자 !
설명은 위 공식 문서에 있으니까, 설정을 생략하고 명령만 적어 놓겠다.
그냥 아래 명령어를 따라 수행하면 된다.
Ceph 설치 전에 준비할 내용:
Kubernetes worker node에 Ceph가 Storage로 사용할 Raw device가 있어야 한다.
(즉, 한번도 사용하지 않은 깨끗한 SSD, HDD 같은 것이 필요하다. Format이 안 되어 있어서 Filesystem도 없는 상태면 딱 좋다.)
나는 깡통 qcow2 이미지를 각 worker node의 Virtual disk로 사용했다.
그리고 Ceph는 3-node cluster로 구성할 것이니까, worker node 3개에 각각 Raw device가 1개씩 있어야 한다.
모든 worker node에 Raw device를 추가 장착했다면, 아래와 같이 `lsblk -f` 명령을 수행하여 깡통 상태의 Storage가 있는지 확인한다.
아래 명령 결과에서 vdb가 아무도 사용하지 않는, 그리고 formatting도 하지 않은 완전한 깡통 상태의 Storage 이다.
$ lsblk -f NAME FSTYPE LABEL UUID MOUNTPOINT vda └─vda1 LVM2_member >eSO50t-GkUV-YKTH-WsGq-hNJY-eKNf-3i07IB ├─ubuntu--vg-root ext4 c2366f76-6e21-4f10-a8f3-6776212e2fe4 / └─ubuntu--vg-swap_1 swap 9492a3dc-ad75-47cd-9596-678e8cf17ff9 [SWAP] vdb ## <- 이 "vdb" 저장 장치와 같이 아무 설정도 없는 상태의 Storage가 있어야 한다. $
모든 workder node에서 위 명령으로 vdb storage 정보를 확인했다면, 이제 본격적으로 설치 작업을 한다.
아래 명령은 kubernetes bastion node 또는 kubectl 수행이 가능한 PC에서 수행한다.
######################################################################## ## GitHub에서 Rook operator를 내려 받는다. ######################################################################## $ git clone --single-branch --branch v1.10.10 https://github.com/rook/rook.git $ cd rook/deploy/examples ######################################################################## ## Rook operator 운영에 필요한 custom resource definition을 생성하고 ## Rook operator 리소스를 kubernetes cluster에 배포한다. ######################################################################## $ kubectl create -f crds.yaml -f common.yaml -f operator.yaml ######################################################################## ## 참고: ## 내가 테스트할 때, 위 명령으로 ceph operator를 구동하고, 바로 아래의 cluster를 ## 구축하려고 하니까 OSD orchestration 단계에서 실패했다. ## 정확한 원인은 모르겠는데, operator 구동 시작 후 20초 정도 기다렸다가 cluster 구축 ## 하는 명령을 수행하면 오류없이 잘 cluster가 구축되었다. ######################################################################## ######################################################################## ## rook-ceph-operator pod가 running 상태인지 확인한다. ######################################################################## $ kubectl -n rook-ceph get pod ######################################################################## ## Ceph cluster를 생성한다. ######################################################################## $ kubectl create -f cluster.yaml ######################################################################## ## 주의: ## 내가 사용한 CPU는 "Intel(R) Xeon(R) E-2124G CPU @ 3.40GHz" 인데, ## 이 CPU를 사용했을 때 Ceph cluster 구성이 완료되려면 대략 3분 정도 시간이 걸렸다. ## 따라서, 아래와 같이 rook-ceph-operator 로그를 보면서 진행 과정을 보는 것이 좋다. ## 대략 3분 정도 로그가 올라가다가 마지막 부분에 "op-osd: finished .... " ## 이런 문구가 출력되면 작업이 끝난 것이다. ######################################################################## $ kubectl -n rook-ceph logs -l app=rook-ceph-operator -f ... 중간 생략 ... 2023-01-06 07:05:19.680387 I | cephclient: successfully disallowed pre-quincy osds and enabled all new quincy-only functionality 2023-01-06 07:05:19.681868 I | op-osd: finished running OSDs in namespace "rook-ceph" 2023-01-06 07:05:19.682577 I | ceph-cluster-controller: done reconciling ceph cluster in namespace "rook-ceph" << 위 문장이 출력되면, 끝난 것이다. Ctrl+C 키를 눌러서 kubectl log 명령을 종료시킨다 >> ######################################################################## ## 만약 3분이 지났는데 'done reconciling ceph cluster ..." 로그가 출력되지 않는다면 ## cluster, operator, crds를 모두 삭제하고 다시 시작해야 한다. ## (예: kubectl delete -f cluster.yaml -f operator.yaml -f ...) ######################################################################## ######################################################################## ## Ceph 관련 pod가 running 상태인지 확인한다. ######################################################################## $ kubectl -n rook-ceph get pod NAME READY STATUS RESTARTS AGE csi-cephfsplugin-provisioner-d77bb49c6-n5tgs 5/5 Running 0 140s csi-cephfsplugin-provisioner-d77bb49c6-v9rvn 5/5 Running 0 140s csi-cephfsplugin-rthrp 3/3 Running 0 140s csi-rbdplugin-hbsm7 3/3 Running 0 140s csi-rbdplugin-provisioner-5b5cd64fd-nvk6c 6/6 Running 0 140s csi-rbdplugin-provisioner-5b5cd64fd-q7bxl 6/6 Running 0 140s rook-ceph-crashcollector-minikube-5b57b7c5d4-hfldl 1/1 Running 0 105s rook-ceph-mgr-a-64cd7cdf54-j8b5p 1/1 Running 0 77s rook-ceph-mon-a-694bb7987d-fp9w7 1/1 Running 0 105s rook-ceph-mon-b-856fdd5cb9-5h2qk 1/1 Running 0 94s rook-ceph-mon-c-57545897fc-j576h 1/1 Running 0 85s rook-ceph-operator-85f5b946bd-s8grz 1/1 Running 0 92m rook-ceph-osd-0-6bb747b6c5-lnvb6 1/1 Running 0 23s rook-ceph-osd-1-7f67f9646d-44p7v 1/1 Running 0 24s rook-ceph-osd-2-6cd4b776ff-v4d68 1/1 Running 0 25s rook-ceph-osd-prepare-node1-vx2rz 0/2 Completed 0 60s rook-ceph-osd-prepare-node2-ab3fd 0/2 Completed 0 60s rook-ceph-osd-prepare-node3-w4xyz 0/2 Completed 0 60s ######################################################################## ## Rook toolbox를 이용하여 Ceph cluster 상태 정보를 조회한다. ## toolbox에 대한 자세한 설명은 아래 Web document를 확인 ## https://rook.io/docs/rook/v1.10/Troubleshooting/ceph-toolbox/ ######################################################################## ######################################################################## ## Rook toolbox를 설치한다. ######################################################################## $ kubectl create -f deploy/examples/toolbox.yaml ######################################################################## ## Rook toolbox pod 내부에서 `ceph status` 명령을 수행하여 ceph cluster 상태를 조회한다. ######################################################################## $ kubectl -n rook-ceph exec -it deploy/rook-ceph-tools -- bash bash-4.4$ ceph status cluster: id: 661d89a0-d4c5-432b-97d7-6a4d06beaf52 health: HEALTH_OK services: mon: 3 daemons, quorum a,b,d (age 10m) mgr: b(active, since 11m), standbys: a osd: 3 osds: 3 up (since 10m), 3 in (since 11m) data: pools: 1 pools, 1 pgs objects: 2 objects, 449 KiB usage: 62 MiB used, 750 GiB / 750 GiB avail pgs: 1 active+clean bash-4.4$ bash-4.4$ bash-4.4$ bash-4.4$ ceph df --- RAW STORAGE --- CLASS SIZE AVAIL USED RAW USED %RAW USED hdd 750 GiB 750 GiB 62 MiB 62 MiB 0 TOTAL 750 GiB 750 GiB 62 MiB 62 MiB 0 --- POOLS --- POOL ID PGS STORED OBJECTS USED %USED MAX AVAIL .mgr 1 1 449 KiB 2 1.3 MiB 0 237 GiB bash-4.4$ exit $
예제 App을 이용하여 Ceph 동작 유무를 확인한다.
############################################################################### ## `git clone`한 소스 코드에 examples 디렉토리가 있다. ## examples 디렉토리로 이동하여 예제 App을 구동해보자. ## 당연히, 위 Ceph에서 PV를 할당받는 예제이다. ############################################################################### $ cd /deploy/examples ############################################################################### ## 예제 App이 사용할 StorageClass를 생성한다. ############################################################################### $ kubectl apply -f csi/rbd/storageclass.yaml cephblockpool.ceph.rook.io/replicapool created storageclass.storage.k8s.io/rook-ceph-block created $ kubectl create -f mysql.yaml service/wordpress-mysql created persistentvolumeclaim/mysql-pv-claim created deployment.apps/wordpress-mysql created $ kubectl get pvc NAME STATUS VOLUME CAPACITY ACCESS MODES STORAGECLASS AGE mysql-pv-claim Bound pvc-6d458ff1-54bf-4f34-b010-a0f4b2a0966e 20Gi RWO rook-ceph-block 94s $ kubectl create -f wordpress.yaml service/wordpress created persistentvolumeclaim/wp-pv-claim created deployment.apps/wordpress created $ kubectl get pod NAME READY STATUS RESTARTS AGE wordpress-7cf5c5c8b-5cgqk 1/1 Running 0 42s wordpress-mysql-6f99c59595-9vs7z 1/1 Running 0 4m8s $ kubectl get svc wordpress NAME TYPE CLUSTER-IP EXTERNAL-IP PORT(S) AGE wordpress LoadBalancer 10.96.232.248 10.1.4.160 80:31494/TCP 27s
참고로, wordpress pod가 구동되고 1분 정도 경과된 후에 Web browser로 접속하는 것이 좋다.
(wordpress가 MySQL DB에 초기 설정값을 만드느라 시간을 좀 쓰는 듯...)
Web browser를 이용하여 EXTERNAL-IP에 출력된 주소로 접속해보자.
아래처럼 Wordpress 설정 화면이 출력되면, 정상 동작하는 것이다.
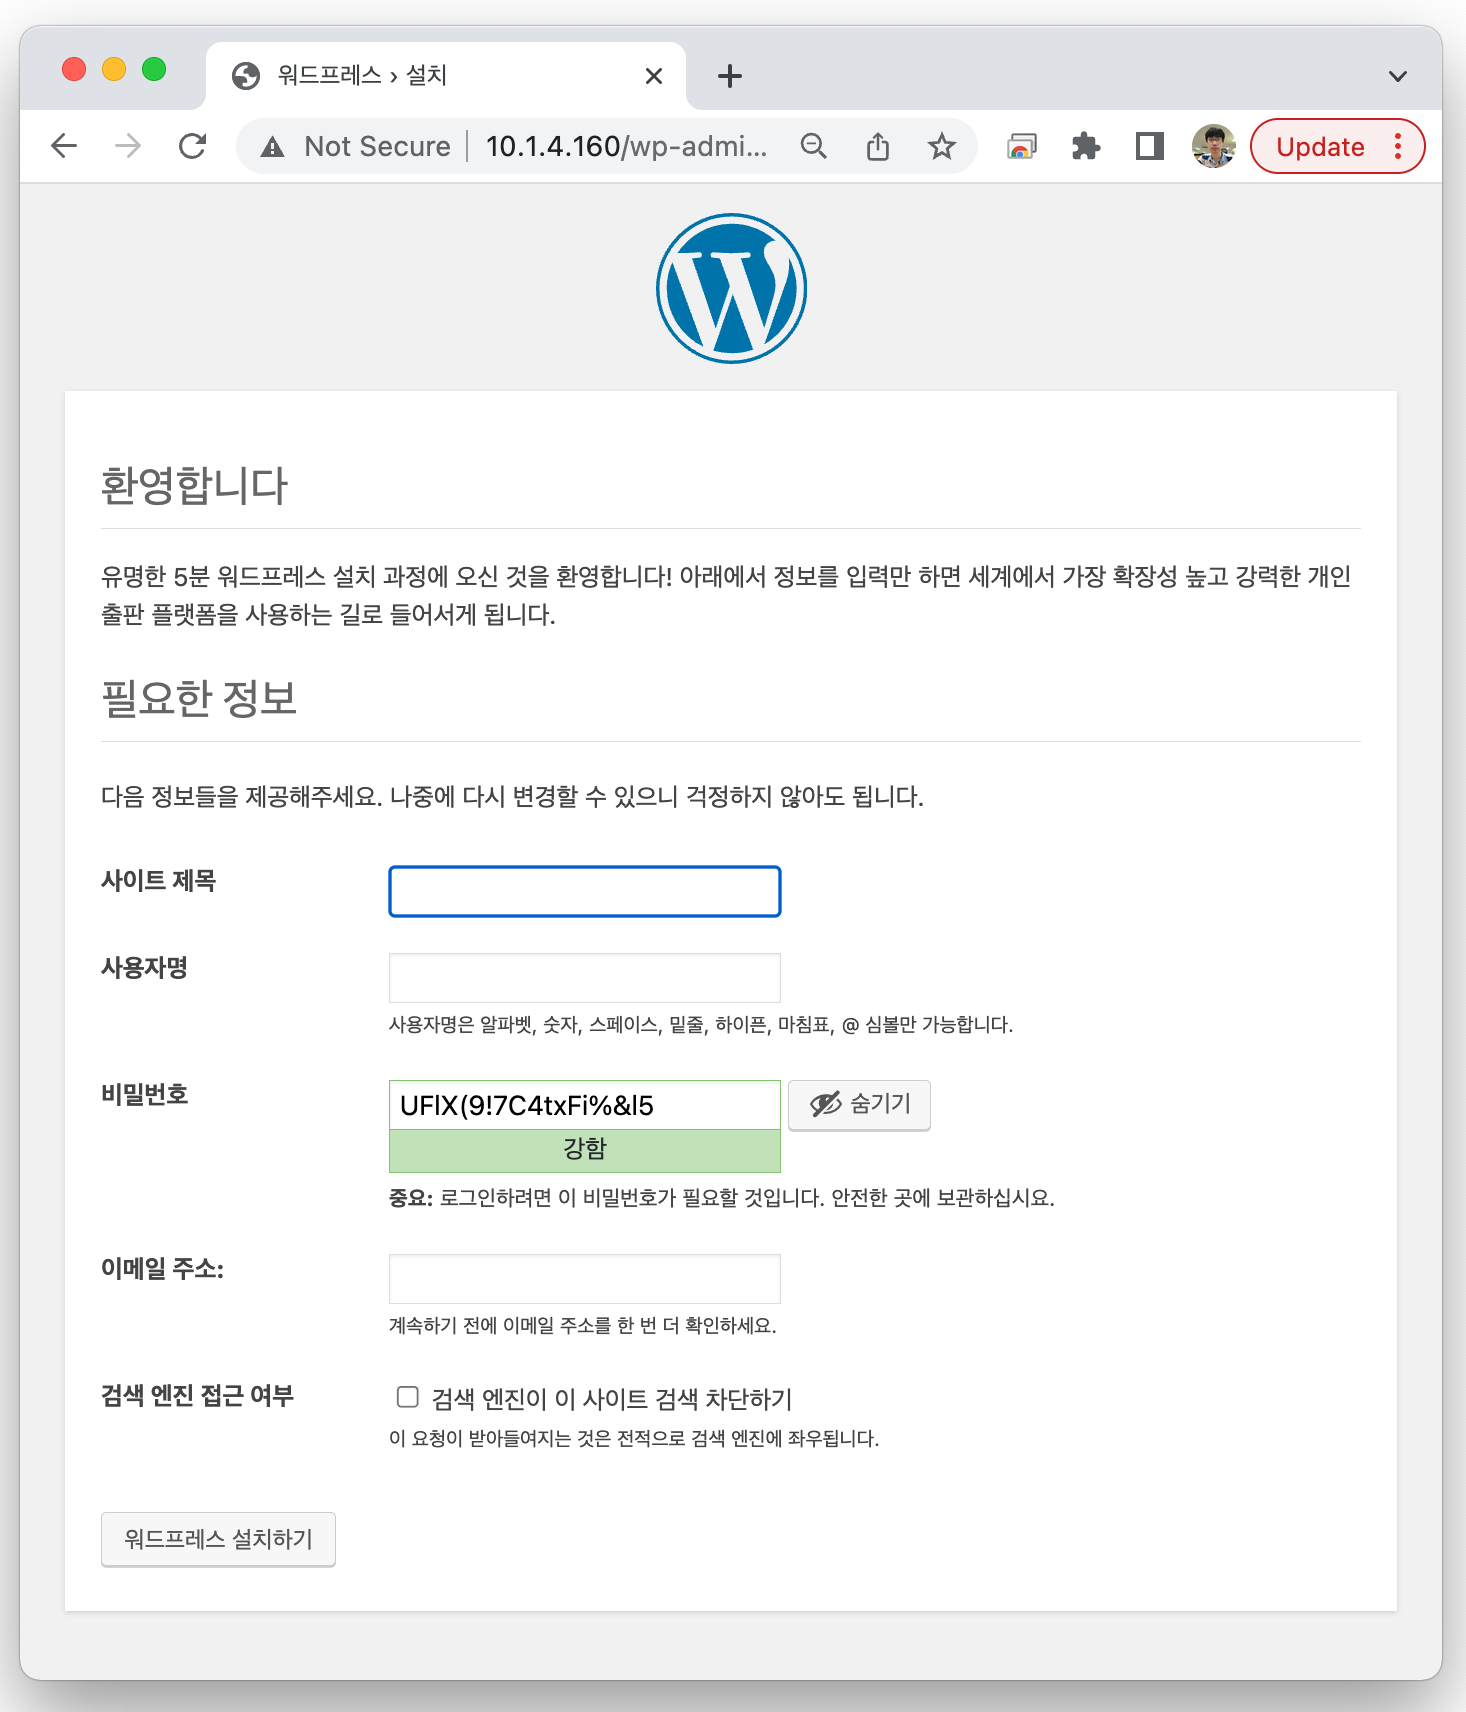
Ceph를 설치하고, Storage를 할당 받아서 PV(Persistent Volume)을 사용하는 것까지 완벽하게 동작한다.
Ceph Dashboard
아래의 Web Docs를 보고 따라 설정하면 된다.
1) Prometheus를 먼저 설치한다.
Prometheus Monitoring - Rook Ceph Documentation
Prometheus Monitoring Each Rook Ceph cluster has some built in metrics collectors/exporters for monitoring with Prometheus. If you do not have Prometheus running, follow the steps below to enable monitoring of Rook. If your cluster already contains a Prome
rook.io
2) Dashboard를 설치한다.
Ceph Dashboard - Rook Ceph Documentation
Ceph Dashboard The dashboard is a very helpful tool to give you an overview of the status of your Ceph cluster, including overall health, status of the mon quorum, status of the mgr, osd, and other Ceph daemons, view pools and PG status, show logs for the
rook.io
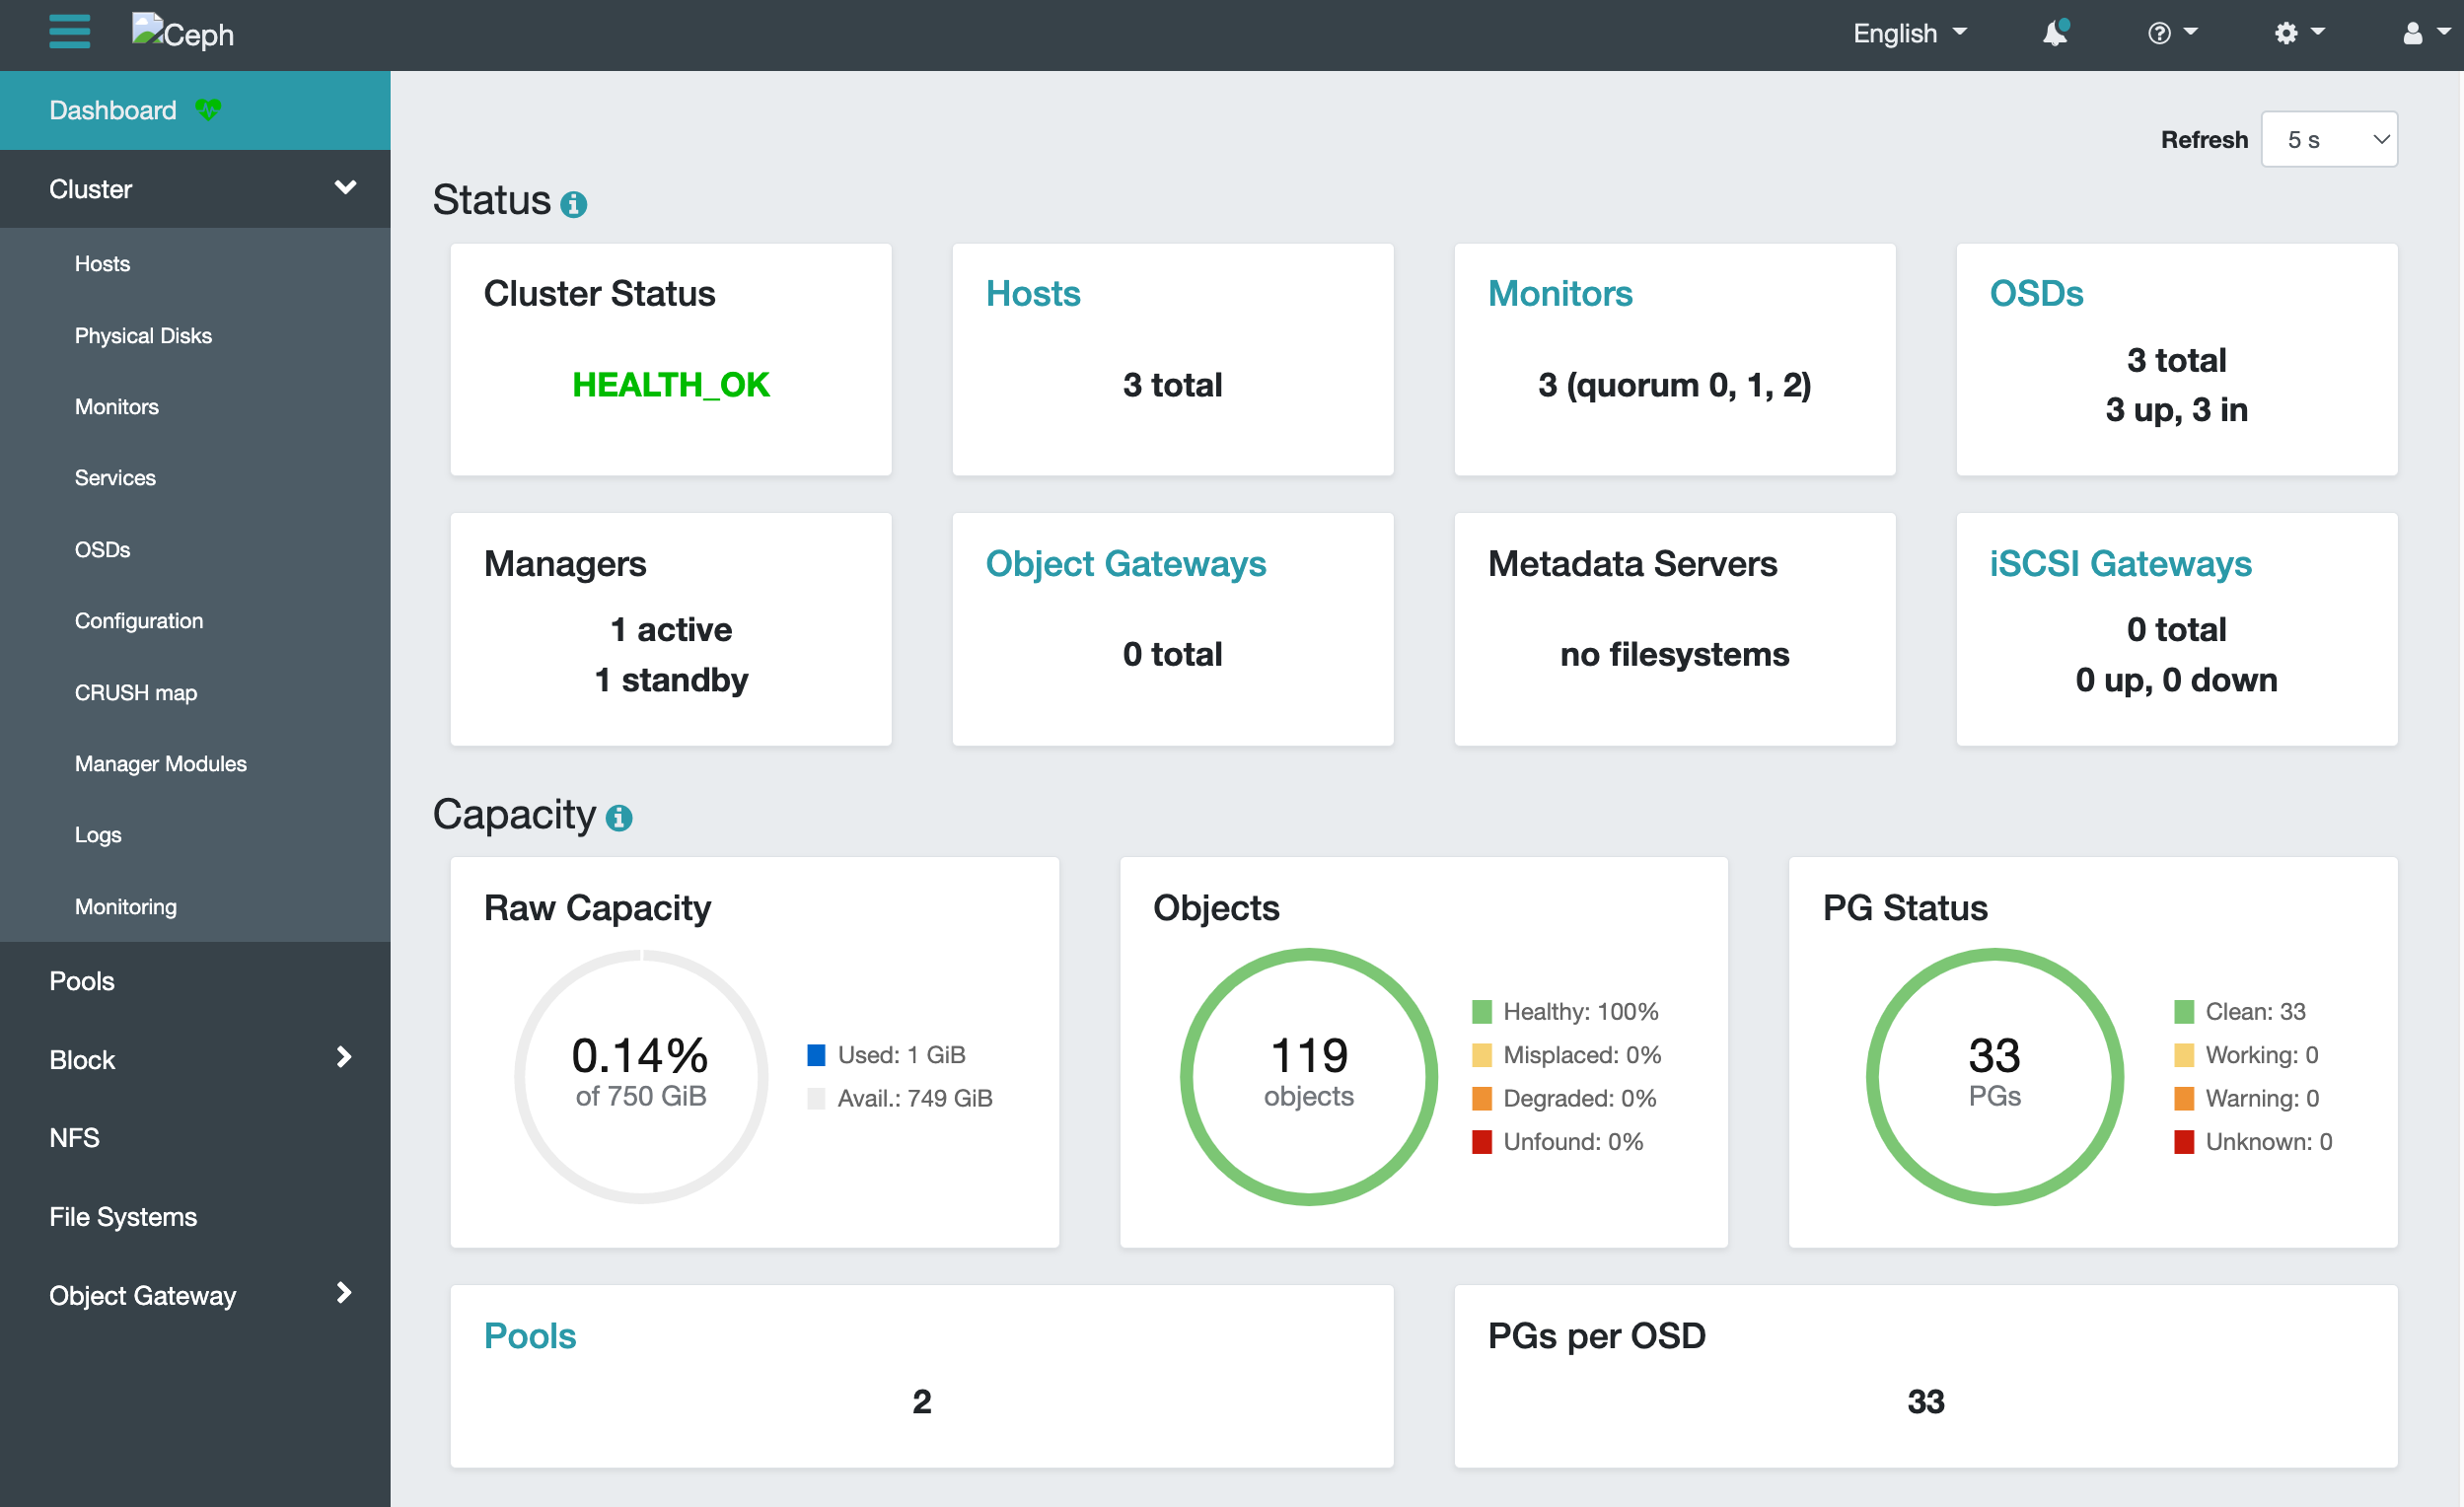
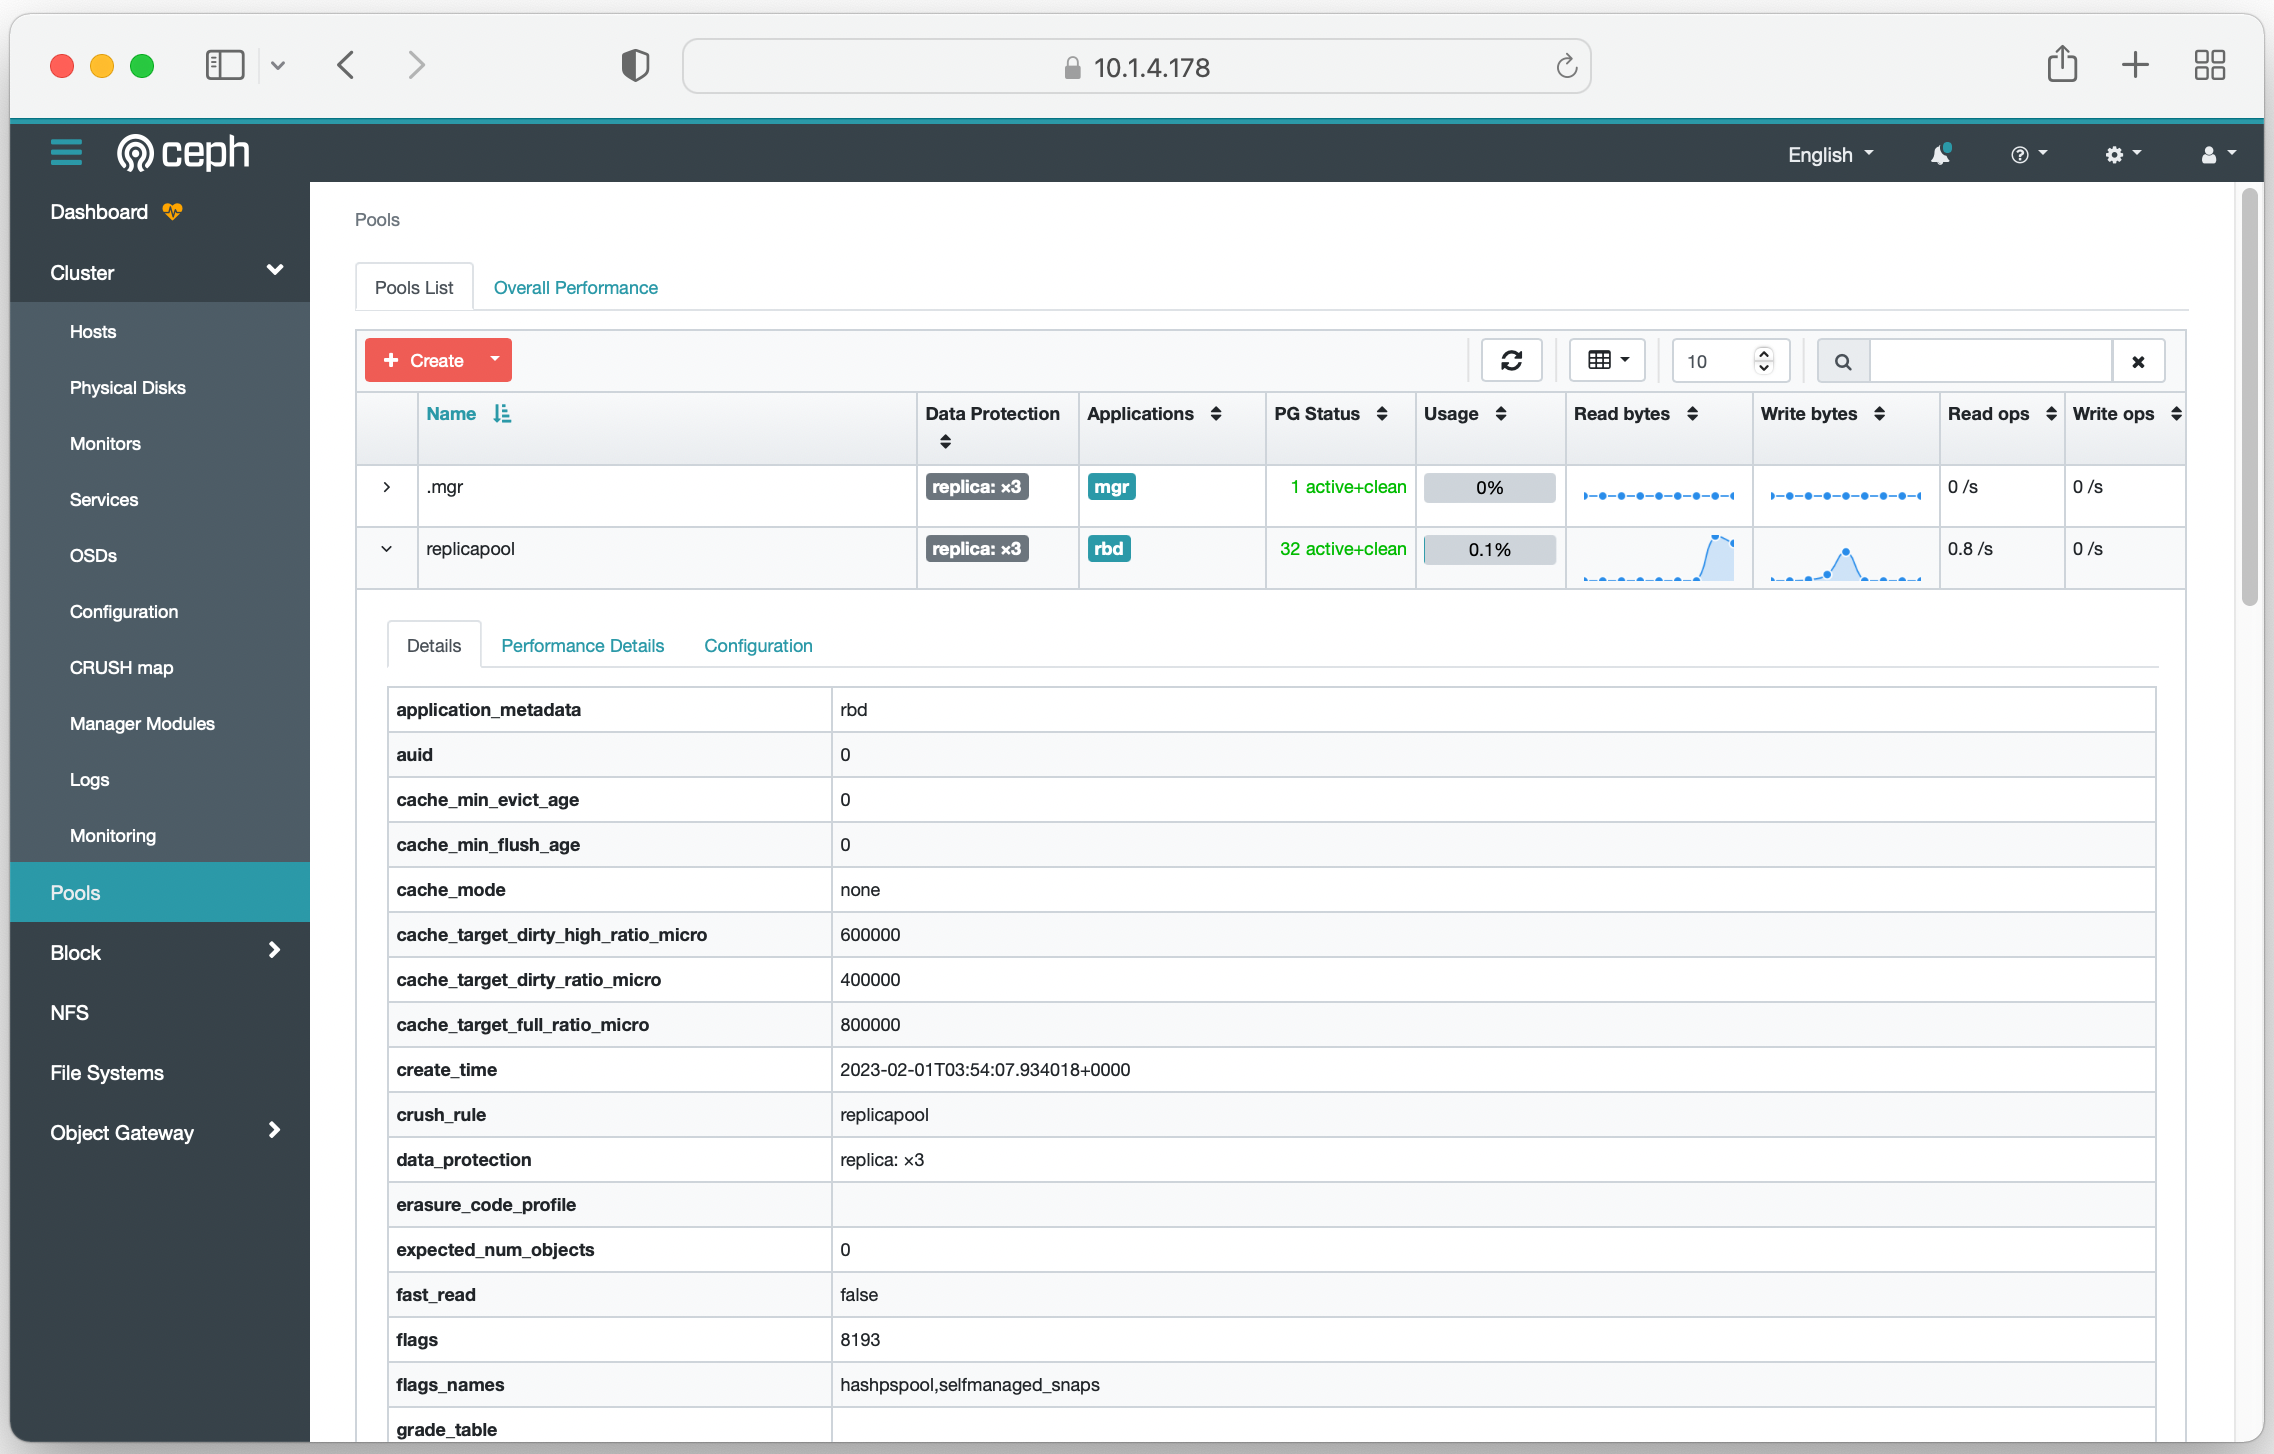
위 설명을 따라하면, 아래와 같이 Web UI, Dashboard를 볼 수 있다.

참고: Ceph 관련하여 읽으면 도움이 되는 문서
SKT TACO(Openstack) 개발자가 직접 Ceph를 설치하면서 작성한 블로그.
K8S 클러스터의 영구저장소로 ceph 사용하기
devocean.sk.com
SKT Kubernetes solution(TKS) 개발자 "엄주관" 님이 직접 Rook를 이용하여 Ceph 및 예제 앱을 설치하면서 작성한 블로그.
Kubernetes 스토리지 오퍼레이터 Rook 맛보기
devocean.sk.com
## ## 채용 관련 글 ## 제가 일하고 있는 기업 부설연구소에서 저와 같이 연구/개발할 동료를 찾고 있습니다. (이곳은 개인 블로그라서 기업 이름은 기재하지 않겠습니다. E-mail로 문의주시면 자세한 정보를 공유하겠습니다.) 근무지 위치: 서울시 서초구 서초동, 3호선 남부터미널역 근처 (전철역 출구에서 회사 입구까지 도보로 328m) 필요한 지식 (아래 내용 중에서 70% 정도를 미리 알고 있다면 빠르게 협업할 수 있음): - 운영체제 (학부 3~4학년 때, 컴퓨터공학 운영체제 과목에서 배운 지식 수준): 예를 들어, Processor, Process 생성(Fork)/종료, Memory, 동시성, 병렬처리, OS kernel driver - Linux OS에서 IPC 구현이 가능 예를 들어, MSGQ, SHM, Named PIPE 등 활용하여 Process간 Comm.하는 기능 구현이 가능하면 됨. - Algorithm(C언어, C++ 언어로 구현 가능해야 함) 예를 들어, Hashtable, B-Tree, Qsort 정도를 C 또는 C++로 구현할 수 있을 정도 - Network 패킷 처리 지식(Layer 2 ~ 4, Layer 7) 예를 들어, DHCP Server/Client의 주요 Feature를 구현할 정도의 능력이 있으면 됨. - Netfilter, eBPF 등 (IP packet hooking, ethernet packet 처리, UDP/TCP packet 처리) - IETF RFC 문서를 잘 읽고 이해하는 능력 ^^ # 위에 열거한 내용 외에도 제가 여기 블로그에 적은 내용들이 대부분 업무하면서 관련이 있는 주제를 기록한 것이라서 # 이 블로그에 있는 내용들을 잘 알고 있다면, 저희 연구소에 와서 연구/개발 업무를 수행함에 있어서 어려움이 없을 겁니다. 회사에서 사용하는 프로그래밍 언어: - 프로그래밍 언어: C, C++, Go (참고: 아직 연구소 동료들이 Rust를 사용하진 않습니다만, 새 언어로써 Rust를 사용하는 것을 고려하는 중) 근무 시간: - 출근: 8~10시 사이에서 자유롭게 선택 - 퇴근: 8시간 근무 후 퇴근 (오후 5시 ~ 7시 사이) - 야근 여부: 거의 없음 (내 경우, 올해 상반기 6개월간 7시 이후에 퇴근한 경우가 2회 있었음) - 회식 여부: 자유 (1년에 2회 정도 회식하는데, 본인이 집에 가고 싶으면 회식에 안 감. 왜 참석 안 하는지 묻지도 않음) 외근 여부: - 신규 프로젝트 멤버 -> 외근 전혀 하지 않음 (나는 신규 프로젝트만 참여해서 지난 1년 동안 한번도 외근 없었음) - 상용 프로젝트 멤버 -> 1년에 5회 미만 정도로 외근 팀 워크샵 여부: - 팀 워크샵 자체를 진행하지 않음. (워크샵 참석하는 거 싫어하는 개발자 환영 ^^) 연락처: - "sejong.jeonjo@gmail.com" # 궁금한 점은 이 연락처로 문의주세요. - 블로그 비밀 댓글 (제가 하루에 한번씩 댓글 확인하고 있음) 원하는 인재상: - 우리 부설연구소는 "긴 호흡으로 프로젝트를 진행"하기 때문에 최소 2년간 한 가지 주제를 꾸준하게 연구/개발할 수 있는 개발자를 원함. - 우리 부설연구소는 자주적으로 연구 주제를 찾아서 업무를 하기 때문에 능동적으로 생각하고 행동하는 동료를 원함. - 차분하게 연구 주제에 몰입하고, 해법을 찾는 것을 즐기는 사람. 내가 느끼는 우리 연구소의 장점: - 갑/을 관계가 없음. (제가 근무하고 있는 연구소는 SI업종이 아니라서 갑/을 회사 개념이 없음) - 연구소 자체적으로 연구 주제를 발굴하고 시스템을 개발하기 때문에 개발 일정에 대한 스트레스가 적음 - 빌딩 전체를 우리 회사가 사용하므로 분위기가 산만하지 않음. - 근처에 예술의전당, 우면산 둘레길이 있어서 점심 시간에 산책하기 좋음 ^^ - 연구소 동료들 매너가 Good (2년간 일하면서 한번도 감정에 스크레치 생기거나 얼굴 붉히며 싸운 적 없음 ^^)
'kubernetes' 카테고리의 다른 글
| Kubernetes Service 리소스의 External-IP를 DNS에 자동 설정하는 Python Script [ Ver 2.0 ] (0) | 2024.08.07 |
|---|---|
| Kubernetes Service 리소스의 External-IP를 DNS에 자동 설정하는 Python Script [ Ver 1.0 ] (0) | 2024.03.25 |
| Oracle OKE Kubernetes worker node에 SSH 접속하는 방법 (2) | 2023.11.21 |
| Kubernetes cluster에 Prometheus와 Grafana 설치 (Helm 챠트 이용) (0) | 2023.10.26 |
| Kubernetes 스터디 자료 모음 (0) | 2023.08.24 |