반응형


작성일: 2023년 12월 2일


나는 Spirent, Ixia 같은 계측기 전문 회사의 계측 장비를 구입 또는 빌려서 성능 측정을 해오고 있었는데, 
공신력을 따지는 성능 측정 보고서가 필요한 경우가 아니라면, Open source code로 구현된 계측기도 쓸만할 것 같다.
이것저것 찾아보다가 CISCO TRex 프로젝트가 눈에 들어왔다.


Cisco TRex 간단하게 살펴보기

- Intel DPDK를 사용
- Stateful 통신(예: TCP HTTP HTTPS DNS 등 Request & Response 방식), Stateless 통신(예: 단방향 UDP 통신) 모두 지원
- Open source
- TRex를 사용하면 개발자는 다양한 유형의 트래픽을 생성하고 결과로 수신되는 데이터를 분석
- 데이터 분석은 MAC 및 IP 수준에서 수행
- DUT는 L3 Switch(IP Router) 또는 L4 이상의 IP network 처리 장치라고 가정
- Linux 환경에서 작동


TRex 설치 및 테스트 환경 구성

TRex와 DUT로 사용할 Linux 장비 구축

OS & HW:

  - OS: Ubuntu 22.04

  - Intel(R) Xeon(R) CPU E5-2640 v3 @ 2.60GHz (16 cores)

  - Memory 128GB

TRex 설치 파일을 Download

$  mkdir -p  /opt/trex
$  cd  /opt/trex
$  wget  --no-cache  https://trex-tgn.cisco.com/trex/release/latest
$  tar -xfz  latest
$  ls -F 
 v3.04/
$  cd  v3.04


TRex가 사용할 NIC 설정

테스트 네트워크는 아래 그림과 같다.

2개의 Linux 장비 중에서 왼쪽 장비는 TRex를 설치하고, 오른쪽 장비는 DUT로 사용할 것이다.

DUT는 Linux에 static ip routing을 설정하여 간단한 Router 동작만 하게 할 것이다.


아래 예시처럼 똑같이 따라하면 된다.

$  ./dpdk_setup_ports.py -i

By default, IP based configuration file will be created. Do you want to use MAC based config? (y/N) N
+----+------+---------+-------------------+------------------------------------------------+-----------------+----------+----------+
| ID | NUMA |   PCI   |        MAC        |                      Name                      |     Driver      | Linux IF |  Active  |
+====+======+=========+===================+================================================+=================+==========+==========+
| 0  | 0    | 03:00.0 | 08:33:73:01:6b:98 | 82580 Gigabit Network Connection               | igb             | eth2     |          |
+----+------+---------+-------------------+------------------------------------------------+-----------------+----------+----------+
| 1  | 0    | 03:00.1 | 08:33:73:01:6b:99 | 82580 Gigabit Network Connection               | igb             | eth3     |          |
+----+------+---------+-------------------+------------------------------------------------+-----------------+----------+----------+
...
... 중간 생략 ...
...
+----+------+---------+-------------------+------------------------------------------------+-----------------+----------+----------+
| 14 | 1    | 88:00.0 | 08:33:73:08:3b:2a | 82599ES 10-Gigabit SFI/SFP+ Network Connection | uio_pci_generic |          |          |
+----+------+---------+-------------------+------------------------------------------------+-----------------+----------+----------+
| 15 | 1    | 88:00.1 | 08:33:73:08:3b:2b | 82599ES 10-Gigabit SFI/SFP+ Network Connection | uio_pci_generic |          |          |
+----+------+---------+-------------------+------------------------------------------------+-----------------+----------+----------+
| 16 | 1    | 8a:00.0 | 08:33:73:08:3b:2c | 82599ES 10-Gigabit SFI/SFP+ Network Connection | ixgbe           | eth16    |          |
+----+------+---------+-------------------+------------------------------------------------+-----------------+----------+----------+
| 17 | 1    | 8a:00.1 | 08:33:73:08:3b:2d | 82599ES 10-Gigabit SFI/SFP+ Network Connection | ixgbe           | eth17    |          |
+----+------+---------+-------------------+------------------------------------------------+-----------------+----------+----------+
Please choose an even number of interfaces from the list above, either by ID, PCI or Linux IF
Stateful will use order of interfaces: Client1 Server1 Client2 Server2 etc. for flows.
Stateless can be in any order.
For performance, try to choose each pair of interfaces to be on the same NUMA.
Enter list of interfaces separated by space (for example: 1 3) : 14 15

For interface 14, assuming loopback to its dual interface 15.
Putting IP 1.1.1.1, default gw 2.2.2.2 Change it?(y/N) N
For interface 15, assuming loopback to its dual interface 14.
Putting IP 2.2.2.2, default gw 1.1.1.1 Change it?(y/N) N
Print preview of generated config? (Y/n) Y

... 출력 내용 생략 ...

$  vi /etc/trex_cfg.yaml

### Config file generated by dpdk_setup_ports.py ###

- version: 2
  interfaces: ['88:00.0', '88:00.1']
  port_info:
      - ip: 16.0.0.253                ## 내가 수정한 부분.  TRex client side IP address.
        default_gw: 16.0.0.254        ## 내가 수정한 부분.  DUT IP address.
      - ip: 48.0.0.253                ## 내가 수정한 부분.  TRex server side IP address.
        default_gw: 48.0.0.254        ## 내가 수정한 부분.  DUT IP address.

  platform:
      master_thread_id: 0
      latency_thread_id: 1
      dual_if:
        - socket: 1
          threads: [8,9,10,11,12,13,14,15,24,25,26,27,28,29,30,31]

$


위 port_info 항목에서 설정한 network 대역에 대해서 간략하게 설명하면,

- Client host가 사용할 IP address range:  16.0.0.0 ~ 16.0.0.127   (16.0.0.0/25)

- Server host가 사용할 IP address range: 48.0.0.0 ~ 48.0.0.127 (48.0.0.0/25)

- Client host가 사용할 gateway address: 16.0.0.254

- Server host가 사용할 gateway address: 48.0.0.254


DUT 장비에서 설정할 내용

DUT 장비에서 아래와 같이 ip_forward에 관해 설정한다.

##
## Linux OS가 IP packet을 forward할 수 있도록 ip_forward를 enable 시킨다.
##
sysctl -w net.ipv4.ip_forward=1
# or
# echo 1 > /proc/sys/net/ipv4/ip_forward


DUT 장비에서 Network port를 설정한다.

$  vi  /etc/netplan/00-installer-config.yaml

network:
  version: 2
  ethernets:
    eth0:
      addresses:
        - 16.0.0.254/25
      routes:
        - to: 16.0.0.0/25
          via: 16.0.0.253
    eth1:
      addresses:
        - 48.0.0.254/25
      routes:
        - to: 48.0.0.0/25
          via: 48.0.0.253
... 중간 생략 ...

$ netplan apply
위 network 설정에 대한 부연 설명:
 - TRex의 client 및 server가 emulation하는 IP address(16.0.0.0/25)가 DUT와 동일한 IP network이면 안 된다.
 - 아마도 TRex를 구현할 때, (IP address + MAC address)를 Mapping하여 Host를 emulation하면 computing cost 및 MAC learning에 대한 load가 커지기 때문에 MAC address를 과감하게 생략하고 L3 switch 뒤에 Host 장치가 있다고 가정하고 TRex를 구현한게 아닌가 싶다. (나의 상상력에 의한 추정) 


테스트를 위한 준비 작업은 끝 !!

아래 글은 실제로 TCP, UDP 패킷을 생성하여 성능 테스트 방법이다.

복잡한 입력 내용은 없고, 아래 예제 CLI 명령을 복붙(Copy & Paste)하면 땡 !!


Stateful Networking Test (TCP, HTTP)

TRex로 사용할 Linux 장비에 SSH 터미널을 미리 2개 접속해놓고 사용하는 것이 좋다.

[ Terminal A  -  TRex 서버 프로그램 구동용 ]

$  ./t-rex-64  -i  --astf

The ports are bound/configured.
Starting  TRex v3.04 please wait  ...
 set driver name net_ixgbe
 driver capability  : TCP_UDP_OFFLOAD  TSO  LRO
 set dpdk queues mode to RSS_DROP_QUE_FILTER
 Number of ports found: 2
zmq publisher at: tcp://*:4500
 wait 1 sec .
port : 0
------------
link         :  link : Link Up - speed 10000 Mbps - full-duplex
promiscuous  : 0
port : 1
------------
link         :  link : Link Up - speed 10000 Mbps - full-duplex
promiscuous  : 0
 number of ports         : 2
 max cores for 2 ports   : 1
 tx queues per port      : 3
 -------------------------------
RX core uses TX queue number 2 on all ports
 core, c-port, c-queue, s-port, s-queue, lat-queue
 ------------------------------------------
 1        0      0       1       0      0
 -------------------------------


-Per port stats table
      ports |               0 |               1
 -----------------------------------------------------------------------------------------
   opackets |               0 |               0
     obytes |               0 |               0
   ipackets |               0 |               0
     ibytes |               0 |               0
    ierrors |               0 |               0
    oerrors |               0 |               0
      Tx Bw |       0.00  bps |       0.00  bps

-Global stats enabled
 Cpu Utilization : 0.0  %
 Platform_factor : 1.0
 Total-Tx        :       0.00  bps
 Total-Rx        :       0.00  bps
 Total-PPS       :       0.00  pps
 Total-CPS       :       0.00  cps

 Expected-PPS    :       0.00  pps
 Expected-CPS    :       0.00  cps
 Expected-L7-BPS :       0.00  bps

 Active-flows    :        0  Clients :        0   Socket-util : 0.0000 %
 Open-flows      :        0  Servers :        0   Socket :        0 Socket/Clients :  -nan
 drop-rate       :       0.00  bps
 current time    : 2.8 sec
 test duration   : 0.0 sec
 
 ##
 ## 이 터미널은 계속 출력용으로 사용되고, 사용자 입력을 받을 수 없다.
 ##


[ Terminal B - 사용자 명령 입력용 ]

$ ./trex-console

... 중간 생략 ...

Type 'help' or '?' for supported actions

trex> stats --ps
Port Status

     port       |          0           |          1
----------------+----------------------+---------------------
driver          |      net_ixgbe       |      net_ixgbe
description     |  82599ES 10-Gigabit  |  82599ES 10-Gigabit
link status     |          UP          |          UP
link speed      |       10 Gb/s        |       10 Gb/s
port status     |         IDLE         |         IDLE
promiscuous     |         off          |         off
multicast       |         off          |         off
flow ctrl       |         none         |         none
vxlan fs        |          -           |          -
--              |                      |
layer mode      |         IPv4         |         IPv4
src IPv4        |      16.0.0.253      |      48.0.0.253
IPv6            |         off          |         off
src MAC         |  08:33:73:08:3b:2a   |  08:33:73:08:3b:2b
---             |                      |
Destination     |      16.0.0.254      |      48.0.0.254
ARP Resolution  |  00:87:33:72:a8:9c   |  00:87:33:72:a8:9d
----            |                      |
VLAN            |          -           |          -
-----           |                      |
PCI Address     |     0000:88:00.0     |     0000:88:00.1
NUMA Node       |          1           |          1
RX Filter Mode  |    hardware match    |    hardware match
RX Queueing     |         off          |         off
Grat ARP        |  every 120 seconds   |  every 120 seconds
------          |                      |

trex> start  -f astf/http_simple.py  -m 2  -d 10   ## 10초 동안 테스트 수행

trex> tui

tui> Global Statistics

connection   : localhost, Port 4501                       total_tx_L2  : 0 bps
version      : ASTF @ v3.04                               total_tx_L1  : 0 bps
cpu_util.    : 0.0% @ 1 cores (1 per dual port)           total_rx     : 0 bps
rx_cpu_util. : 0.0% / 0 pps                               total_pps    : 0 pps
async_util.  : 0% / 38.44 bps                             drop_rate    : 0 bps
total_cps.   : 0 cps                                      queue_full   : 0 pkts

Port Statistics

   port    |         0         |         1         |       total
-----------+-------------------+-------------------+------------------
owner      |              root |              root |
link       |                UP |                UP |
state      |            LOADED |            LOADED |
speed      |           10 Gb/s |           10 Gb/s |
CPU util.  |              0.0% |              0.0% |
--         |                   |                   |
Tx bps L2  |             0 bps |             0 bps |             0 bps
Tx bps L1  |             0 bps |             0 bps |             0 bps
Tx pps     |             0 pps |             0 pps |             0 pps
Line Util. |               0 % |               0 % |
---        |                   |                   |
Rx bps     |             0 bps |             0 bps |             0 bps
Rx pps     |             0 pps |             0 pps |             0 pps
----       |                   |                   |
opackets   |               343 |              1401 |              1744
ipackets   |              1401 |               343 |              1744
obytes     |             38396 |           1895776 |           1934172
ibytes     |           1895776 |             38396 |           1934172
tx-pkts    |          343 pkts |         1.4 Kpkts |        1.74 Kpkts
rx-pkts    |         1.4 Kpkts |          343 pkts |        1.74 Kpkts
tx-bytes   |           38.4 KB |            1.9 MB |           1.93 MB
rx-bytes   |            1.9 MB |           38.4 KB |           1.93 MB
-----      |                   |                   |
oerrors    |                 0 |                 0 |                 0
ierrors    |                 0 |                 0 |                 0

status:  -

Press 'ESC' for navigation panel...
status: [OK]

tui> stop

trex> exit

$


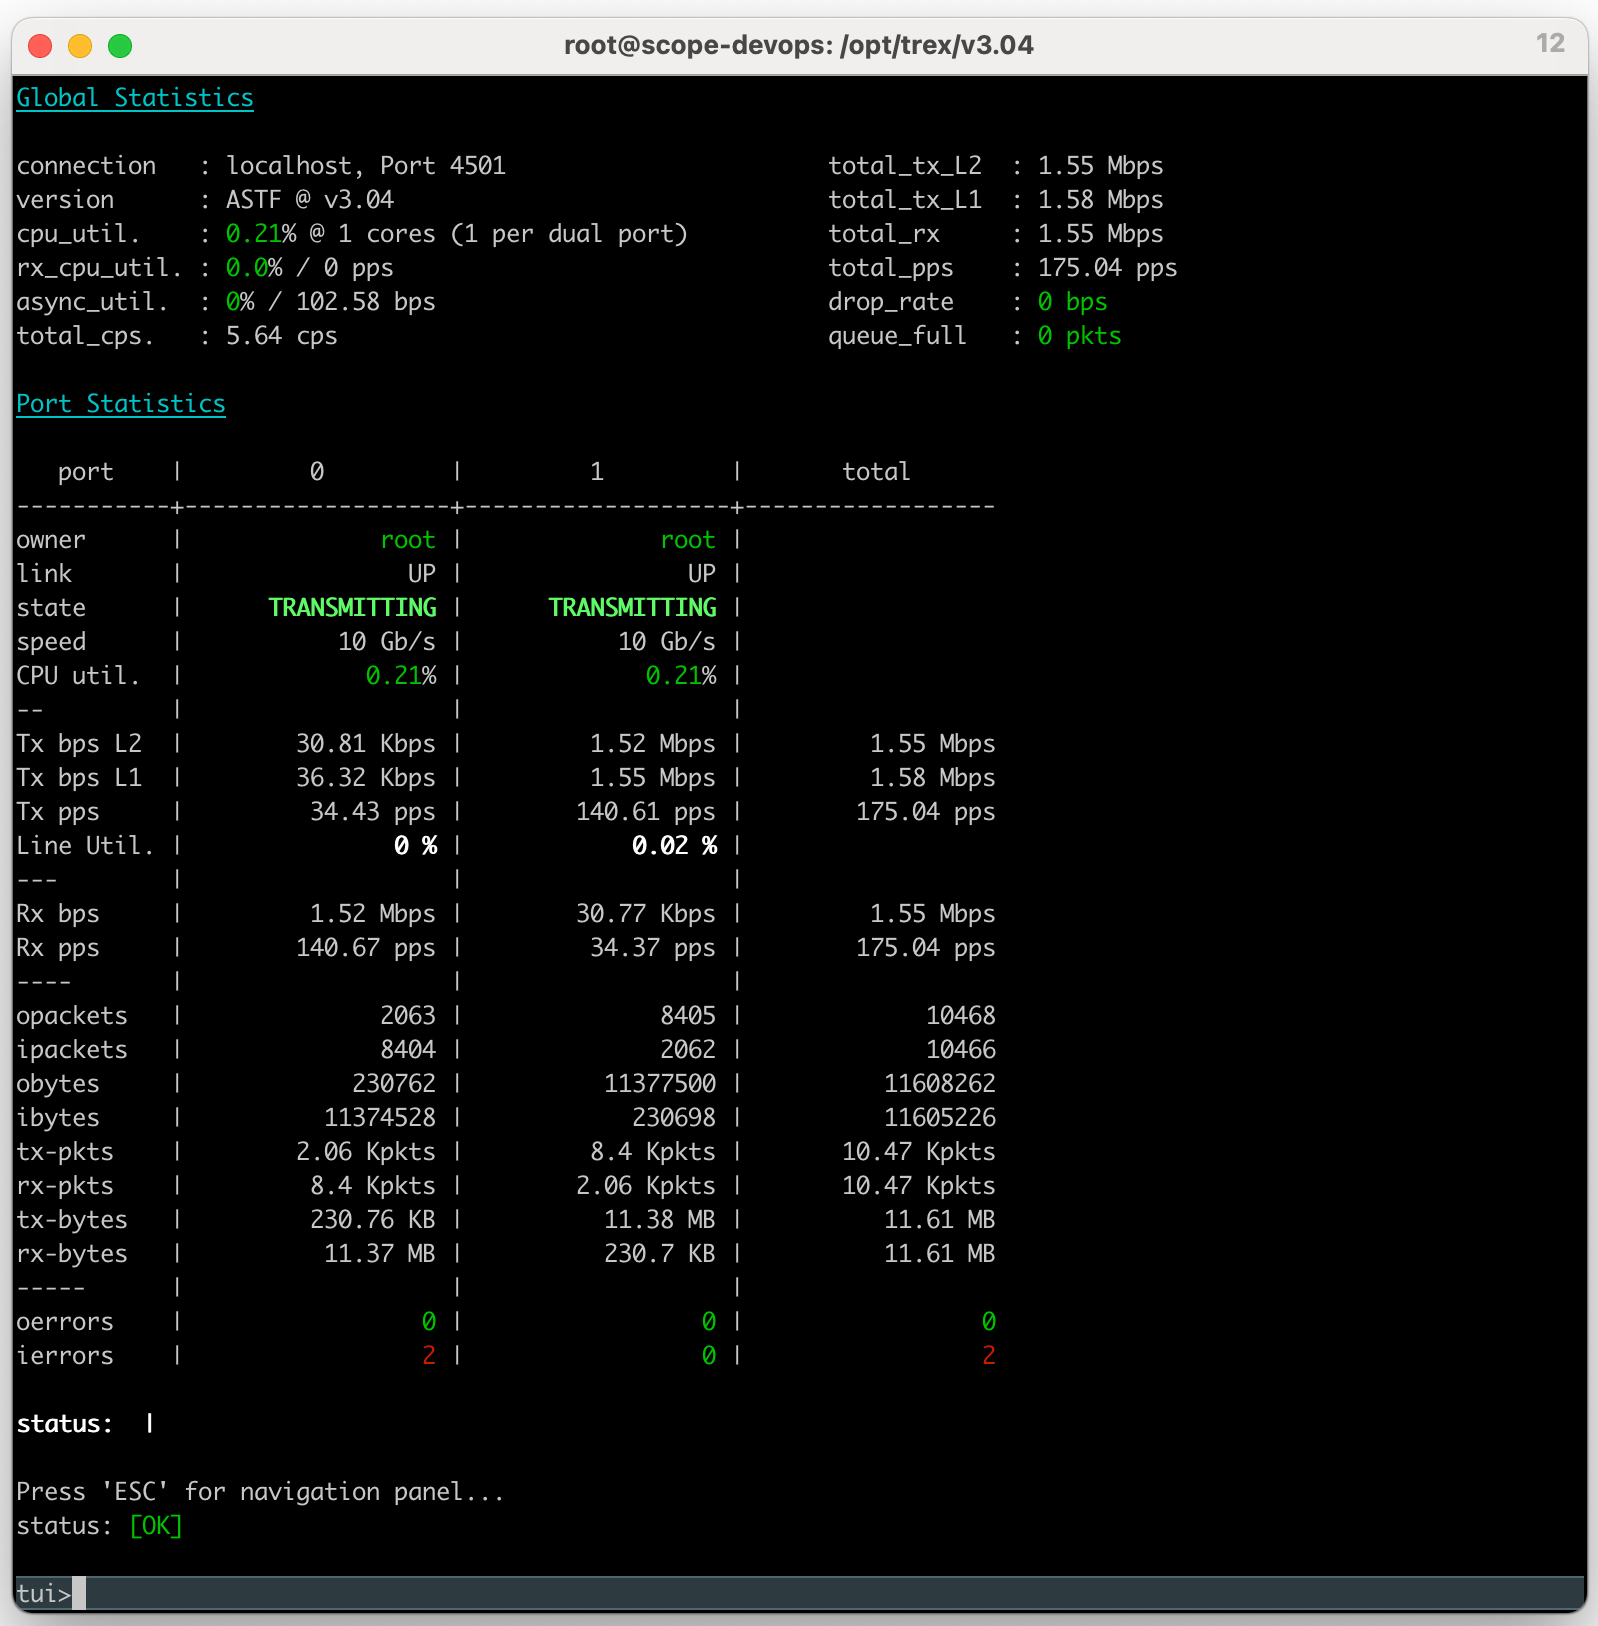
위 터미널 내용을 Image로 캡처하면, 아래 모양처럼 보인다.


위에서 사용한 astf/http_simple.py 스크립트 외에 내가 테스트하면서 유용하다고 생각했던 스크립트들을 열거하면 아래와 같다.

##
## 서로 다른 내용의 여러 개 PCAP을 동시에 Play할 때는 아래 스크립트를 사용한다.
##
trex>  start  -f astf/http_by_l7_percent.py  -m 100  -d 30
... 출력 내용 생략 ...


##
## Interative mode의 CLI가 아닌 경우도 지원한다.
##
$ ./t-rex-64 --astf -f astf/http_simple_cc.py   -m 300mbps  -d 30


Stateful Networking Test (UDP Request & Response)

TCP/HTTP 테스트랑 터미널 구성이나 CLI 명령 입력이 비슷하기 때문에 [ Terminal B ]에 입력하는 내용만 설명하겠다.

[ Terminal B - 사용자 명령 입력용 ]

##
## UDP로 1개의 요청 메시지를 보내고, 1개의 응답 메시지를 받는 경우.
##
trex>  start  -f astf/udp1.py  -m 10000  -d 30


##
## SIP/UDP 요청 메시지를 보내고, 응답 메시지를 받는 경우.
##
trex>  start  -f astf/udp_sip.py  -m 1000000  -d 5


##
## DNS/UDP 요청 메시지를 보내고, 응답 메시지를 받는 경우.
##
trex>  start  -f astf/udp_topo_traffic.py  -m 30000  -d 10


Stateless Networking Test (UDP One-Way Direction)

단방향으로 UDP 패킷만 보내는 경우에는 아래와 같이 명령을 수행한다. (Spirent C1 계측기와 유사한 동작)

[ Terminal A  -  TRex 서버 프로그램 구동용 ]

$  ./t-rex-64 -i --stl --no-scapy-server

... 출력 내용 생략 ...


[ Terminal B - 사용자 명령 입력용 ]

$  ./trex-console

trex>  portattr -a --prom on
... 출력 내용 생략 ...


trex>  stats --ps
... 출력 내용 생략 ...


trex>  start -f stl/udp_1pkt_src_ip_split.py  -m 9809mbps -d 15
... 출력 내용 생략 ...


trex>  start -f stl/bench.py -m 10kbps -d 5
... 출력 내용 생략 ...


trex>  start -f stl/udp_multi_simple_list_test.py -m 10kbps -d 5
... 출력 내용 생략 ...


trex>  start -f stl/udp_1pkt_simple.py -m 10kbps -d 5
... 출력 내용 생략 ...


trex>  streams -a      
... 출력 내용 생략 ...


Concurrent Connection Test (CC 테스트, 동시 접속 과부하 테스트)

HTTP 세션이 오래 유지되도록 하면서 서버 장비 또는 L4 ~ L7 Network 장비의 Memory 부하를 끌어올리는 테스트를 하고자 한다면,

아래의 설정과 명령을 따라 수행하면 된다.

(테스트 절차가 위에서 했던 테스트와 비슷하므로 자세한 설명은 생략한다.)


우선 TRex 설정 값부터 조정해야 한다.

trex_cfg.yaml 파일에서 dp_flows 항목의 값을 적당히 높여준다.

물론 TRex가 돌아가는 장비(HW)의 Memory가 충분한지 먼저 확인하고 적절하게 값을 높여서 설정한다.

$  vim  /etc/trex_cfg.yaml
- version: 2
  memroy:
    ## 30GB --> 15,000,000 flows  (이 값을 참고하여 필요한 만큼 값을 올린다)
    dp_flows: 15000000
... 중간 생략 ...

$  cd $TREX_ROOT
$  ./t-rex-64  -i  --astf


그리고 아래와 같이 python 스크립트를 수행한다.

$  ./trex-console

trex> start  -f astf/http_high_active_flows.py  -m 1000  -t delay=10000000

## 유용한 옵션 값을 제시하면 아래와 같다.
##   아래 옵션으로 실행하면,
##     CC  : 500,000 ~ 550,000
##     CPS : 40,000
##     BPS : 300Mbps
##     CPU : 50%
tui> start  -f astf/http_high_active_flows.py  -m 50000  -t delay=10000000


##   아래 옵션으로 실행하면,
##     CC  : 1,000,000    # 위 명령보다 delay를 2배 늘리면, CC도 2배 늘어난다.
##     CPS : 40,000
##     BPS : 320Mbps
##     CPU : 50%
tui> start  -f astf/http_high_active_flows.py  -m 50000  -t delay=20000000


참고:  -m 옵션의 값을 처음에는 작게 설정해서 테스트하고, 테스트 결과를 보면서 -m 옵션 값을 2~10배씩 올려가면서 테스트한다.


참고 문서 (내가 읽어보고 괜찮다고 느낀 순서로 정렬)

문서 이름 문서 URL
TRex - Use Case (TCP, UDP)
(참고: 깊은 이해 없이 따라하기 좋음)
https://promwad.com/news/cisco-trex-traffic-generator
TRex - 최초 구성 설정 방법 https://github.com/cisco-system-traffic-generator/trex-core/blob/master/doc/trex_config.asciidoc
TRex 사용 매뉴얼 https://trex-tgn.cisco.com/trex/doc/trex_manual.html
TRex PKG 릴리즈 리스트 (버전별) https://trex-tgn.cisco.com/trex/release/
TRex - Use Case (UDP) https://satishdotpatel.github.io/trex-load-generator/
TRex Stateless support https://trex-tgn.cisco.com/trex/doc/trex_stateless.html
TRex Advance stateful support
  (TCP, HTTP 테스트할 때 도움이 됨) 
https://trex-tgn.cisco.com/trex/doc/trex_astf.html
TRex GUI https://github.com/cisco-system-traffic-generator/trex-stateless-gui


반응형


작성일: 2023년 9월 19일


NETCONF Python 예제 코드 

https://github.com/ncclient/ncclient/tree/master/examples

https://github.com/ncclient/ncclient/blob/master/examples/base/nc08.py  (Interface 설정 및 Activate)

https://github.com/aristanetworks/openmgmt/tree/main/src/ncclient  (Aristanetworks 예제)

https://developer.cisco.com/codeexchange/github/repo/ncclient/ncclient/  (CISCO 개발자 페이지)


NETCONF Python 예제 코드

https://blog.wimwauters.com/networkprogrammability/2020-03-30-netconf_python_part1/

https://blog.wimwauters.com/networkprogrammability/2020-03-31_netconf_python_part2/


NETCONF Golang 예제 코드

https://github.com/Juniper/go-netconf/tree/master/examples


NETCONF C++ 예제 코드

https://github.com/CESNET/libnetconf2/tree/master/examples


RESTCONF Postman 예제 코드

https://blog.wimwauters.com/networkprogrammability/2020-04-02_restconf_introduction_part1/

https://blog.wimwauters.com/networkprogrammability/2020-04-03_restconf_introduction_part2/


RESTCONF Python 예제  코드

https://blog.wimwauters.com/networkprogrammability/2020-04-04_restconf_python/


반응형


참고할 문서

CISCO SDN  (www.oss.kr에서 download한 pdf 문서)

https://www.oss.kr/editor/file/3bd27047/download/99fb53a9-31c4-46f9-91ad-79eeaa927f16

위 문서에서 중요한 부분만 발췌한 내용 (아래)

Application Centric Infra (CISCO)


ACI VMM 아키텍처 - Openstack Neutron ML2


ACI & Kubernetes – The Cisco K8s CNI

CISCO ACI와 Kubernetes 조합으로 Network를 구성하고 싶다면, 아래  Documents를 참고할 것.


ACI & Kubernetes - The Cisco K8s CNI (Part One) - Haystack Networks

A look and review of the integration between Cisco ACI, Kubernetes and the Cisco K8 CNI.

haystacknetworks.com


Enable Consistent Application Services for Containers

Seamless developer experience intended to maintain the simplicity of Kubernetes while still enabling advanced capabilities within the Cisco ACI fabric, and maintaining application availability, security, and visibility across the infrastructure.

blogs.cisco.com


YouTube 영상: Kubernetes integration with CISCO ACI


ACI Networking Plugin for Kubernetes

https://pubhub.devnetcloud.com/media/netdevops-live/site/files/s01t07.pdf


ACI CNI Plugin (GitHub Source Code)


GitHub - noironetworks/aci-containers: Plugins for integrating ACI with container orchestration systems

Plugins for integrating ACI with container orchestration systems - GitHub - noironetworks/aci-containers: Plugins for integrating ACI with container orchestration systems

github.com


EPG, Contract, AP(Application Profile), BD(Broadcast Domain) 등 개념이 머릿속에 잘 그려지지 않아서 

이런 개념을 Use Case로 그린 Diagram만 우선 보고자 한다.


Cisco ACI Multi-Site Architecture White Paper (2021-11-23)


Cisco Application Centric Infrastructure - Cisco ACI Multi-Site Architecture White Paper

Cisco Application Centric Infrastructure (Cisco ACI) as a pervasive fabric technology, enterprises and service providers commonly need to interconnect separate Cisco ACI fabrics.

www.cisco.com


Cisco Application Centric Infrastructure - White Papers

Cisco Application Centric Infrastructure - white papers

www.cisco.com


EPGs and Preferred Groups


Referencing objects across templates and across schemas


Specific strat egy to define templates inside a schema


Layer 3 intra-V RF Layer 3 communication across sites


Intra-VRF Layer 3 communication across sites stretching an EPG


Layer 3 inter-VRF communication across sites


Inter-VRF communication across sites (shared services)


Interconnecting Cisco ACI fabrics for Layer 3 communication via L3Outs


Initial state: layer 3 intersite communication using the L3Out path


Issue when mixing VXLAN and L3Out traffic paths


Use cases for integrating Cisco ACI Multi-Pod and Cisco ACI Multi-Site


Single network infrastructure offering both IPN and ISN connectivity


Hierarchical MP -BGP EVPN peering


Multi-Site and traditional L3Out connections on border leaf nodes


Use of a stretched external EPG (Ext-EPG)


Multi-Site and traditional L3Out connections with a stretched bridge domain


Cisco ACI EPG-based network model


An example of stretched application between on-premises Cisco ACI and cloud sites


An example of stretched EPGs across sites


An example of intersite shared services


An example of Cloud L3Out


An example of On-Premises L3Out for cloud endpoints


On-premises service chaining for a stretched application tier


Cisco ACI policy model (Tenant, VRF, BD, EPG, EndPoint, Taboo, Contracts, Pod, Path, Node)


반응형


작성일: 2023년 10월 15일


[ 강의 동영상 ]
계영수 님이 GNS3 강의 동영상을 만든지 4년이 지나서 지금 GNS3 버전과 GUI 구성이 조금 달라서 헷갈릴 수 있지만,
이 동영상이 큰 도움이 된다.

  https://www.youtube.com/playlist?list=PL30o9a_lTg-KN4UmwKj2txuY3Vrd1nMrx


GNS3 및 CISCO Switch 명령 예제 모음


테스트할 때마다 사용하는 명령을 명령어 수행 순서대로 기록해보았다.


CISCO Switch Port에 IP Address 설정하기

##
## CISCO Switch Port에 IP Address 설정하기
## 

R1# configure terminal
Enter configuration commands, one per line.  End with CNTL/Z.

R1(config)# interface fastEthernet 0/0

R1(config-if)# ip address 10.1.1.1 255.255.255.0

R1(config-if)# no shutdown 

R1(config-if)# end
*Jul  2 21:14:42.231: %SYS-5-CONFIG_I: Configured from console by console

R1# ping 10.1.1.2
Type escape sequence to abort.
Sending 5, 100-byte ICMP Echos to 10.1.1.2, timeout is 2 seconds:
!!!!!
Success rate is 100 percent (5/5), round-trip min/avg/max = 8/30/68 ms

R1#


CISCO Switch Loopback Port에 IP Address 설정하기

R1# configure terminal 
Enter configuration commands, one per line.  End with CNTL/Z.

R1(config)# interface loop0
R1(config-if)#
*Jul  3 12:59:03.859: %LINEPROTO-5-UPDOWN: Line protocol on Interface Loopback0, changed state to up

R1(config-if)# ip address 1.1.1.1 255.255.255.255
R1(config-if)# end
R1#
*Jul  3 12:59:45.647: %SYS-5-CONFIG_I: Configured from console by console
R1#


CISCO Switch에 BGP 설정하기

##
## AS 100을 관리하는 라우터(R1) 설정
##

R1# configure terminal 
Enter configuration commands, one per line.  End with CNTL/Z.

R1(config)# router bgp 100
R1(config-router)# neighbor 10.1.1.2 remote-as 200
R1(config-router)# end
R1#
*Jul  3 13:05:03.939: %SYS-5-CONFIG_I: Configured from console by console
R1#


##
## AS 200을 관리하는 라우터(R2) 설정
##

R2# configure terminal 
Enter configuration commands, one per line.  End with CNTL/Z.

R2(config)# router bgp 200
R2(config-router)# neighbor 10.1.1.1 remote-as 100
R2(config-router)# end
R2#
*Jul  3 13:07:28.543: %SYS-5-CONFIG_I: Configured from console by console
R2#
*Jul  3 13:07:35.307: %BGP-5-ADJCHANGE: neighbor 10.1.1.1 Up 
R2#


BGP 설정 내용 확인하기

##
## 간략한 BGP 정보를 보는 명령
##

R1# show ip bgp summary

BGP router identifier 1.1.1.1, local AS number 100
BGP table version is 1, main routing table version 1

Neighbor        V           AS MsgRcvd MsgSent   TblVer  InQ OutQ Up/Down  State/PfxRcd
10.1.1.2        4          200       7       7        1    0    0 00:02:53        0


##
## 상세한 BGP Neighbor 정보를 보는 명령
##

R1# show ip bgp neighbors 
BGP neighbor is 10.1.1.2,  remote AS 200, external link
  BGP version 4, remote router ID 2.2.2.2
  BGP state = Established, up for 00:05:43   ## <-- state 값을 확인해야 함.
  Last read 00:00:20, last write 00:00:14, hold time is 180, keepalive interval is 60 seconds
  Neighbor sessions:
    1 active, is not multisession capable (disabled)
  Neighbor capabilities:
    Route refresh: advertised and received(new)
    Four-octets ASN Capability: advertised and received
    Address family IPv4 Unicast: advertised and received
    Enhanced Refresh Capability: advertised and received
    Multisession Capability: 
    Stateful switchover support enabled: NO for session 1
  Message statistics:
    InQ depth is 0
    OutQ depth is 0
    
                         Sent       Rcvd
    Opens:                  1          1
    Notifications:          0          0
    Updates:                1          1
    Keepalives:             8          8
    Route Refresh:          0          0
    Total:                 10         10
  Default minimum time between advertisement runs is 30 seconds

 For address family: IPv4 Unicast
  Session: 10.1.1.2
  BGP table version 1, neighbor version 1/0
  Output queue size : 0
  Index 1, Advertise bit 0
  1 update-group member
  Slow-peer detection is disabled
  Slow-peer split-update-group dynamic is disabled
                                 Sent       Rcvd
  Prefix activity:               ----       ----
    Prefixes Current:               0          0
    Prefixes Total:                 0          0
    Implicit Withdraw:              0          0
    Explicit Withdraw:              0          0
    Used as bestpath:             n/a          0
    Used as multipath:            n/a          0

                                   Outbound    Inbound
  Local Policy Denied Prefixes:    --------    -------
    Total:                                0          0
  Number of NLRIs in the update sent: max 0, min 0
  Last detected as dynamic slow peer: never
  Dynamic slow peer recovered: never
  Refresh Epoch: 1
  Last Sent Refresh Start-of-rib: never
  Last Sent Refresh End-of-rib: never
  Last Received Refresh Start-of-rib: never
  Last Received Refresh End-of-rib: never
				       Sent	  Rcvd
	Refresh activity:	       ----	  ----
	  Refresh Start-of-RIB          0          0
	  Refresh End-of-RIB            0          0

  Address tracking is enabled, the RIB does have a route to 10.1.1.2
  Connections established 1; dropped 0
  Last reset never
  Transport(tcp) path-mtu-discovery is enabled
  Graceful-Restart is disabled
Connection state is ESTAB, I/O status: 1, unread input bytes: 0            
Connection is ECN Disabled, Mininum incoming TTL 0, Outgoing TTL 1
Local host: 10.1.1.1, Local port: 37711
Foreign host: 10.1.1.2, Foreign port: 179
Connection tableid (VRF): 0
Maximum output segment queue size: 50

Enqueued packets for retransmit: 0, input: 0  mis-ordered: 0 (0 bytes)

Event Timers (current time is 0x118E84):
Timer          Starts    Wakeups            Next
Retrans            10          0             0x0
TimeWait            0          0             0x0
AckHold             9          6             0x0
SendWnd             0          0             0x0
KeepAlive           0          0             0x0
GiveUp              0          0             0x0
PmtuAger            1          0        0x157854
DeadWait            0          0             0x0
Linger              0          0             0x0
ProcessQ            0          0             0x0

iss: 1109643795  snduna: 1109644028  sndnxt: 1109644028
irs:  864525182  rcvnxt:  864525415

sndwnd:  16152  scale:      0  maxrcvwnd:  16384
rcvwnd:  16152  scale:      0  delrcvwnd:    232
          
SRTT: 737 ms, RTTO: 2506 ms, RTV: 1769 ms, KRTT: 0 ms
minRTT: 48 ms, maxRTT: 1000 ms, ACK hold: 200 ms
Status Flags: active open
Option Flags: nagle, path mtu capable
IP Precedence value : 6

Datagrams (max data segment is 1460 bytes):
Rcvd: 19 (out of order: 0), with data: 10, total data bytes: 232
Sent: 20 (retransmit: 0, fastretransmit: 0, partialack: 0, Second Congestion: 0), with data: 10, total data bytes: 232

 Packets received in fast path: 0, fast processed: 0, slow path: 0
 fast lock acquisition failures: 0, slow path: 0
TCP Semaphore      0x6AA22B60  FREE 

R1#


IP Routing Table 정보 조회하기

R1# show ip route 

Codes: L - local, C - connected, S - static, R - RIP, M - mobile, B - BGP
       D - EIGRP, EX - EIGRP external, O - OSPF, IA - OSPF inter area 
       N1 - OSPF NSSA external type 1, N2 - OSPF NSSA external type 2
       E1 - OSPF external type 1, E2 - OSPF external type 2
       i - IS-IS, su - IS-IS summary, L1 - IS-IS level-1, L2 - IS-IS level-2
       ia - IS-IS inter area, * - candidate default, U - per-user static route
       o - ODR, P - periodic downloaded static route, H - NHRP, l - LISP
       + - replicated route, % - next hop override

Gateway of last resort is not set

      1.0.0.0/32 is subnetted, 1 subnets
C        1.1.1.1 is directly connected, Loopback0
      10.0.0.0/8 is variably subnetted, 2 subnets, 2 masks
C        10.1.1.0/24 is directly connected, FastEthernet0/0
L        10.1.1.1/32 is directly connected, FastEthernet0/0

R1#


BGP 이용하여 Network Route 광고(Advertisement)

##
## R1 라우터가 이웃 라우터에게 Advertisement하기
##

R1# configure terminal 
Enter configuration commands, one per line.  End with CNTL/Z.

R1(config)# router bgp 100
R1(config-router)# network 1.1.1.1 mask 255.255.255.255   ## <-- Route 광고하기
R1(config-router)# end
*Jul  3 14:26:39.559: %SYS-5-CONFIG_I: Configured from console by console
R1#


##
## 이웃 라이터(예: R2)에서 수신한 Route Advertisement 정보를 확인
##

R2# show ip bgp summary 
BGP router identifier 2.2.2.2, local AS number 200
BGP table version is 2, main routing table version 2
1 network entries using 148 bytes of memory
1 path entries using 64 bytes of memory
1/1 BGP path/bestpath attribute entries using 136 bytes of memory
1 BGP AS-PATH entries using 24 bytes of memory
0 BGP route-map cache entries using 0 bytes of memory
0 BGP filter-list cache entries using 0 bytes of memory
BGP using 372 total bytes of memory
BGP activity 1/0 prefixes, 1/0 paths, scan interval 60 secs

Neighbor        V           AS MsgRcvd MsgSent   TblVer  InQ OutQ Up/Down  State/PfxRcd
10.1.1.1        4          100      83      82        2    0    0 01:11:20        1  ## <- 이 값이 1로 변경되었는지 확인
R2#


BGP Network Route 광고 정보 조회

##
## 라우터 R1에서 BGP 정보 조회
##

R1# show ip bgp
BGP table version is 2, local router ID is 1.1.1.1
Status codes: s suppressed, d damped, h history, * valid, > best, i - internal, 
              r RIB-failure, S Stale, m multipath, b backup-path, f RT-Filter, 
              x best-external, a additional-path, c RIB-compressed, 
Origin codes: i - IGP, e - EGP, ? - incomplete
RPKI validation codes: V valid, I invalid, N Not found

     Network          Next Hop            Metric LocPrf Weight Path
 *>  1.1.1.1/32       0.0.0.0                  0         32768 i
 R1#
 
 
##
## 라우터 R2에서 BGP 정보 조회
##

R2# show ip bgp
BGP table version is 2, local router ID is 2.2.2.2
Status codes: s suppressed, d damped, h history, * valid, > best, i - internal, 
              r RIB-failure, S Stale, m multipath, b backup-path, f RT-Filter, 
              x best-external, a additional-path, c RIB-compressed, 
Origin codes: i - IGP, e - EGP, ? - incomplete
RPKI validation codes: V valid, I invalid, N Not found

     Network          Next Hop            Metric LocPrf Weight Path
 *>  1.1.1.1/32       10.1.1.1                 0             0 100 i
R2#


반응형


작성일: 2023년 9월 19일


어찌저찌 하다가 얻어 걸린 정보라서 메모를 해둔다.  (곧 까먹을 것 같아서...)


##
## Google 검색어 입력란(Text Box)에 아래 문장을 입력하고 검색하기.
##

intitle:index.of ios parent directory bin


위 검색어로 검색하면, 아래와 같은 결과가 출력될 것이다.


검색 결과에 여러 웹 사이트가 있지만, 아래 웹 사이트 가장 괜찮은 것 같다.


Index of /pustaka/docs/GNS3/images


lms.onnocenter.or.id


위 웹 사이트에서 CISCO C7200 Router에 대한 ios를 다운로드한 후, 아래 동영상을 보면서 따라하면 아주 쉽게 GNS3에 Router Image를 등록할 수 있다.


+ Recent posts