반응형


OCP Cluster를 구축한 직후에  ovs-vsctl 명령으로 Open vSwitch의 구성을 확인해봤다.


특징한 살펴보면, 

  • br-int Bridge에 각 Kube Node로 가는 물리 Port(50.50.51.2x)는 geneve 터널링 방식을 사용.
    (아래 ovs-vsctl 명령 결과에서 geneve로 검색하면 됨)


[root@worker1 ~]# ovs-vsctl show
9cad81c8-d7be-4b18-90e8-03aadd86a8cb
    Bridge br-ex
        Port enp131s0f0
            Interface enp131s0f0
                type: system
        Port patch-br-ex_worker1.twcm.cloud-to-br-int
            Interface patch-br-ex_worker1.twcm.cloud-to-br-int
                type: patch
                options: {peer=patch-br-int-to-br-ex_worker1.twcm.cloud}
        Port br-ex
            Interface br-ex
                type: internal
    Bridge br-int
        fail_mode: secure
        datapath_type: system
        Port ovn-5e8778-0
            Interface ovn-5e8778-0
                type: geneve
                options: {csum="true", key=flow, remote_ip="50.50.51.22"}
        Port "83cf7b04f35b763"
            Interface "83cf7b04f35b763"
        Port br-int
            Interface br-int
                type: internal
        Port d10af31c1d33dac
            Interface d10af31c1d33dac
        Port "460c3ee2f55e7c9"
            Interface "460c3ee2f55e7c9"
        Port ovn-f95ec3-0
            Interface ovn-f95ec3-0
                type: geneve
                options: {csum="true", key=flow, remote_ip="50.50.51.21"}
        Port patch-br-int-to-br-ex_worker1.twcm.cloud
            Interface patch-br-int-to-br-ex_worker1.twcm.cloud
                type: patch
                options: {peer=patch-br-ex_worker1.twcm.cloud-to-br-int}
        Port ovn-84a2f7-0
            Interface ovn-84a2f7-0
                type: geneve
                options: {csum="true", key=flow, remote_ip="50.50.51.23"}
        Port "5fe45b331cff8df"
            Interface "5fe45b331cff8df"
        Port ovn-k8s-mp0
            Interface ovn-k8s-mp0
                type: internal
        Port "59a37a9be52afdb"
            Interface "59a37a9be52afdb"
    ovs_version: "2.15.4"
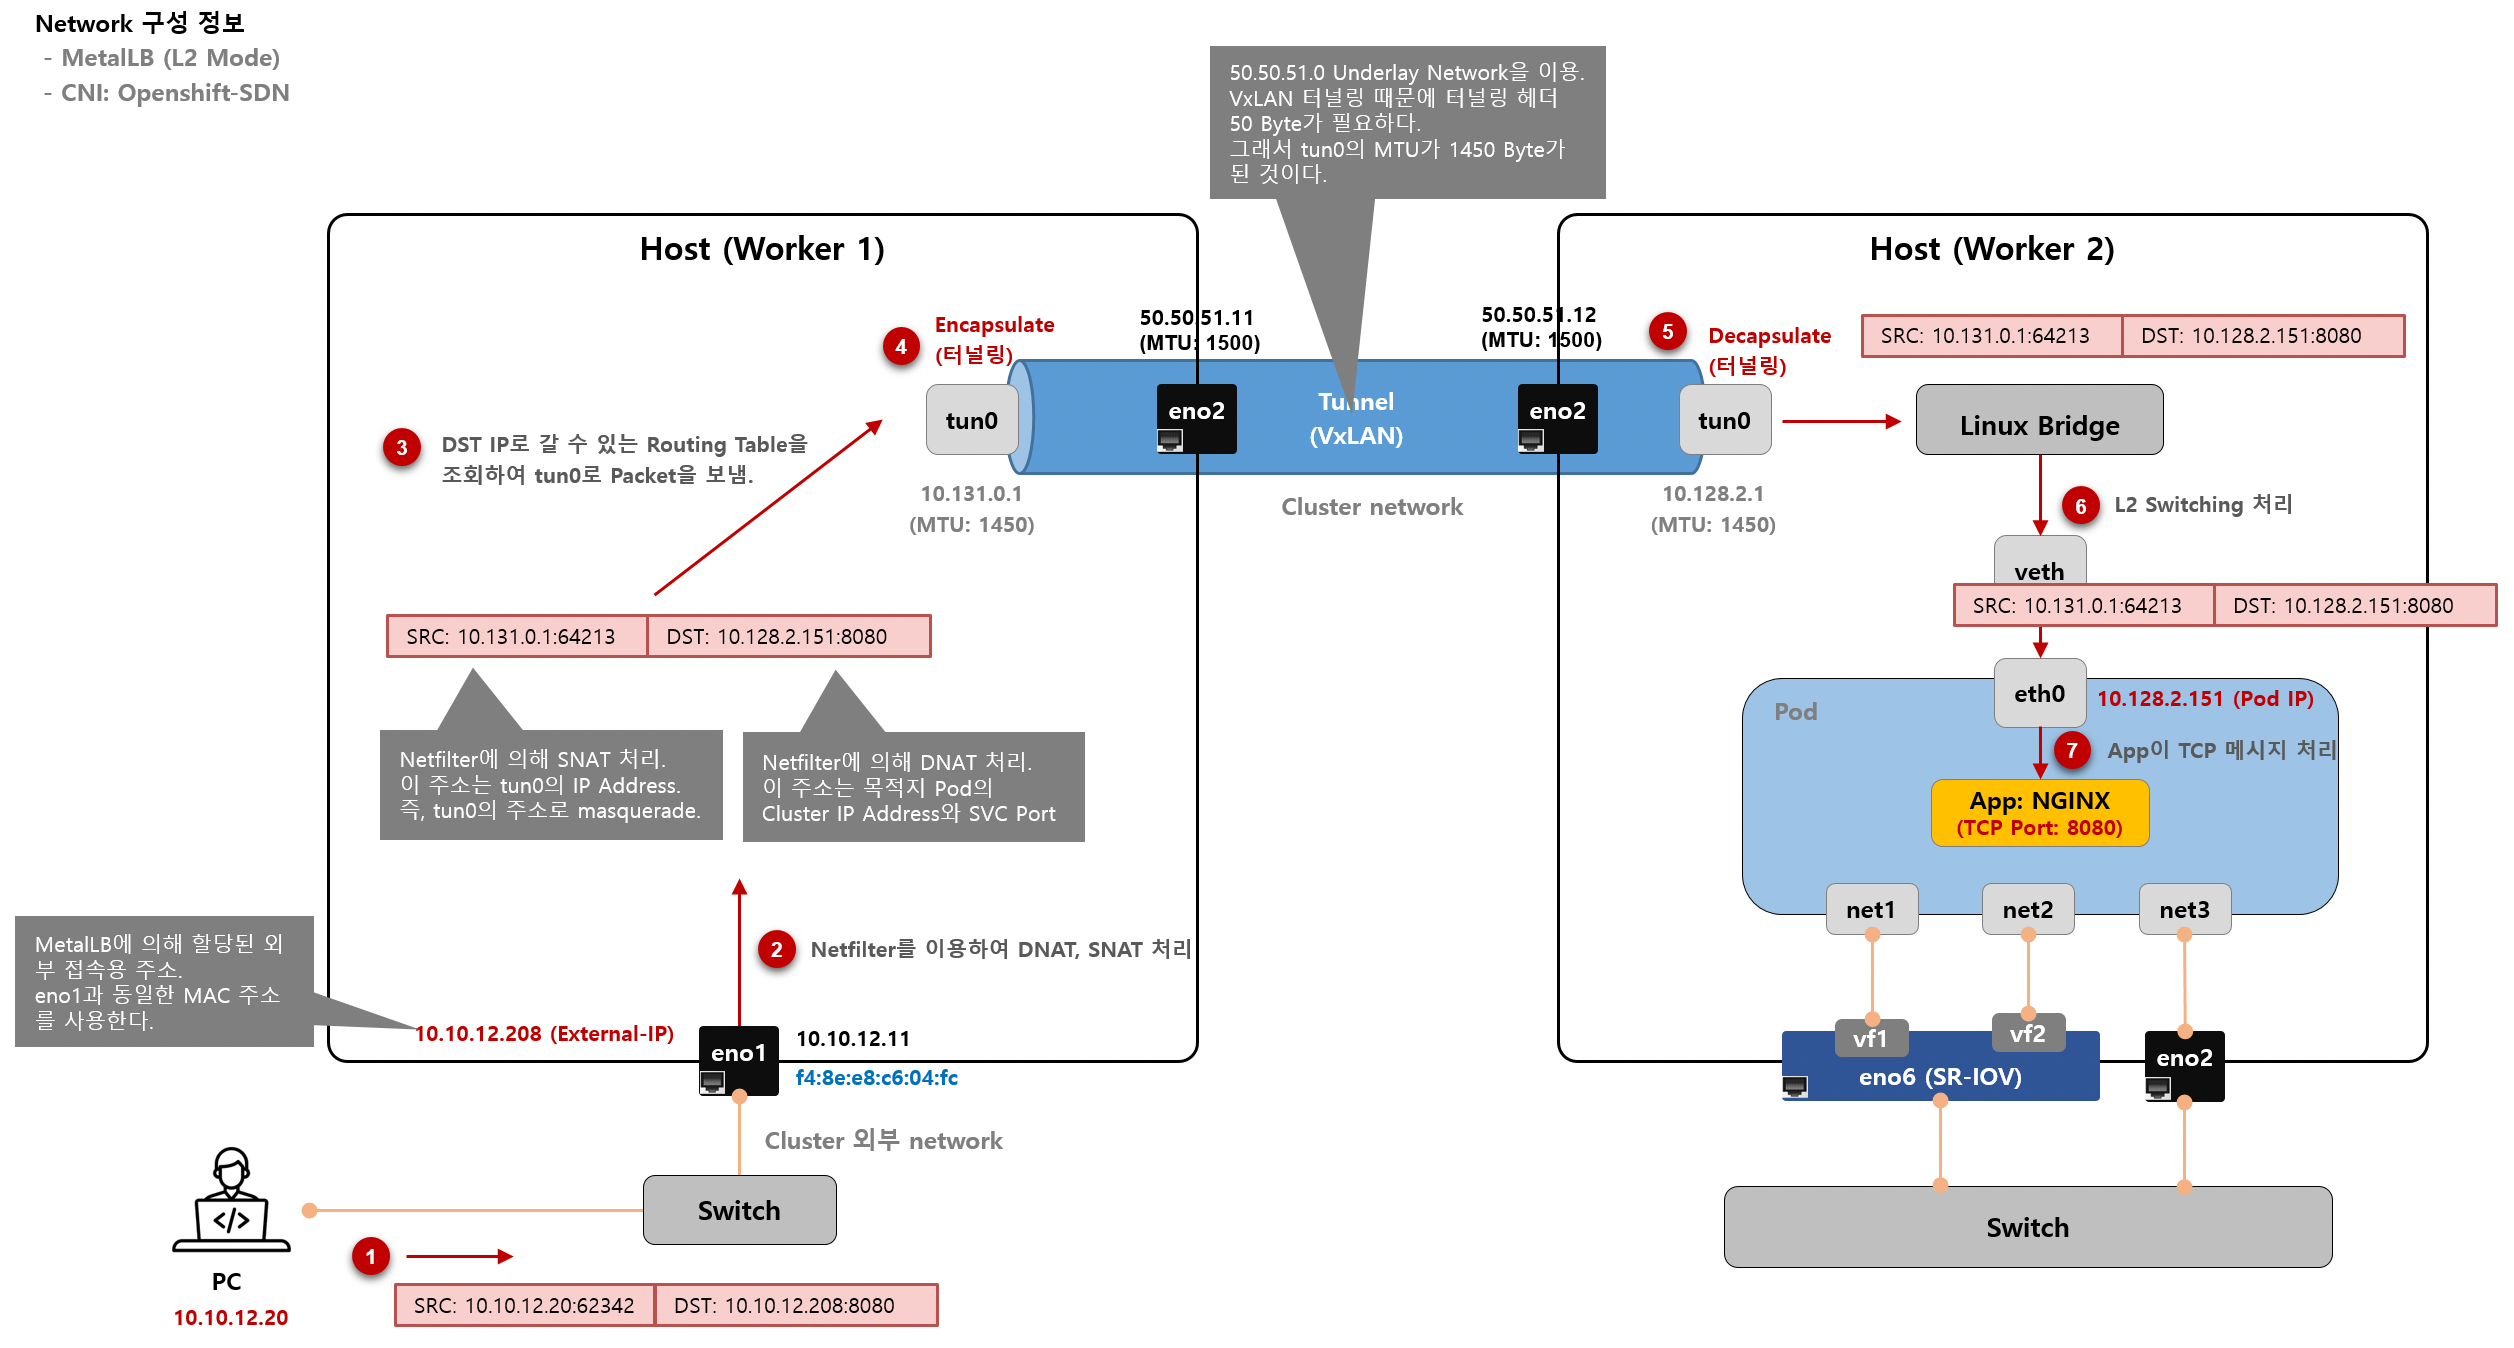


실제 Pod가 사용하는 Overlay Network Portovn-k8s-mp0는 아래 보이는 것처럼 MTU가 1400 bytes이다.

geneve 터널링을 위해 100 byte를 사용해야 하므로, MTU1400 bytes가 된 것이다.


[root@worker1 ~]# ifconfig ovn-k8s-mp0
ovn-k8s-mp0: flags=4163<UP,BROADCAST,RUNNING,MULTICAST>  mtu 1400
        inet 10.131.0.2  netmask 255.255.254.0  broadcast 10.131.1.255
        inet6 fe80::ec45:a3ff:fe53:665  prefixlen 64  scopeid 0x20<link>
        ether ee:45:a3:53:06:65  txqueuelen 1000  (Ethernet)
        RX packets 248078  bytes 20827992 (19.8 MiB)
        RX errors 0  dropped 0  overruns 0  frame 0
        TX packets 264379  bytes 23121981 (22.0 MiB)
        TX errors 0  dropped 0 overruns 0  carrier 0  collisions 0


Pod가 IP Networking은 일반적인 L2 Switching 통해서 처리되므로, 아래 routing table을 참조하여 이웃하는 Worker, Master Node로 전달된다. 

10.128.0.0  10.131.0.0 network가 Pod가 사용하는 Network이다.


[root@worker1 ~]# netstat -nr
Kernel IP routing table
Destination     Gateway         Genmask         Flags   MSS Window  irtt Iface
0.0.0.0         50.50.51.10     0.0.0.0         UG        0 0          0 br-ex
10.128.0.0      10.131.0.1      255.252.0.0     UG        0 0          0 ovn-k8s-mp0
10.131.0.0      0.0.0.0         255.255.254.0   U         0 0          0 ovn-k8s-mp0
50.50.51.0      0.0.0.0         255.255.255.0   U         0 0          0 br-ex
169.254.169.0   50.50.51.10     255.255.255.252 UG        0 0          0 br-ex
169.254.169.3   10.131.0.1      255.255.255.255 UGH       0 0          0 ovn-k8s-mp0
172.30.0.0      50.50.51.10     255.255.0.0     UG        0 0          0 br-ex


Netfilter를 살펴보면,

Pod와 Service 리소스를 생성하면서 Netfilter의 Chain Rule 변화 여부를 모니터링 해봤는데, 변화가 없다.


[root@worker1 ~]# iptables -L -t nat
Chain PREROUTING (policy ACCEPT)
target     prot opt source               destination
OVN-KUBE-ETP  all  --  anywhere             anywhere
OVN-KUBE-EXTERNALIP  all  --  anywhere             anywhere
OVN-KUBE-NODEPORT  all  --  anywhere             anywhere

Chain INPUT (policy ACCEPT)
target     prot opt source               destination

Chain POSTROUTING (policy ACCEPT)
target     prot opt source               destination
OVN-KUBE-SNAT-MGMTPORT  all  --  anywhere             anywhere
KUBE-POSTROUTING  all  --  anywhere             anywhere             /* kubernetes postrouting rules */

Chain OUTPUT (policy ACCEPT)
target     prot opt source               destination
OVN-KUBE-EXTERNALIP  all  --  anywhere             anywhere
OVN-KUBE-NODEPORT  all  --  anywhere             anywhere

Chain KUBE-MARK-MASQ (0 references)
target     prot opt source               destination
MARK       all  --  anywhere             anywhere             MARK or 0x4000

Chain KUBE-MARK-DROP (0 references)
target     prot opt source               destination
MARK       all  --  anywhere             anywhere             MARK or 0x8000

Chain KUBE-POSTROUTING (1 references)
target     prot opt source               destination
RETURN     all  --  anywhere             anywhere             mark match ! 0x4000/0x4000
MARK       all  --  anywhere             anywhere             MARK xor 0x4000
MASQUERADE  all  --  anywhere             anywhere             /* kubernetes service traffic requiring SNAT */ random-fully

Chain KUBE-KUBELET-CANARY (0 references)
target     prot opt source               destination

Chain OVN-KUBE-SNAT-MGMTPORT (1 references)
target     prot opt source               destination
SNAT       all  --  anywhere             anywhere             /* OVN SNAT to Management Port */ to:10.131.0.2

Chain OVN-KUBE-NODEPORT (2 references)
target     prot opt source               destination

Chain OVN-KUBE-EXTERNALIP (2 references)
target     prot opt source               destination

Chain OVN-KUBE-ETP (1 references)
target     prot opt source               destination
[root@worker1 ~]#


그리고 위 상황에서 Service  리소스를 한개를 ClusterIP type에서 NodePort type으로 변경했더니,

아래와 같이 OVN-KUBE-NODEPORT에 Chain Rule 한개 추가되었다.


[root@worker1 ~]# iptables -L -t nat

... 중간 생략 ...

## 이 내용이 추가되었음.

Chain OVN-KUBE-NODEPORT (2 references)
target     prot opt source               destination
DNAT       tcp  --  anywhere             anywhere             ADDRTYPE match dst-type LOCAL tcp dpt:31785 to:172.30.44.86:80

## 참고로 위 Chain Rule은 iptables 명령으로 추가한다면, 아래와 같이 실행하면 된다.
## (설명) destination port가 31785이면, 172.30.44.86:80 주소로 DNAT 처리하는 Rule을
##       OVN-KUBE-NODEPORT 체인에 추가하라는 명령.
# -A OVN-KUBE-NODEPORT -p tcp -m addrtype --dst-type LOCAL -m tcp --dport 31785 -j DNAT --to-destination 172.30.44.86:80

... 중간 생략 ...


이하, 작성 중...
반응형

Kuberentes를 사용하면서 이해하기 어려운 부분이 CNI(Cluter Network Interface)이다.

실제로 각 CNI 마다 동작하는 방식과 구현이 다른데 CNI라고 퉁쳐서 표현하다보니 Kubernetes를 사용하는 운영자 입장에서는 CNI가 어떻게 IP Traffic(트래픽)을 처리하는지 알기 어렵다.

여러 종류의 CNI 중에서 내가 사용하고 있는 특정 CNI에 대해서 깊이 있게 설명하는 자료도 별로 없으니 스터디하기가 더욱 어렵다.


나의 일터에서는 주로 Openshift SDN을 사용하기 때문에 오늘은 시간을 내서 Openshift SDN을 깊게 파헤쳐보려 한다.


우선 아래 그림에 있는 빨간색 숫자를 따라 가면서 보자.

이 빨간 색 숫자의 순서대로 요청 패킷이 처리된다.


Openshift SDN 동작 방식


그림에 순서에 맞게 설명을 적었기 때문에 전반적인 설명은 필요 없을 것 같다.

단, 복잡한 처리가 있는 부분을 좀더 살펴 본다면,


(2) Netfilter를 이용하여 DNAT, SNAT 처리

Kubernetes Pod 정보를 조회해보면 Cluster IP를 볼 수 있다. 바로 그 Pod의 Cluster IP로 DNAT 처리되는 것이다.

즉, 10.10.12.208:8080 목적지 주소를 보고, 이 주소 값과 Mapping되는 Kubernetes Pod IP를 찾고 Netfilter를 이용하여 DNAT 처리한다.

Worker 1 Node에서 iptables 명령을 이용하여 Netfilter의 Chain Rule을 조회하면 실제로 아래와 같이 정보를 볼 수 있다.

이 Chain Rule대로 관련 Packet 조건을 찾고, 그 조건에 맞는 Netfilter Chain을 따라가면서 DNAT처리하는 것이다.


$  iptables -t nat -L KUBE-SERVICES -nv | grep 10.10.12.208
 1760  106K KUBE-FW-BAR7JSQD2GL6A2KT  tcp  --  *      *       0.0.0.0/0            10.10.12.208         /* almighty/almighty5:web loadbalancer IP */ tcp dpt:8080

… 중간 생략 …

$ iptables -t nat -L KUBE-SEP-ZBWV76PMI2XAVMCD -nv
 1949  117K DNAT       tcp  --  *      *       0.0.0.0/0            0.0.0.0/0            /* almighty/almighty5:web */ tcp to:10.128.2.151:8080

—> kube-proxy가 실제 iptables 룰 생성시 사용한 명령은 아래와 같음.
KUBE-SEP-ZBWV76PMI2XAVMCD -p tcp -m comment --comment "almighty/almighty5:web" -m tcp -j DNAT --to-destination 10.128.2.151:8080


만약 Destination Pod가 다른 Worker Node에 있다면, 다른 Worker Node로 IP Packet을 보내기 위해 tun0 인터페이스를 이용하여야 한다. 이때 tun0의 IP Address로 SNAT 하도록 하는 Chain Rule 적용을 받는다.


Chain POSTROUTING (policy ACCEPT)
target     prot opt source               destination
OPENSHIFT-MASQUERADE  all  --  anywhere             anywhere             /* rules for masquerading OpenShift traffic */
KUBE-POSTROUTING  all  --  anywhere             anywhere             /* kubernetes postrouting rules */

Chain KUBE-POSTROUTING (1 references)
target     prot opt source               destination
RETURN     all  --  anywhere             anywhere             mark match ! 0x1/0x1
MARK       all  --  anywhere             anywhere             MARK xor 0x1
MASQUERADE  all  --  anywhere             anywhere             /* kubernetes service traffic requiring SNAT */ random-fully


(3) DST IP로 갈 수 있는 Routing Table을 조회하여 tun0로 Packet을 보냄

아마 대부분 Kubernetes 사용자가 헷갈려하는 부분일 것이다.

만약 Destination Pod가 같은 Worker Node에 있다면, 단순히 Netfilter가 처리한 대로 Packet Forward만 하면 된다.

그런데, Destination Pod가 다른 Worker Node에 있다면 관련있는 물리 Network Port를 찾아서 보내야 한다.

위 그림에서 Worker 1과 Worker 2의 tun0 간에는 ARP Packet이 브로드캐스팅되므로, 이미 Worker 1에서는 Destination Pod IP에 해당하는 MAC Address를 알고 있다. 

(참고: arp 명령으로 Worker 1 노드의 ARP Table 조회 가능)

따라서 일반적인 L2 Forward 처리와 동일하게 처리된다.


(4) ~ (5) Encapsulate, Decapsulate

일반적인 VxLAN 터널링을 사용하여 Worker Node간에 Pod의 메시지를 전송해준다.

VxLAN 터널링 때문에 tun0의 MTU는 1450 byte가 된다. (왜냐하면, 터널링 헤더 메시지 때문에 50 Byte만큼 tun0 포트의 MTU가 작아지게 된다)


나머지 절차는 모두 L2 Switching이기 때문에 딱히 설명할 것이 없다.


응답 메시지는 따로 설명하지 않았다.

왜냐하면,

L2 Switching 구간은 단순히 Source Address와 Destination Address를 반대로 뒤집으면 되고,

Netfilter가 SNAT 처리한 부분의 Connection Track 정보를 찾아서 원래의 주소값으로 치환해주면 되기 때문이다.


블로그 작성자: sejong.jeonjo@gmail.com


반응형

이것저것 문서를 다 찾아보았지만 아래 Red Hat 설명이 제일 깔끔하고, 정확하다.

(Red Hat 검증팀이 직접 테스트해보면서, 그 절차를 문서화한 것이니까 당연히 정확할 듯)


16.9. DPDK 및 RDMA 사용 OpenShift Container Platform 4.10 | Red Hat Customer Portal

Access Red Hat’s knowledge, guidance, and support through your subscription.

access.redhat.com


Kubernetes Cluster에서 DKDP 테스트할 때, 필요한 예제 App과 Library !!!


GitHub - openshift/app-netutil: app-netutil is a library that provides API methods for applications to get pod network informati

app-netutil is a library that provides API methods for applications to get pod network information. - GitHub - openshift/app-netutil: app-netutil is a library that provides API methods for applicat...

github.com


아래 문서들은 호기심 해소를 위해 보면 좋은 자료들.

아직 내용을 다 읽어보진 않았지만, 설명 그림(illustration)이 괜찮게 보여서 인용해본다.


GitHub - intel/userspace-cni-network-plugin

Contribute to intel/userspace-cni-network-plugin development by creating an account on GitHub.

github.com


위 문서에 있는 이미지들...


MISC

Red Hat이 공식 Container Image Registry를 통해서 아래와 같이 제공하는 container image도 있기는 한데, 라이센스 문제나 비용 문제 때문에 쓸수 없으니까, 그냥 내용 참고만 하고 나중에 돈이 충분하게 생기면 한번 image pulling해서 써봐야겠다.


https://catalog.redhat.com/software/containers/openshift4/dpdk-base-rhel8/5e32be6cdd19c77896004a41?container-tabs=dockerfile&gti-tabs=registry-tokens 


Red Hat Ecosystem Catalog

Your role Select your roleArchitectDeveloperDevOps EngineerProduct ManagerSystems AdministratorOther

catalog.redhat.com


+ Recent posts