Host OS가 Ubuntu 20.04이고, 이 Host에 KVM을 설치했다.
그리고 이 KVM에서 PCI passthrough를 사용하는 방법을 정리해봤다.
참고: 이론적인 내용은 아래 블로그가 아주 쉽게 설명하고 있다.
https://www.nepirity.com/blog/kvm-gpu-passthrough/
KVM 기반의 GPU Passthrough 환경 - 네피리티
KVM 기반의 GPU Passthrough 환경 KVM 기반의 Hypervisor 에서 하드웨어 장치를 직접 Virtual Machine에게 할당하는 PassThrough 를 소개하고 환경 설정 방법에 대해서 설명드리도록 하겠습니다. PCI Passthrough는 NIC,
www.nepirity.com
PCI passthrough 사용을 위한 Host OS 설정
PCI passthrough를 사용하기 위해 아래 명령과 같이 Host OS를 설정한다.
| |
| |
| |
| |
| $ cat /etc/default/grub |
| |
| ... 중간 생략 ... |
| |
| GRUB_CMDLINE_LINUX_DEFAULT="quiet splash intel_iommu=on intel_iommu=igfx_off iommu=pt vfio-pci.ids=8086:1572" |
| |
| ... 중간 생략 ... |
| |
| $ reboot |
| |
| ... |
| ... |
| ... |
| |
| |
| |
| |
| |
| |
| $ dmesg | grep -i vfio |
| [ 0.000000] Command line: BOOT_IMAGE=/vmlinuz-5.4.0-94-generic root=UUID=7824a9ea-e59b-4796-9e23-75e3d909a001 ro quiet splash intel_iommu=on intel_iommu=igfx_off iommu=pt vfio-pci.ids=8086:1572 vt.handoff=7 |
| [ 4.136218] Kernel command line: BOOT_IMAGE=/vmlinuz-5.4.0-94-generic root=UUID=7824a9ea-e59b-4796-9e23-75e3d909a001 ro quiet splash intel_iommu=on intel_iommu=igfx_off iommu=pt vfio-pci.ids=8086:1572 vt.handoff=7 |
| [ 10.734658] VFIO - User Level meta-driver version: 0.3 |
| [ 10.814142] vfio_pci: add [8086:1572[ffffffff:ffffffff]] class 0x000000/00000000 |
| |
| ... |
| ... |
| ... |
| |
| |
| $ lspci -k |
| |
| ... 중간 생략 ... |
| |
| 12:00.0 Ethernet controller: Intel Corporation Ethernet Controller X710 for 10GbE SFP+ (rev 02) |
| Subsystem: Hewlett-Packard Company Ethernet 10Gb 2-port 562SFP+ Adapter |
| Kernel driver in use: vfio-pci |
| Kernel modules: i40e |
| 12:00.1 Ethernet controller: Intel Corporation Ethernet Controller X710 for 10GbE SFP+ (rev 02) |
| Subsystem: Hewlett-Packard Company Ethernet 10Gb 562SFP+ Adapter |
| Kernel driver in use: vfio-pci |
| Kernel modules: i40e |
| |
| ... 중간 생략 ... |
| |
| $ |
PCI passthrough 사용을 위한 KVM 설정
| |
| |
| |
| |
| |
| $ lspci | grep -i x710 |
| 12:00.0 Ethernet controller: Intel Corporation Ethernet Controller X710 for 10GbE SFP+ (rev 02) |
| 12:00.1 Ethernet controller: Intel Corporation Ethernet Controller X710 for 10GbE SFP+ (rev 02) |
| af:00.0 Ethernet controller: Intel Corporation Ethernet Controller X710 for 10GbE SFP+ (rev 02) |
| af:00.1 Ethernet controller: Intel Corporation Ethernet Controller X710 for 10GbE SFP+ (rev 02) |
| $ |
| |
| |
| |
| |
| |
| |
| |
| |
| |
| |
| |
| |
| |
| |
| |
| $ virsh nodedev-list | grep 12_00 |
| pci_0000_12_00_0 |
| pci_0000_12_00_1 |
| $ virsh nodedev-list | grep af_00 |
| pci_0000_af_00_0 |
| pci_0000_af_00_1 |
| $ |
| |
| |
| |
| |
| |
| |
| |
| |
| root@bmt:~ |
| <device> |
| <name>pci_0000_12_00_0</name> |
| <path>/sys/devices/pci0000:11/0000:11:00.0/0000:12:00.0</path> |
| <parent>pci_0000_11_00_0</parent> |
| <driver> |
| <name>vfio-pci</name> |
| </driver> |
| <capability type='pci'> |
| <class>0x020000</class> |
| <domain>0</domain> |
| <bus>18</bus> |
| <slot>0</slot> |
| <function>0</function> |
| <product id='0x1572'>Ethernet Controller X710 for 10GbE SFP+</product> |
| <vendor id='0x8086'>Intel Corporation</vendor> |
| <capability type='virt_functions' maxCount='64'/> |
| <iommuGroup number='38'> |
| <address domain='0x0000' bus='0x12' slot='0x00' function='0x0'/> |
| </iommuGroup> |
| <numa node='0'/> |
| <pci-express> |
| <link validity='cap' port='0' speed='8' width='8'/> |
| <link validity='sta' speed='8' width='8'/> |
| </pci-express> |
| </capability> |
| </device> |
| |
| |
| root@bmt:~ |
| <device> |
| <name>pci_0000_12_00_1</name> |
| <path>/sys/devices/pci0000:11/0000:11:00.0/0000:12:00.1</path> |
| <parent>pci_0000_11_00_0</parent> |
| <driver> |
| <name>vfio-pci</name> |
| </driver> |
| <capability type='pci'> |
| <class>0x020000</class> |
| <domain>0</domain> |
| <bus>18</bus> |
| <slot>0</slot> |
| <function>1</function> |
| <product id='0x1572'>Ethernet Controller X710 for 10GbE SFP+</product> |
| <vendor id='0x8086'>Intel Corporation</vendor> |
| <capability type='virt_functions' maxCount='64'/> |
| <iommuGroup number='39'> |
| <address domain='0x0000' bus='0x12' slot='0x00' function='0x1'/> |
| </iommuGroup> |
| <numa node='0'/> |
| <pci-express> |
| <link validity='cap' port='0' speed='8' width='8'/> |
| <link validity='sta' speed='8' width='8'/> |
| </pci-express> |
| </capability> |
| </device> |
| |
| |
| root@bmt:~ |
| <device> |
| <name>pci_0000_af_00_0</name> |
| <path>/sys/devices/pci0000:ae/0000:ae:00.0/0000:af:00.0</path> |
| <parent>pci_0000_ae_00_0</parent> |
| <driver> |
| <name>vfio-pci</name> |
| </driver> |
| <capability type='pci'> |
| <class>0x020000</class> |
| <domain>0</domain> |
| <bus>175</bus> |
| <slot>0</slot> |
| <function>0</function> |
| <product id='0x1572'>Ethernet Controller X710 for 10GbE SFP+</product> |
| <vendor id='0x8086'>Intel Corporation</vendor> |
| <capability type='virt_functions' maxCount='64'/> |
| <iommuGroup number='151'> |
| <address domain='0x0000' bus='0xaf' slot='0x00' function='0x0'/> |
| </iommuGroup> |
| <pci-express> |
| <link validity='cap' port='0' speed='8' width='8'/> |
| <link validity='sta' speed='8' width='8'/> |
| </pci-express> |
| </capability> |
| </device> |
| |
| |
| root@bmt:~ |
| <device> |
| <name>pci_0000_af_00_1</name> |
| <path>/sys/devices/pci0000:ae/0000:ae:00.0/0000:af:00.1</path> |
| <parent>pci_0000_ae_00_0</parent> |
| <driver> |
| <name>vfio-pci</name> |
| </driver> |
| <capability type='pci'> |
| <class>0x020000</class> |
| <domain>0</domain> |
| <bus>175</bus> |
| <slot>0</slot> |
| <function>1</function> |
| <product id='0x1572'>Ethernet Controller X710 for 10GbE SFP+</product> |
| <vendor id='0x8086'>Intel Corporation</vendor> |
| <capability type='virt_functions' maxCount='64'/> |
| <iommuGroup number='152'> |
| <address domain='0x0000' bus='0xaf' slot='0x00' function='0x1'/> |
| </iommuGroup> |
| <pci-express> |
| <link validity='cap' port='0' speed='8' width='8'/> |
| <link validity='sta' speed='8' width='8'/> |
| </pci-express> |
| </capability> |
| </device> |
| |
| |
| |
| |
| |
| |
| |
| |
| |
| $ virsh nodedev-detach pci_0000_12_00_0 |
| Device pci_0000_12_00_0 detached |
| |
| $ virsh nodedev-detach pci_0000_12_00_1 |
| Device pci_0000_12_00_1 detached |
위와 같이 KVM에서 Host 머신의 PCI 장치를 Detach했으면, 아래 KVM Virtual Manager 화면에서
특정 Virtual Machine 의 설정 화면을 열어본다.
그리고 이 Virtual Machine에 PCI Device를 추가한다. (아래 화면의 설정 순서를 따라할 것!!!)
 KVM Virt-Manager 에서 특정 VM의 HW 설정
위 설정 화면에서 [Finish] 버튼을 누르면, 아래 화면처럼 새로 추가한 PCI 장치 정보를 볼 수 있다.
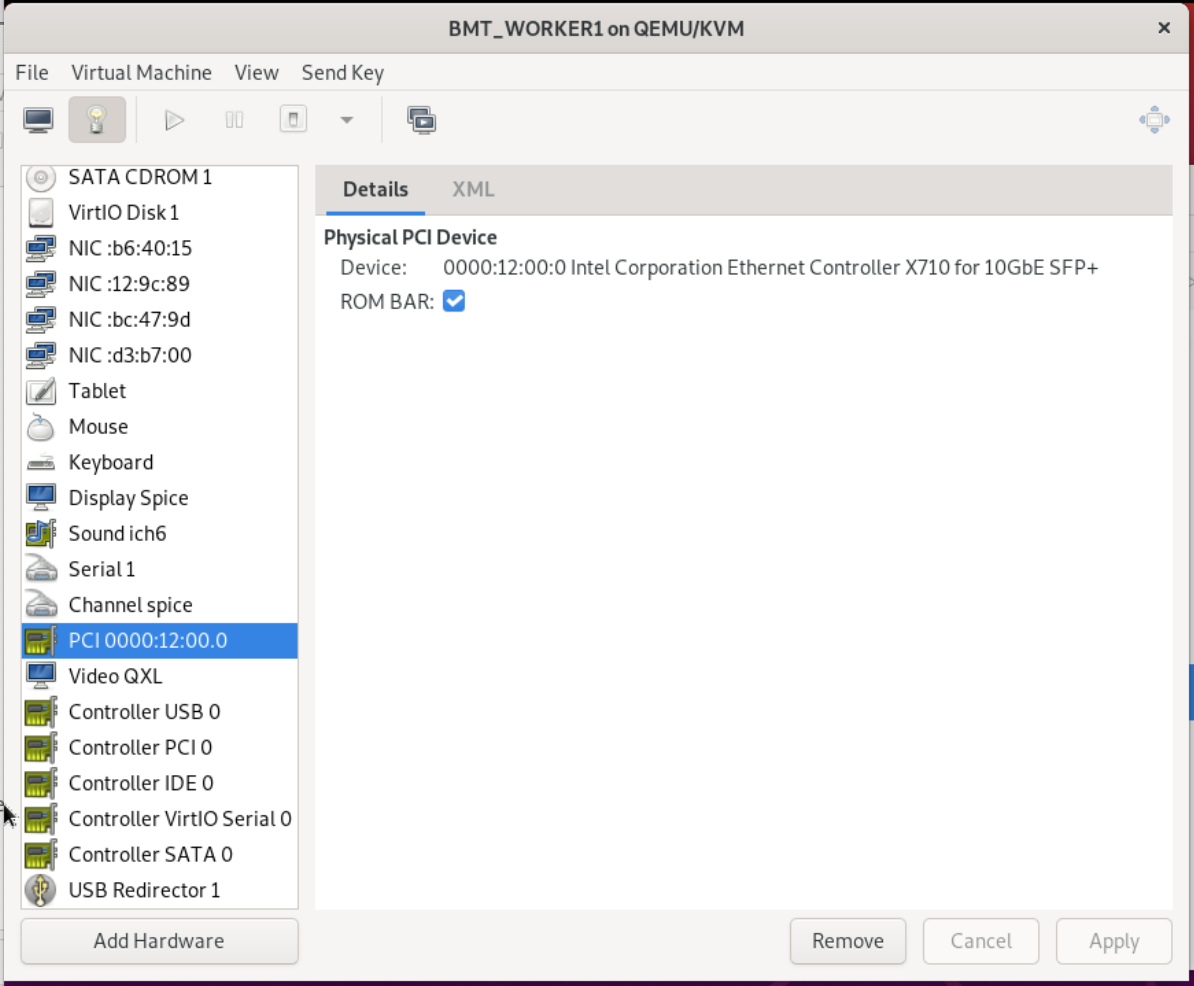 VM의 HW 목록 및 설정 정보를 확인
위와 같이 Virtual Machine이 설정된 후에 VM 내부에서는 SR-IOV 구성까지 해야 NIC에 여러 VF를 생성하고, Application Process가 VF를 사용할 수 있을 것이다. (이후 과정에 나중에 테스트하면서 다시 기록할 생각이다)
